Customize Toolbars/it: Difference between revisions
Renatorivo (talk | contribs) No edit summary |
Renatorivo (talk | contribs) No edit summary |
||
| Line 1: | Line 1: | ||
{{TutorialInfo/it|Topic=Configurazione|Level=Principiante|Time=5 minuti|Author=[[User:Mario52|Mario52]]|FCVersion=Tutte}} |
{{TutorialInfo/it|Topic=Configurazione|Level=Principiante|Time=5 minuti|Author=[[User:Mario52|Mario52]]|FCVersion=Tutte}} |
||
== |
==Synopsis== |
||
This tutorial walks you through how to create a Toolbar button and one or more buttons that connect you to your favourite macros or to other associated links whether there is a custom icon or not. |
|||
Questo tutorial spiega come creare un pulsante nella barra degli strumenti per avviare velocemente una macro o per associare altri collegamenti a una icona personalizzata. |
|||
==Uso== |
==Uso== |
||
'''1''' : Selezionare |
'''1''' : Selezionare {{Menu → Strumenti → Personalizza}} |
||
| Line 12: | Line 12: | ||
{{clear}} |
{{clear}} |
||
or right click on any toolbar |
|||
o posizionare il puntatore sulla barra degli strumenti e poi fare clic con il pulsante destro del mouse |
|||
[[File:CustomizeToolBar 02.png|640px|center| |
[[File:CustomizeToolBar 02.png|640px|center|Right mouse click]] |
||
{{clear}} |
{{clear}} |
||
the Customize window appears |
|||
appare la finestra Personalizza |
|||
[[File:CustomizeToolBar 03.png|640px|center|The |
[[File:CustomizeToolBar 03.png|640px|center|The Customize window appears]] |
||
{{clear}} |
{{clear}} |
||
'''2''' : |
'''2''' : select the "Macro" tab |
||
'''3''' : |
'''3''' : to add a toolbar icon for your macro click the Pixmap button (labelled {{KEY|... }}) |
||
[[File:CustomizeToolBar 04.png|640px|center|Select |
[[File:CustomizeToolBar 04.png|640px|center|Select a toolbar]] |
||
{{clear}} |
{{clear}} |
||
'''4''' : search for an appropriate icon from amongst FreeCAD's existing icons, |
|||
'''4''' : cercare l'icona tra quelle già presenti in FreeCAD, se non si trova qui fare clic sul pulsante {{KEY|Aggiungi icone...}} per aggiungerne altre alla libreria |
|||
<div class="mw-collapsible mw-collapsed toccolours"> |
<div class="mw-collapsible mw-collapsed toccolours"> |
||
'''5''' : |
'''5''' : or add your own icon by clicking {{KEY|Add icons...}} (expand for an example) |
||
<div class="mw-collapsible-content"> |
<div class="mw-collapsible-content"> |
||
| Line 40: | Line 40: | ||
{{clear}} |
{{clear}} |
||
'''5b''' : |
'''5b''' : you will get a file selection window, select your custom image file (PNG format, 64x64 pixels) |
||
[[File:CustomizeToolBar 06.png|640px|center|Get a file]] |
[[File:CustomizeToolBar 06.png|640px|center|Get a file]] |
||
| Line 48: | Line 48: | ||
</div> |
</div> |
||
'''6''' : |
'''6''' : select your icon and click {{KEY|OK}} |
||
[[File:CustomizeToolBar 07.png|640px|center|Select your icon]] |
[[File:CustomizeToolBar 07.png|640px|center|Select your icon]] |
||
| Line 65: | Line 65: | ||
{{clear}} |
{{clear}} |
||
'''10''' : |
'''10''' : your button has now been created |
||
[[File:CustomizeToolBar 10.png|640px|center|Your button is created]] |
[[File:CustomizeToolBar 10.png|640px|center|Your button is created]] |
||
{{clear}} |
{{clear}} |
||
'''11''' : |
'''11''' : create a toolbar for the button |
||
'''12''' : go to the '''Toolbars''' tab and choose your workbench in the drop down on the right ('''Part''' in this example) |
|||
'''12''' : cliccare sulla tabella '''Barre degli strumenti''' |
|||
Since version 0.15 there is a {{KEY|[[File:Freecad.svg|16px]] Global }} toolbar. If your toolbar is docked in this bar, it will always remain visible |
|||
[[File:CustomizeToolBar 11.png|640px|center| |
[[File:CustomizeToolBar 11.png|640px|center|Toolbars tab]] |
||
{{clear}} |
{{clear}} |
||
'''13''' : |
'''13''' : in the dropdown on the left select '''Macros''' |
||
[[File:CustomizeToolBar 12.png|640px|center| |
[[File:CustomizeToolBar 12.png|640px|center|Macros]] |
||
{{clear}} |
{{clear}} |
||
'''14''' : |
'''14''' : your macro and its icon appears in the list |
||
[[File:CustomizeToolBar 13.png|640px|center|Your icon |
[[File:CustomizeToolBar 13.png|640px|center|Your icon is listed]] |
||
{{clear}} |
{{clear}} |
||
'''15''' : |
'''15''' : Click the button {{KEY|New...}} (you can choose your toolbar here and it will be attached to the Part Workbench) |
||
[[File:CustomizeToolBar 14.png|640px|center|Click |
[[File:CustomizeToolBar 14.png|640px|center|Click on "New"]] |
||
{{clear}} |
{{clear}} |
||
'''16''' : |
'''16''' : in the window "New Toolbar" enter the name for your toolbar and click {{KEY|OK}} |
||
[[File:CustomizeToolBar 15.png|640px|center|Enter the name for your |
[[File:CustomizeToolBar 15.png|640px|center|Enter the name for your toolbar]] |
||
{{clear}} |
{{clear}} |
||
'''17''' : your toolbar has now been created - make sure you check its checkbox so that it will actually appear |
|||
'''17''' : ora la barra è stata creata - assicuratevi di attivare la casella di controllo in modo che essa sia visualizzata nella barra degli strumenti |
|||
'''18''' : selezionare la macro con la sua icona nella finestra di sinistra e quindi fare clic sul {{KEY|Pulsante}} freccia destra |
'''18''' : selezionare la macro con la sua icona nella finestra di sinistra e quindi fare clic sul {{KEY|Pulsante}} freccia destra |
||
| Line 113: | Line 113: | ||
{{clear}} |
{{clear}} |
||
'''21''' : your new toolbar with its button is now displayed above the active window as well as in the toolbars' right-click menu |
|||
'''21''' : ora la nuova barra degli strumenti con il suo pulsante viene visualizzata sia nella finestra attiva che tramite il menu del tasto destro sulla barra degli strumenti |
|||
[[File:CustomizeToolBar 18.png|640px|center|New Toolbar]] |
[[File:CustomizeToolBar 18.png|640px|center|New Toolbar]] |
||
Revision as of 10:17, 26 November 2016
| Argomento |
|---|
| Configurazione |
| Livello di difficoltà |
| Principiante |
| Tempo di esecuzione |
| 5 minuti |
| Autori |
| Mario52 |
| Versione di FreeCAD |
| Tutte |
| Files di esempio |
| Nessuno |
| Vedere anche |
| Nessuno |
Synopsis
This tutorial walks you through how to create a Toolbar button and one or more buttons that connect you to your favourite macros or to other associated links whether there is a custom icon or not.
Uso
1 : Selezionare Template:Menu → Strumenti → Personalizza

or right click on any toolbar

the Customize window appears

2 : select the "Macro" tab
3 : to add a toolbar icon for your macro click the Pixmap button (labelled ... )

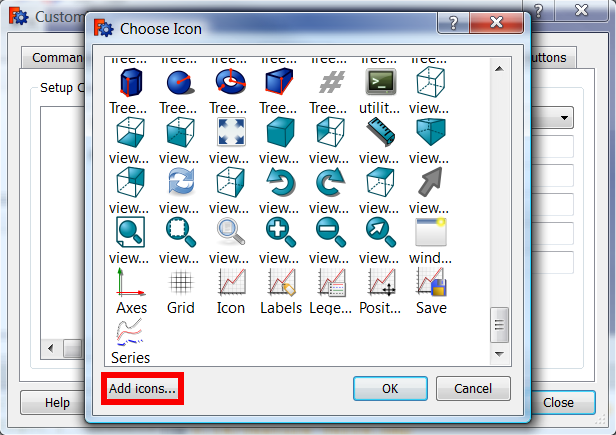
4 : search for an appropriate icon from amongst FreeCAD's existing icons,
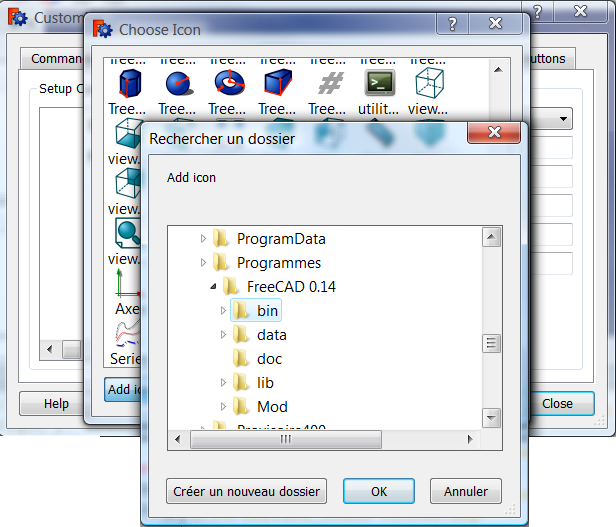
5 : or add your own icon by clicking Add icons... (expand for an example)
6 : select your icon and click OK

7 : l'icona selezionata ora è visualizzata accanto al pulsante Pixmap ...

8 : Scegliere la macro e specificare un Testo di menu (il testo che appare come etichetta nel menu); compilare anche il campo Suggerimento (il testo che appare quando il mouse si trova sopra al pulsante sulla barra degli strumenti); per il pulsante si possono anche compilare altri campi opzionali
9 : Cliccare su Aggiungi

10 : your button has now been created

11 : create a toolbar for the button
12 : go to the Toolbars tab and choose your workbench in the drop down on the right (Part in this example)
Since version 0.15 there is a Global toolbar. If your toolbar is docked in this bar, it will always remain visible

13 : in the dropdown on the left select Macros

14 : your macro and its icon appears in the list

15 : Click the button New... (you can choose your toolbar here and it will be attached to the Part Workbench)

16 : in the window "New Toolbar" enter the name for your toolbar and click OK

17 : your toolbar has now been created - make sure you check its checkbox so that it will actually appear
18 : selezionare la macro con la sua icona nella finestra di sinistra e quindi fare clic sul Pulsante freccia destra

19 : È stata creata una barra degli strumenti chiamata "Camera"
20 : cliccare sul pulsante Chiudi

21 : your new toolbar with its button is now displayed above the active window as well as in the toolbars' right-click menu

22 : buon lavoro!

