Customize Toolbars/fr: Difference between revisions
(Updating to match new version of source page) |
No edit summary |
||
| Line 2: | Line 2: | ||
==Synopsis== |
==Synopsis== |
||
Ce tutoriel vous vous montre la personnalisation de la barre d'outils. Les outils (incluant les outils-Macro) peuvent être utilisés dans différents ateliers. Dans un exemple une Macro devient un "texte de Menu", " une "pointe d'outil" et une "icône". Ensuite l'outil-Macro devient un élément supplémentaire de la barre d'outil dans l'atelier. |
|||
This tutorial shows you the customization of toolbars. Tools (inclusive Macro-tools) can used in different workbenches. In an example a Macro becomes a Macro-tool by creation of a '''Menu text''', a '''Tool tip''' and an '''Icon'''. Afterwards this Macro-tool becomes part of an extra toolbar in a workbench. |
|||
== |
==Use== |
||
<u>'''1.''' Find the Customize Menu</u> |
|||
*Click {{MenuCommand|Main Menu → Tools → Customize}}, |
|||
[[File:CustomizeToolBar 01.png|640px|center|Personnaliser]] |
[[File:CustomizeToolBar 01.png|640px|center|Personnaliser]] |
||
{{clear}} |
{{clear}} |
||
*or right click on any toolbar. |
|||
ou positionnez votre souris sur un endroit libre de la barre d'outils et cliquez sur le bouton droit de la souris |
|||
[[File:CustomizeToolBar 02.png|640px|center|Cliquez sur le bouton droit de la souris]] |
[[File:CustomizeToolBar 02.png|640px|center|Cliquez sur le bouton droit de la souris]] |
||
{{clear}} |
{{clear}} |
||
*The Customize window appears. |
|||
la fenêtre "Personnaliser" s'affiche |
|||
[[File:CustomizeToolBar 03.png|640px|center|La fenêtre "Personnaliser" s'affiche]] |
[[File:CustomizeToolBar 03.png|640px|center|La fenêtre "Personnaliser" s'affiche]] |
||
| Line 23: | Line 24: | ||
<u>'''2.''' Make a Macro to a Macro-Tool</u> |
<u>'''2.''' Make a Macro to a Macro-Tool</u> |
||
*Select the "Macro" tab. |
|||
'''2''' : sélectionnez l'onglet Macro |
|||
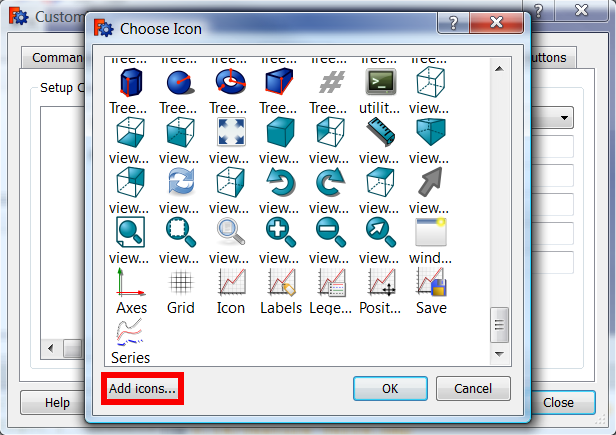
*To add an icon for the provided macro click the Pixmap button (labelled {{KEY|... }}). |
|||
'''3''' : cliquez sur le bouton {{KEY|... }} pour sélectionner un icône pour votre macro |
|||
[[File:CustomizeToolBar 04.png|640px|center|Sélectionner un icône]] |
[[File:CustomizeToolBar 04.png|640px|center|Sélectionner un icône]] |
||
{{clear}} |
{{clear}} |
||
*Search for an appropriate icon from amongst FreeCAD's existing icons, |
|||
'''4''' : cherchez et sélectionnez dans la liste un icône pour votre macro, |
|||
<div class="mw-collapsible mw-collapsed toccolours"> |
<div class="mw-collapsible mw-collapsed toccolours"> |
||
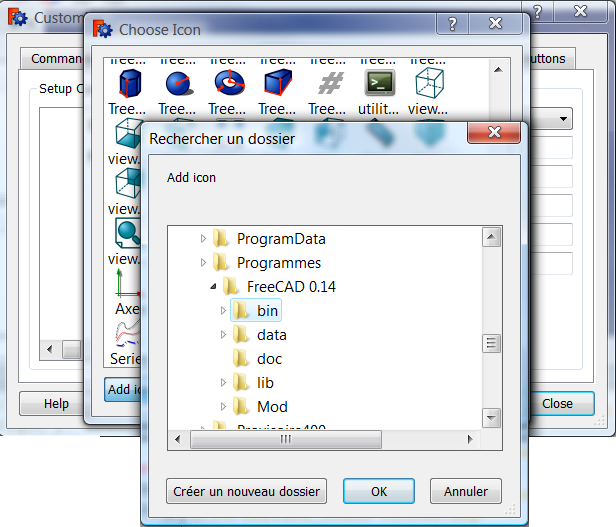
[or add your own icon by clicking {{KEY|Add icons...}}]. (expand for an example) |
|||
'''5''' : si votre icône n'est pas listé, cliquez sur le bouton {{KEY|Ajouter...}} pour ajouter des icônes dans la bibliothèque (déroulez pour voir cette section) |
|||
<div class="mw-collapsible-content"> |
<div class="mw-collapsible-content"> |
||
| Line 41: | Line 42: | ||
{{clear}} |
{{clear}} |
||
[You will get a file selection window, select your custom image file (PNG format, 64x64 pixels)] |
|||
[[File:CustomizeToolBar 06.png|640px|center|Rechercher un fichier]] |
[[File:CustomizeToolBar 06.png|640px|center|Rechercher un fichier]] |
||
| Line 49: | Line 50: | ||
</div> |
</div> |
||
* Select your icon and click {{KEY|OK}}. |
|||
'''6''' : sélectionnez votre icône et cliquez sur le bouton {{KEY|OK}} pour valider |
|||
[[File:CustomizeToolBar 07.png|640px|center|Sélectionnez votre icône]] |
[[File:CustomizeToolBar 07.png|640px|center|Sélectionnez votre icône]] |
||
{{clear}} |
{{clear}} |
||
* The icon you selected is now displayed next to the Pixmap button labelled {{KEY|...}}. |
|||
'''7''' : l'icône sélectionné est maintenant affiché, cliquez sur le bouton trois petits points {{KEY|...}} |
|||
[[File:CustomizeToolBar 08.png|640px|center|Votre icône est affiché]] |
[[File:CustomizeToolBar 08.png|640px|center|Votre icône est affiché]] |
||
{{clear}} |
{{clear}} |
||
*Select the provided macro in line '''Macro:''' and specify a '''Menu text''': (which will appear as the text label in the menu); also fill in the '''Tool Tip':'' (which is the text that will appear when a mouse is over the button on the toolbar); further lines are optional. |
|||
'''8''' : Choisissez votre macro et spécifiez un texte de menu (ce texte apparaîtra comme l'étiquette dans le menu); remplissez également l'info-bulle (qui est le texte qui apparaît lorsque la souris survole le bouton de la barre d'outils); il y a d'autres champs textes pour votre bouton qui sont facultatifs mais que vous pouvez remplir |
|||
* Click the button {{KEY|Add}}. |
|||
[[File:CustomizeToolBar 09.png|640px|center|Cliquez sur le bouton]] |
[[File:CustomizeToolBar 09.png|640px|center|Cliquez sur le bouton]] |
||
{{clear}} |
{{clear}} |
||
*The button of the macro-tool is now created. |
|||
'''10''' : votre bouton est maintenant créé |
|||
[[File:CustomizeToolBar 10.png|640px|center|Votre bouton est créé]] |
[[File:CustomizeToolBar 10.png|640px|center|Votre bouton est créé]] |
||
{{clear}} |
{{clear}} |
||
<u>'''3.''' Create a toolbar outside the workbench '''Macro''' which contains the created '''Macro-tool'''</u> |
|||
'''11''' : nous allons créer une barre d'outils pour le bouton |
|||
* Select the '''Toolbars''' tab and choose the workbench (for which the toolbar is provided) in the drop down on the right ('''Part''' in this example). |
|||
'''12''' : cliquez sur l'onglet "Barre d'outils" et l'atelier sur lequel sera attachée la '''Barre d'outils''' (ici '''Part'''). |
|||
[Since version 0.15 there is a {{KEY|[[File:Freecad.svg|16px]] Global}} toolbar. If this is selected, the provided toolbar will be in each workbench.] |
|||
[[File:CustomizeToolBar 11.png|640px|center|Onglet Barre d'outils]] |
[[File:CustomizeToolBar 11.png|640px|center|Onglet Barre d'outils]] |
||
{{clear}} |
{{clear}} |
||
*In the dropdown on the left select '''Macros'''. |
|||
'''13''' : dans la fenêtre de gauche, sélectionnez l'onglet '''Macros''' et '''Macros''' |
|||
[[File:CustomizeToolBar 12.png|640px|center|Onglet Macros > Macros]] |
[[File:CustomizeToolBar 12.png|640px|center|Onglet Macros > Macros]] |
||
{{clear}} |
{{clear}} |
||
*The macro-tool with its icon appears in the list. |
|||
'''14''' : maintenant votre macro et son icône apparaissent |
|||
[[File:CustomizeToolBar 13.png|640px|center|Votre icône apparait]] |
[[File:CustomizeToolBar 13.png|640px|center|Votre icône apparait]] |
||
{{clear}} |
{{clear}} |
||
*Click the button {{KEY|New...}} |
|||
'''15''' : Cliquez le bouton {{KEY|Nouveau...}} (choisissez votre barre d'outils ici votre barre d'outils est attachée à l'atelier Part)<br />Dans les dernières versions (développement) de FreeCAD vous pourrez voir un atelier "Global" que vous pouvez utiliser comme barre d'outils où attacher la vôtre et votre barre d'outils personnelle sera constamment visible quel que soit l'atelier de travail choisi. |
|||
[[File:CustomizeToolBar 14.png|640px|center|Cliquez le bouton Nouveau]] |
[[File:CustomizeToolBar 14.png|640px|center|Cliquez le bouton Nouveau]] |
||
{{clear}} |
{{clear}} |
||
*In the window "New Toolbar" enter the name of the provided extra toolbar for the '''Part''' Workbench and click {{KEY|OK}} |
|||
'''16''' : dans la fenêtre '''Nouvelle barre d'outils''' entrez le nom de la nouvelle barre d'outils et validez avec le bouton {{KEY|OK}} |
|||
[[File:CustomizeToolBar 15.png|640px|center|Entrez le nom de la nouvelle barre d'outils]] |
[[File:CustomizeToolBar 15.png|640px|center|Entrez le nom de la nouvelle barre d'outils]] |
||
{{clear}} |
{{clear}} |
||
*The toolbar is now created. |
|||
'''17''' : votre barre d'outils est maintenant créée, assurez vous de cocher la case à cocher pour valider la barre à outils et votre barre à outils apparaît |
|||
*To add the creadet macro-tool to this toolbar, select it in the left window and then click the {{KEY|Button}} with the arrow pointing right. |
|||
'''18''' : sélectionnez votre macro par son icône dans la fenêtre de gauche puis cliquez sur le {{KEY|Bouton}} flèche bleue pour faire passer l'icône de la macro dans la fenêtre de droite |
|||
[[File:CustomizeToolBar 16.png|640px|center|Sélectionnez votre macro]] |
[[File:CustomizeToolBar 16.png|640px|center|Sélectionnez votre macro]] |
||
{{clear}} |
{{clear}} |
||
* You have created now a toolbar called "Camera" (with the Macro-tool '''Camera''' in it) |
|||
'''19''' : vous venez maintenant de créer une barre d'outils appelée "Camera" avec un bouton qui s'appelle aussi "Camera" |
|||
*Click the {{KEY|Close}} button. |
|||
'''20''' : cliquez sur le bouton {{KEY|Fermer}} |
|||
[[File:CustomizeToolBar 17.png|640px|center|Fermer]] |
[[File:CustomizeToolBar 17.png|640px|center|Fermer]] |
||
{{clear}} |
{{clear}} |
||
*Your new toolbar is now contained in the toolbars' right-click menu. Its Icons (in our example only the camera) are visible, if the toolbar is activated (blue checkmark). |
|||
'''21''' : votre nouvelle barre d'outils et son bouton sont maintenant affichés dans la fenêtre active attachée à l'atelier "Part" et aussi visible dans le menu en faisant clic droit sur un endroit libre de la barre d'outils |
|||
[[File:CustomizeToolBar 18.png|640px|center|Nouvelle barre d'outils]] |
[[File:CustomizeToolBar 18.png|640px|center|Nouvelle barre d'outils]] |
||
Revision as of 15:59, 21 September 2017
| Thème |
|---|
| SampleTopic |
| Niveau |
| Débutant |
| Temps d'exécution estimé |
| 5 minutes |
| Auteurs |
| Mario52 |
| Version de FreeCAD |
| Toutes |
| Fichiers exemples |
| None |
| Voir aussi |
| None |
Synopsis
Ce tutoriel vous vous montre la personnalisation de la barre d'outils. Les outils (incluant les outils-Macro) peuvent être utilisés dans différents ateliers. Dans un exemple une Macro devient un "texte de Menu", " une "pointe d'outil" et une "icône". Ensuite l'outil-Macro devient un élément supplémentaire de la barre d'outil dans l'atelier.
Use
1. Find the Customize Menu
- Click Main Menu → Tools → Customize,

- or right click on any toolbar.

- The Customize window appears.

2. Make a Macro to a Macro-Tool
- Select the "Macro" tab.
- To add an icon for the provided macro click the Pixmap button (labelled ... ).

- Search for an appropriate icon from amongst FreeCAD's existing icons,
[or add your own icon by clicking Add icons...]. (expand for an example)
- Select your icon and click OK.

- The icon you selected is now displayed next to the Pixmap button labelled ....

- Select the provided macro in line Macro:' and specify a Menu text: (which will appear as the text label in the menu); also fill in the Tool Tip': (which is the text that will appear when a mouse is over the button on the toolbar); further lines are optional.
- Click the button Add.

- The button of the macro-tool is now created.

3. Create a toolbar outside the workbench Macro which contains the created Macro-tool
- Select the Toolbars tab and choose the workbench (for which the toolbar is provided) in the drop down on the right (Part in this example).
[Since version 0.15 there is a Global toolbar. If this is selected, the provided toolbar will be in each workbench.]

- In the dropdown on the left select Macros.

- The macro-tool with its icon appears in the list.

- Click the button New...

- In the window "New Toolbar" enter the name of the provided extra toolbar for the Part Workbench and click OK

- The toolbar is now created.
- To add the creadet macro-tool to this toolbar, select it in the left window and then click the Button with the arrow pointing right.

- You have created now a toolbar called "Camera" (with the Macro-tool Camera in it)
- Click the Close button.

- Your new toolbar is now contained in the toolbars' right-click menu. Its Icons (in our example only the camera) are visible, if the toolbar is activated (blue checkmark).


