CAM Deburr: Difference between revisions
(Options) |
(Removed "Start Vertex" property. It is no longer listed.) |
||
| Line 78: | Line 78: | ||
* {{PropertyData|Coolant Mode}}: Coolant mode for this operation |
* {{PropertyData|Coolant Mode}}: Coolant mode for this operation |
||
* {{PropertyData|Cycle Time}}: Estimated cycle time for this operation |
* {{PropertyData|Cycle Time}}: Estimated cycle time for this operation |
||
* {{PropertyData|Start Vertex}}: The vertex index to start the path from |
|||
* {{PropertyData|Tool Controller}}: The tool controller that will be used to calculate the path |
* {{PropertyData|Tool Controller}}: The tool controller that will be used to calculate the path |
||
* {{PropertyData|User Label}}: User assigned label |
* {{PropertyData|User Label}}: User assigned label |
||
Revision as of 18:16, 23 September 2022
|
|
| Menu location |
|---|
| Path → Deburr |
| Workbenches |
| Path |
| Default shortcut |
| None |
| Introduced in version |
| 0.18 |
| See also |
| None |
Description
The Path Deburr tool is primarily for Deburring an edge.
Usage
- There are several ways to invoke the command:
- Press the
Deburr button.
- Select the Path →
Deburr option from the menu.
- Press the
- The Deburr task panel opens. See Options.
- Select Base Geometry.
- Specify the required parameters.
- Press the OK button.
Options
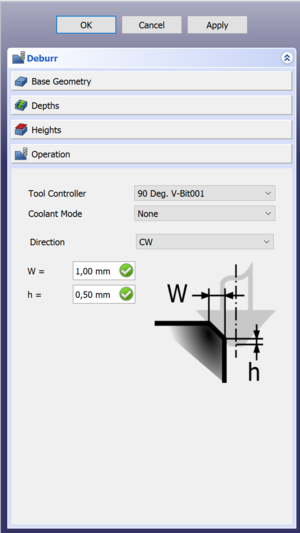
After selecting the geometry in the Base Geometry section of the task panel you can press Apply to see the tool path as defined by the default options.
Next you can check your depths/step down and heights, just like with other path commands.
The Final step is to activate the Operation section where you can specify the following:
- Tool controller: Select the tool to use.
- Coolant Mode: Select
None,FloodorMist. - Directions: Select
CW(clockwise) orCCW(counter-clockwise). - W: The dimension of your edge.
- h: The offset from the bottom of the tool. It's a safety feature because if the tip gets above the edge it won't cut anymore.
Properties
Data
Base
- DataPlacement:
- DataLabel: User name of the object (UTF-8)
Deburr
- DataDirection: CCW or CW
- DataEntry Point: Change this to change Entry point, if set to 2 it will go in 2 corners from the default.
- DataExtra depth: Extra depth or h in the menu.
- DataJoin: How to join chamfer segments, Round or Miter. [example needed]
- DataSide: Can change sides. [example needed]
- DataWidth: The width you fill in in the menu by W.
Depth
- DataClearance Height: The height needed to clear clamps and obstructions (set by default to
OpStockZMax + SetupSheet.ClearanceHeightOffset) - DataSafe Height: The above which Rapid motions are allowed. (set to
OpStockZMax + SetupSheet.SafeHeightOffset) - DataStart Depth: Starting Depth of Tool- first cut depth in Z
- DataStep Down: Incremental Step Down of Tool
Path
- DataActive: Make False, to prevent operation from generating code
- DataBase: The base geometry for this operation, edges or a face
- DataComment: An optional comment for this operation
- DataCoolant Mode: Coolant mode for this operation
- DataCycle Time: Estimated cycle time for this operation
- DataTool Controller: The tool controller that will be used to calculate the path
- DataUser Label: User assigned label
- Getting started
- Installation: Download, Windows, Linux, Mac, Additional components, Docker, AppImage, Ubuntu Snap
- Basics: About FreeCAD, Interface, Mouse navigation, Selection methods, Object name, Preferences, Workbenches, Document structure, Properties, Help FreeCAD, Donate
- Help: Tutorials, Video tutorials
- Workbenches: Std Base, Arch, Assembly, CAM, Draft, FEM, Inspection, Mesh, OpenSCAD, Part, PartDesign, Points, Reverse Engineering, Robot, Sketcher, Spreadsheet, Surface, TechDraw, Test Framework
- Hubs: User hub, Power users hub, Developer hub
