Translations:Add Workbench to Addon Manager/7/pl: Difference between revisions
(Created page with "# Otwórz Menadżer dodatków: wybierz opcję {{MenuCommand|Narzędzia → 16px Menadżer dodatków}} z menu. # Naciśnij przycisk {{Button|Narzędzia programisty ...}}. # Otworzy się okno dialogowe {{MenuCommand|Narzędzia dla twórców dodatków}}.<br> 350px # Wprowadź następujące dane: #* {{MenuCommand|Ścieżka do dodatku}}: Ścieżka do lokalnego repozytorium git...") |
No edit summary |
||
| Line 14: | Line 14: | ||
# The {{MenuCommand|Zawartość elementu}} otwiera się okno dialogowe. |
# The {{MenuCommand|Zawartość elementu}} otwiera się okno dialogowe. |
||
<br>[[Image:Addon_Manager_Content_Item_Dialog.png|350px]] |
<br>[[Image:Addon_Manager_Content_Item_Dialog.png|350px]] |
||
# {{ |
# {{MenuCommand|Typ treści}} powinien być ustawiony na {{Value|Workbench}}. |
||
# Zaznacz pole wyboru {{MenuCommand|To jest jedyny element w dodatku}}. |
# Zaznacz pole wyboru {{MenuCommand|To jest jedyny element w dodatku}}. |
||
# Wpisz {{MenuCommand|Nazwa klasy środowiska pracy}}. Jest to nazwa klasy określona w pliku {{FileName|InitGui.py}}. |
# Wpisz {{MenuCommand|Nazwa klasy środowiska pracy}}. Jest to nazwa klasy określona w pliku {{FileName|InitGui.py}}. |
||
Latest revision as of 08:32, 6 January 2024
- Otwórz Menadżer dodatków: wybierz opcję Narzędzia →
Menadżer dodatków z menu.
- Naciśnij przycisk Narzędzia programisty ....
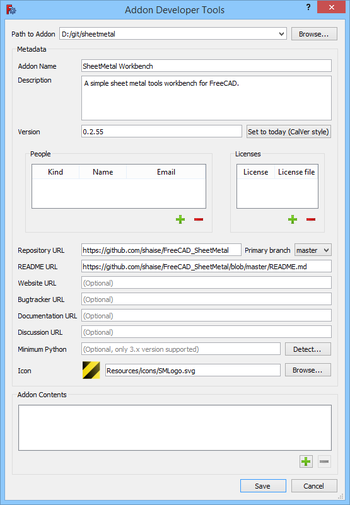
- Otworzy się okno dialogowe Narzędzia dla twórców dodatków.

- Wprowadź następujące dane:
- Ścieżka do dodatku: Ścieżka do lokalnego repozytorium git.
- Nazwa dodatku: Ta nazwa pojawi się na liście w menedżerze dodatków.
- Opis: Analogicznie.
- Wersja: Analogicznie.
- URL repozytorium
- Gałąź podstawowa
- URL README: Rekomendowane.
- Ikonka: Ikonka musi być częścią repozytorium.
- Press the
przycisk na dole okna dialogowego.
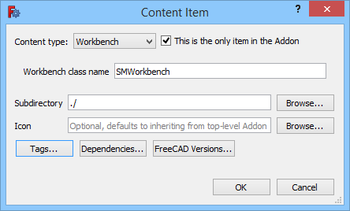
- The Zawartość elementu otwiera się okno dialogowe.
- Typ treści powinien być ustawiony na
Workbench. - Zaznacz pole wyboru To jest jedyny element w dodatku.
- Wpisz Nazwa klasy środowiska pracy. Jest to nazwa klasy określona w pliku InitGui.py.
- Dla Katalog podrzędny wpisz
./. - Naciśnij przycisk OK, aby zamknąć okno dialogowe.
- Naciśnij przycisk Zapisz, aby zamknąć okno dialogowe Narzędzia dla twórców dodatków i zapisać plik package.xml.
- Naciśnij przycisk
Close, aby zamknąć Menedżer dodatków.
- Prześlij utworzony plik do zdalnego repozytorium.


