Path Workbench: Difference between revisions
| Line 49: | Line 49: | ||
In the Setup subdialog we configure the stock. |
In the Setup subdialog we configure the stock. |
||
The model we have created in FreeCAD is what we want to have in the end. The stock is the material we start with. Here we use a cubic block of which we can configure the size here. |
The model we have created in FreeCAD is what we want to have in the end. The stock is the material we start with. Here we use a cubic block of which we can configure the size here. |
||
[[File:Path-JobSetup]] |
|||
=== === |
=== === |
||
Revision as of 23:58, 11 January 2018
This page is currently reworked. It may contain unordered, missing, obsolete or wrong information
Introduction
The Path workbench is used to produce machine instructions for CNC machines from a FreeCAD model. This can be used to produce real-world 3D objects on machines like mills, lathes, lasercutters or alike. Usually these instructions are some kind of GCode dialect.
 The FreeCAD process to create these machine instructions is as follows:
- You create a 3D model of your object, probably using one ore several of [[Part Design Workbench|Part Design], Part or Draft workbench
- You create a Job in Path Workbench, the job uses a certain set of tools.
- You create milling paths using e.g. Contour and Pocket operations. These Path objects use a slightly abstract G-Code represention which is independent from the machine
- Finally, since each type of machine often speaks a different G-Code dialect, you use a machine dependent post processor to create G-Code which. This translates the FreeCAD G-Code into the particular flavor recognized by your machine. There are several postprocessors included which you can use directly or use as a template for creating your own.
A walkthrough for the impatient
Here we will show how to get from a simple FreeCAD object to the machine's G-Code
The model
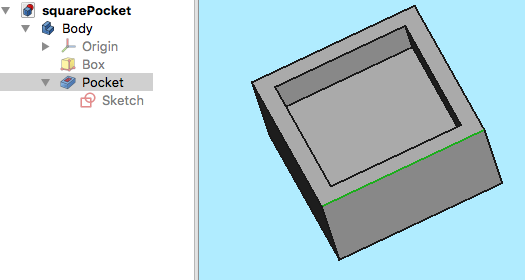
Let's start with a simple FreeCAD model: a cube with a rectangular pocket.
It is modeled straightforward in the Part Design Workbench using a Body, a Box and a Pocket based on a Sketch. The sketch is oriented in the XY plane.
The Job
In the Path workbench we create a ![]() Job
Job
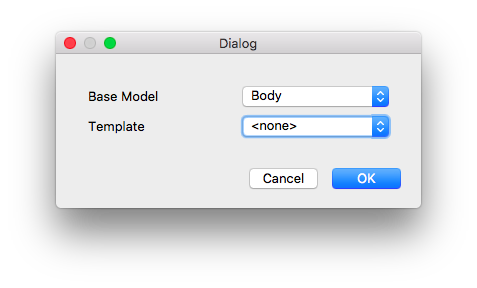
In the job creation dialog we select the Body as the Base Model and confirm with OK.
Job Output
The model in the 3D view is now surrounded by a wireframe cube and the job configuration dialog opens. We start with the configuration of the output, which determines the finally generated G-Code file.
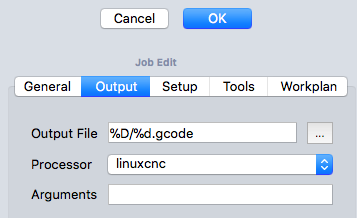
We can select a filename or we can use some placeholders, which we do here to create the output file in the same directory as the file with the square pocket. The filename will be the same as the FreeCAD model's name with the extension .gcode. Move the mouse over the input field to see further possibilities of placeholders.
Select the postprocessor which will translate the internal format into the code used by your machine. In the example we use the linuxcnc postprocessor.
The postprocessor can be configured with additional arguments which are shown as you move the mouse over the field. We use none of them here.
Job Setup
In the Setup subdialog we configure the stock. The model we have created in FreeCAD is what we want to have in the end. The stock is the material we start with. Here we use a cubic block of which we can configure the size here.
The bracket for the various path elements is the Job. You can think of it as a job you have to do at a real mill: The mill has a certain set of control codes (usually G-Code), you use a certain set of tools, you have some stock material, and you start to mill by using the different tools. You can use the same tool for different paths, e.g. milling different pockets.
GUI tools
Scripting
The Path workbench offers a broad python scripting API. With it, you can create and modify paths from python scripts, or extend the available functionality of the workbench.


