Part Chamfer/cs: Difference between revisions
Renatorivo (talk | contribs) No edit summary |
(Updating to match new version of source page) |
||
| Line 1: | Line 1: | ||
{{GuiCommand |
{{GuiCommand|Name=Part Chamfer|MenuLocation=Part → Chamfer|Workbenches=[[Part Module|Part]], Complete|SeeAlso=}} |
||
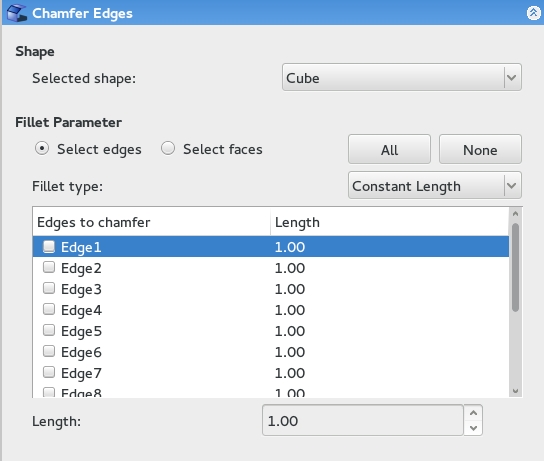
Zkosí vybrané hrany objektu. Dialogové okno umožňuje výběr objektu a hran, na kterých se má pracovat. |
Zkosí vybrané hrany objektu. Dialogové okno umožňuje výběr objektu a hran, na kterých se má pracovat. |
||
[[Image:Dialog-chamfer.jpg]] |
[[Image:Dialog-chamfer.jpg]] |
||
==How to Use== |
|||
# Press the {{KEY|[[Image:Part_Chamfer.svg|30px]]}} button from the [[Part_Workbench|Part Workbench]]. Alternatively, you can select {{MenuCommand|Part → Chamfer}}. |
|||
# Select the shape to chamfer from the dialog. |
|||
# Select edges to chamfer by checking the corresponding box in the chamfer dialog or by selecting them on the model directly. |
|||
# Edit chamfer parameters. |
|||
# Press OK to close the chamfer dialog and apply the chamfer. |
|||
==Options== |
|||
* When selecting edges on the model, you have the option to select by edge or by face. Selecting by face can be more efficient in many situations. |
|||
* Constant length chamfer or variable length chamfer. |
|||
** A constant length chamfer will create a chamfer with edges equidistant to the original edge at the distance specified. |
|||
** A variable length chamfer will have edges that may be set to different distances from the original edge, allowing you to create a chamfer at a variable angle. |
|||
{{clear}} |
{{clear}} |
||
Revision as of 22:08, 27 August 2015
|
|
| Menu location |
|---|
| Part → Chamfer |
| Workbenches |
| Part, Complete |
| Default shortcut |
| None |
| Introduced in version |
| - |
| See also |
| None |
Zkosí vybrané hrany objektu. Dialogové okno umožňuje výběr objektu a hran, na kterých se má pracovat.
How to Use
- Press the
button from the Part Workbench. Alternatively, you can select Part → Chamfer.
- Select the shape to chamfer from the dialog.
- Select edges to chamfer by checking the corresponding box in the chamfer dialog or by selecting them on the model directly.
- Edit chamfer parameters.
- Press OK to close the chamfer dialog and apply the chamfer.
Options
- When selecting edges on the model, you have the option to select by edge or by face. Selecting by face can be more efficient in many situations.
- Constant length chamfer or variable length chamfer.
- A constant length chamfer will create a chamfer with edges equidistant to the original edge at the distance specified.
- A variable length chamfer will have edges that may be set to different distances from the original edge, allowing you to create a chamfer at a variable angle.
