Draft Label/es: Difference between revisions
Renatorivo (talk | contribs) |
(Created page with "==Descripción==") |
||
| Line 2: | Line 2: | ||
{{GuiCommand/es|Name=Draft Label|Workbenches=[[Draft Module|Draft]], [[Arch Module|Arch]]|MenuLocation=Draft → Label|Shortcut=D L}} |
{{GuiCommand/es|Name=Draft Label|Workbenches=[[Draft Module|Draft]], [[Arch Module|Arch]]|MenuLocation=Draft → Label|Shortcut=D L}} |
||
== |
==Descripción== |
||
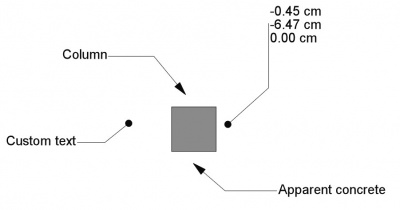
This tool inserts a label, which is a piece of text with a 2-segment line and an arrow, in the active document. If an object or a sub-element (face, edge or vertex) is selected when starting the command, the Label can be made to automatically display a certain attribute of the selected element. |
This tool inserts a label, which is a piece of text with a 2-segment line and an arrow, in the active document. If an object or a sub-element (face, edge or vertex) is selected when starting the command, the Label can be made to automatically display a certain attribute of the selected element. |
||
Revision as of 10:52, 29 November 2018
|
|
| Ubicación en el Menú |
|---|
| Draft → Label |
| Entornos de trabajo |
| Draft, Arch |
| Atajo de teclado por defecto |
| D L |
| Introducido en versión |
| - |
| Ver también |
| Ninguno |
Descripción
This tool inserts a label, which is a piece of text with a 2-segment line and an arrow, in the active document. If an object or a sub-element (face, edge or vertex) is selected when starting the command, the Label can be made to automatically display a certain attribute of the selected element.
How to use
- Optionally, select an object or a subelement of an object (Vertex, edge or face)
- Press the
 Draft Label button, or press D then L keys
 - Click a first point on the 3D view, or type a coordinate, to indicate the target point (arrow position). This can be anywhere, it doesn't need to be exactly on the selected element
- Click a second point on the 3D view, or type a coordinate, to indicate the middle point that is the start of the straight segment.
- Click a third point on the 3D view, or type a coordinate, to indicate the position of the text.
Options
- Pressing CTRL will snap your point to available snap locations.
- To enter coordinates manually, simply enter the numbers, then press ENTER between each X, Y and Z component.
- Pressing ESC will cancel the operation.
- The direction of the straight segment (right or left) will automatically justify the text left or right.
Properties
- DatosLabel Type: The type of information shown by this label (see below)
- DatosCustom Text: The text to display when Label Type is set to custom
- DatosPlacement: Indicates the rotation and the position of the text
- DatosStraight Distance: The length of the straight segment
- DatosStraight Direction: The direction of the straight segment Horizontal or vertical
- DatosTarget Point: The point indicated by this label
- VistaText Size: The size of the text
- VistaText Font: The font used for the text
- VistaText Alignment: The vertical alignment of the text: Top, middle or bottom
- VistaText Color: The color of the text
- VistaLine Width: The width of the line
- VistaLine Color: The color of the line
- VistaArrow Type: The type of the arrow: Dot, circle, arrow or tick.
- VistaArrow Size: The size of the arrow
- VistaFrame: Draws a frame around the text
Label types
- Custom: Shows the contents of the Custom Text property
- Name: Shows the name of the target object
- Label: Shows the label of the target object
- Position: Shows the coordinates of the target object (Placement base point), or the coordinates of the target vertex, if applicable, or the coordinates of the center of the target subelement (center of mass)
- Length: Shows the length of the target subelement, if possible
- Area: Shows the area of the target subelement, if possible
- Volume: Shows the volume of the target object, if possible
- Tag: Shows the tag value of the target object, if the target object has such property (which is the case of all Arch objects)
- Material: Shows the label of the material of the target object, if the target object has such property
Scripting
The Text tool can by used in macros and from the python console by using the following function:
makeLabel(targetpoint=None,target=None,direction=None,distance=None,labeltype=None,placement=None)
- Returns the newly created object.
Example:
import FreeCAD,Draft
selection = FreeCADGui.Selection.getSelectionEx()[0]
Draft.makeLabel(FreeCAD.Vector(10,-10,0),selection,"Horizontal",20,"Label")
