Draft Arc: Difference between revisions
No edit summary |
No edit summary |
||
| Line 1: | Line 1: | ||
{{GuiCommand|Name=Draft_Arc|Workbenches=[[Draft Module|Draft]]|MenuLocation= |
{{GuiCommand|Name=Draft_Arc|Workbenches=[[Draft Module|Draft]]|MenuLocation=Draft -> Arc}} |
||
| ⚫ | |||
== |
====Description==== |
||
| ⚫ | |||
| ⚫ | |||
| ⚫ | |||
[[Image:Draft_Arc_example.jpg]] |
|||
====Usage==== |
|||
* Picking a point on an empty area of the 3d view, or on an existing object. |
|||
| ⚫ | |||
| ⚫ | |||
* Enter numbers to [[Draft_Coordinates|manually insert a coordinate]]. |
|||
* The newly created line will take the current [[Draft_Linestyle|linestyle]]. |
|||
* Pressing ALT when choosing the end angle will switch you to counter-clockwise direction. |
* Pressing ALT when choosing the end angle will switch you to counter-clockwise direction. |
||
* Pressing ESCAPE cancels the function. |
* Pressing ESCAPE cancels the function. |
||
====Scripting==== |
|||
The created arc is a [[Part_Module|Part]] feature containing one edge with three vertices. |
|||
Revision as of 22:36, 15 November 2008
|
|
| Menu location |
|---|
| Draft -> Arc |
| Workbenches |
| Draft |
| Default shortcut |
| None |
| Introduced in version |
| - |
| See also |
| None |
Description
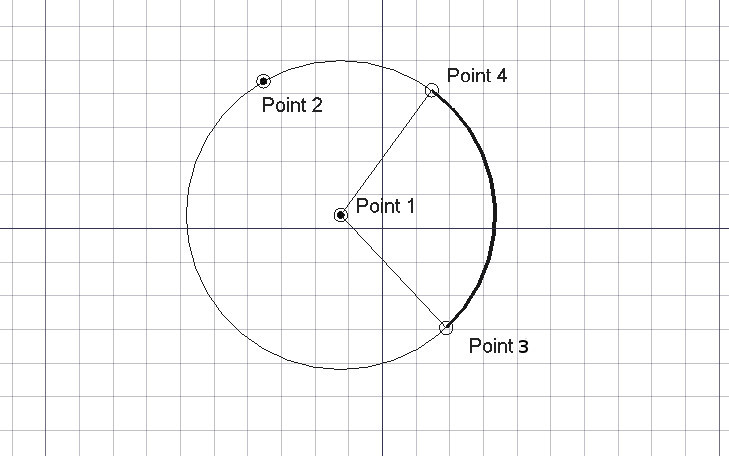
This tool draws an arc by picking four points: the center, the radius, the start angle and the end angle.
Usage
- Picking a point on an empty area of the 3d view, or on an existing object.
- Pressing CTRL will snap your point to availible snap locations.
- Pressing SHIFT will constrain your new point in relation to the last one.
- Enter numbers to manually insert a coordinate.
- The newly created line will take the current linestyle.
- Pressing ALT when choosing the end angle will switch you to counter-clockwise direction.
- Pressing ESCAPE cancels the function.
Scripting
The created arc is a Part feature containing one edge with three vertices.
