Defeaturing: Difference between revisions
Renatorivo (talk | contribs) (Marked this version for translation) |
Renatorivo (talk | contribs) No edit summary |
||
| (One intermediate revision by the same user not shown) | |||
| Line 13: | Line 13: | ||
<!--T:11--> |
<!--T:11--> |
||
The easiest way to use defeaturing is by using the [ |
The easiest way to use defeaturing is by using the [[Defeaturing_Workbench|Defeaturing Workbench]] |
||
==Code snippet== <!--T:7--> |
==Code snippet== <!--T:7--> |
||
| Line 38: | Line 38: | ||
</translate> |
</translate> |
||
{{Userdocnavi{{#translation:}}}} |
|||
[[Category:Addons{{#translation:}}]] |
|||
[[Category:External Workbenches{{#translation:}}]] |
|||
{{clear}} |
{{clear}} |
||
Latest revision as of 20:00, 29 August 2020
Introduction
3D Model Defeaturing got added with Open CASCADE 7.3 [1] and can be used for editing STEP models by removing of the features from the model.
It is also possible to direct modeling the model, when the history of operations is unavailable. (This is the case for 3d STEP models). Defeaturing can also useful to remove proprietary details of the model before sharing it.
The easiest way to use defeaturing is by using the Defeaturing Workbench
Code snippet
Defeaturing can also be used with python:
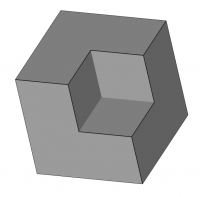
box = Part.makeBox(10,10,10)
box2 = Part.makeBox(5,5,5,FreeCAD.Vector(5,5,0))
box3 = box.cut(box2)
Part.show(box3)
faces = App.ActiveDocument.ActiveObject.Shape.Faces[6:] #the faces of box3 that are part of the corner pocket
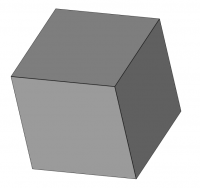
box4 = App.ActiveDocument.ActiveObject.Shape.defeaturing(faces) #defeature the shape
Part.show(box4) #show defeatured shape
Box3 shape used in python code, before defeaturing
Box4 shape used in python code, defeatured
- Getting started
- Installation: Download, Windows, Linux, Mac, Additional components, Docker, AppImage, Ubuntu Snap
- Basics: About FreeCAD, Interface, Mouse navigation, Selection methods, Object name, Preferences, Workbenches, Document structure, Properties, Help FreeCAD, Donate
- Help: Tutorials, Video tutorials
- Workbenches: Std Base, Arch, Assembly, CAM, Draft, FEM, Inspection, Mesh, OpenSCAD, Part, PartDesign, Points, Reverse Engineering, Robot, Sketcher, Spreadsheet, Surface, TechDraw, Test Framework
- Hubs: User hub, Power users hub, Developer hub

