A2plus Workbench: Difference between revisions
m (uniform image links) |
(→Special Features: Shape of whole Assembly) |
||
| Line 115: | Line 115: | ||
The button [[Image:A2p DOFs.svg|24px]] outputs a list of all parts in your assembly that are connected with a constraint. It states how many degrees of freedom and dependencies every part has. The list is output into FreeCAD's widget ''Report view''. If this widget is currently not visible, it can either be shown by right-clicking into an empty part of the FreeCAD toolbar area and then choosing it in the appearing context menu or with the menu {{MenuCommand|View → [[Std_Panels|Panels]] → Report view}}. |
The button [[Image:A2p DOFs.svg|24px]] outputs a list of all parts in your assembly that are connected with a constraint. It states how many degrees of freedom and dependencies every part has. The list is output into FreeCAD's widget ''Report view''. If this widget is currently not visible, it can either be shown by right-clicking into an empty part of the FreeCAD toolbar area and then choosing it in the appearing context menu or with the menu {{MenuCommand|View → [[Std_Panels|Panels]] → Report view}}. |
||
=== Shape of whole Assembly === |
|||
Sometimes it is necessary to have the whole assembly combined as one shape. This shape can then for example be used for 3D printing in the [[Mesh Workbench|Mesh workbench]] or for drawings in the [[TechDraw Module|TechDraw workbench]]. It is created using the toolbar button [[Image:A2p_SimpleAssemblyShape.svg|24px]]. The shape is by default not made visible. Use the same toolbar button to update the shape in case of changes in the assembly. |
|||
== A2plus Preferences == |
== A2plus Preferences == |
||
Revision as of 21:18, 14 February 2019
Introduction
The A2plus workbench is an external workbench to assemble different parts in FreeCAD...
Installing
The A2plus workbench is an addon to FreeCAD. It can easily be installed via the menu Tools → Addon Manager. A2plus is under active development and will get new features frequently. Therefore you should update it regularly using also the menu Tools → Addon Manager. The A2plus code is hosted and developed on GitHub and can also be installed manually by copying it into FreeCAD's MOD directory.
Getting Started
At first switch to the A2plus toolbar in FreeCAD. To create an assembly create a new file in FreeCAD. At first this file needs to be saved. It is recommended (but not necessary) to save it in the same folder of the parts you want to assemble.
Now parts can be added to the assembly by using the toolbar button . The first added part gets a fixed position by default. (You can change this later via the part property Datafixed Position.)
Parts that are already in the assembly can be cloned with the toolbar button .
To edit a part from the assembly, select it in the model tree and use the toolbar button . This will open the part into a new tab in FreeCAD or switch to its tab if the file is already opened.
To import changes in parts into the assembly click on the toolbar button .
Imported parts will keep their external dependencies and can be edited. For well-defined parts like screws it is however useful that their shape cannot be edited. This can be achieved with the toolbar button that converts the selected part to a static copy of the original part.
Assembling
Assembling parts is done by adding constraints between parts. After a constraint A2plus will move the parts according to the constraint if possible.
For complex constraints between parts A2plus might fail to solve the constraints. Therefore also have a look at section ?? for strategies to resolve such cases.
Constraints between parts are added by keeping the Ctrl key pressed and selecting an edge or face of two parts. The constraint will be added attached in the model tree to the affected parts.
Keeping the Overview
The more parts you add, the more important it is to keep the overview. A2plus therefore offers these tools to move and view parts:
- To move a part around in the assembly, select it in the model tree and use the toolbar button
. When you placed the part where you like it, left-click with the mouse. If the moved part has already constraints the part will be placed accordingly by pressing the toolbar button
because this triggers to resolve all constraints of the assembly.
- To show a constraint select it in the model tree and use the toolbar button
. This will make the whole assembly transparent and highlight the two things that are connected in the constraint. To go back to the normal view, left-click into the assembly.
- To show only certain parts in the assembly, select these parts in the model tree and use the toolbar button
. Alternatively you can hide a certain part by selecting it in the model tree and pressing Space to toggle its visibility.
- To toggle the transparency view of the whole assembly you can use the toolbar button
.
Constraints
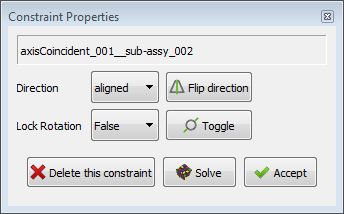
When creating a constraint such a dialog will be displayed after you pressed a constraint toolbar button:
 .
.
For certain constraints it allows you to modify the constraint direction. With the button Solve you can check in advance if this new constraint can be solved by A2plus. If not you can look for alternatives, see section ?? below.
A2plus provides the following constraints:
Point on Point
Select a vertex (point) on each part. The toolbar button adds the constraint pointIdentity. It will make the vertices coincident.
Point on Line
Select a vertex (point) on one part and an edge on the other part. The toolbar button adds the constraint pointOnLine. It will put the vertex on the edge.
Point on Plane
Select a vertex (point) on one part and a plane on the other part. The toolbar button adds the constraint pointOnPlane. The constraint dialog allows you to specify an offset between the point and the plane. This offset can also be flipped between both sides of the plane. If the offset is zero, the constraint will put the vertex on the plane.
Sphere on Sphere
Select either a spherical face or a vertex (point) on both parts. The toolbar button adds the constraint sphereCenterIdent. It will either make the center of the spheres, the center of the sphere and the vertex, or the vertices coincident.
Circular Edge on Circular Edge
Select a circular edge on both parts. The toolbar button adds the constraint circularEdge. The constraint dialog allows you to specify an offset between the edges. This offset can also be flipped. You can furthermore set the constraint direction and lock the rotation of the parts. If the offset is zero, the constraint will put the edges concentric in the same plane.
Axis Coincident
Select either a cylindrical face or a linear edge on both parts. The toolbar button adds the constraint axisCoincident. The constraint dialog allows you to specify the axis direction. The dialog allows you furthermore to lock the rotation of the parts. The constraint will make the axes or lines coincident.
Axis Parallel
Select either a cylindrical face or a linear edge on both parts. The toolbar button adds the constraint axisParallel. The constraint dialog allows you to specify the axis direction. The constraint will make the axes or lines parallel.
Axis on Plane
Select either a cylindrical face or a linear edge on one part and a plane on the other part. The toolbar button adds the constraint axisPlaneParallel. The constraint will make the axis or line parallel to the plane.
Plane Parallel
Select a plane on both parts. The toolbar button adds the constraint planesParallel. The constraint dialog allows you to specify the constraint direction. The constraint will make the planes parallel.
Plane on Plane
Select a plane on both parts. The toolbar button adds the constraint planeCoincident. The constraint dialog allows you to specify a constraint direction and an offset between the planes. This offset can also be flipped. If the offset is zero, the constraint will make the planes coincident.
Plane Angular
Select a plane on both parts. The toolbar button adds the constraint angledPlanes. The constraint dialog allows you to specify an angle between the planes. The constraint will make the planes at first parallel and the set the specified angle.
Coincidence at Center of Mass
Select either a closed edge or a plane on both parts. The toolbar button adds the constraint CenterOfMass. The constraint dialog allows you to specify an offset between the edges or planes. This offset can also be flipped. You can furthermore set the constraint direction and lock the rotation of the parts. If the offset is zero, the constraint will put the edges or planes into the same plane.
Subassemblies
An assembly can contain other assemblies. They are added like parts by pressing the toolbar button and selecting a *.FCStd file containing an assembly. Such subassemblies can also be edited like parts using the toolbar button
. Please assure sure for higher assembly stages that you update the assembly via the toolbar button
when there were changes.
Constraint Handling
Possible constraints for a selection are displayed in the toolbar and the Constraint Tools dialog by enabling the corresponding buttons. The Constraint Tools dialog is opened via the toolbar button . It is intended to stay open to be able to add quickly several constraints to the assembly.
Existing constraints can be edited by selecting them in the model tree and then using the toolbar button . This opens the Constraint Properties dialog.
Constraints can be deleted either by selecting them in the model tree and pressing Del or by selecting a part with constraints in the model tree and using the toolbar button .
All constraints can any time be resolved with the toolbar button . If the toolbar button
is turned on a resolve is automatically done after every edit of a constraint.
The toolbar button affects the constraint that was added most recently. It flips the constraint direction.
Part Lists
Special Features
Assembly Structure
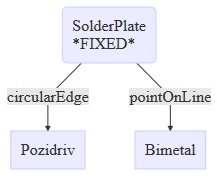
The toolbar button creates a HTML file with the structure of your assembly. The file will by default be created in the folder of your assembly file. The structure looks like this one:

Degrees of Freedom
The button outputs a list of all parts in your assembly that are connected with a constraint. It states how many degrees of freedom and dependencies every part has. The list is output into FreeCAD's widget Report view. If this widget is currently not visible, it can either be shown by right-clicking into an empty part of the FreeCAD toolbar area and then choosing it in the appearing context menu or with the menu View → Panels → Report view.
Shape of whole Assembly
Sometimes it is necessary to have the whole assembly combined as one shape. This shape can then for example be used for 3D printing in the Mesh workbench or for drawings in the TechDraw workbench. It is created using the toolbar button . The shape is by default not made visible. Use the same toolbar button to update the shape in case of changes in the assembly.
A2plus Preferences
The a2plus preferences can be accessed via FreeCAD's menu Edit → Preferences and there in the section A2plus. ...