Surface CurveOnMesh/ro: Difference between revisions
No edit summary |
(Updating to match new version of source page) |
||
| Line 3: | Line 3: | ||
{{Docnav |
{{Docnav |
||
|[[Surface_ExtendFace|ExtendFace]] |
|[[Surface_ExtendFace|ExtendFace]] |
||
|[[Surface_BlendCurve|BlendCurve]] |
|||
| |
|||
|[[Surface_Workbench|Surface]] |
|[[Surface_Workbench|Surface]] |
||
|IconL=Surface_ExtendFace.svg |
|IconL=Surface_ExtendFace.svg |
||
|IconR= |
|IconR=Surface_BlendCurve.svg |
||
|IconC=Workbench_Surface.svg |
|IconC=Workbench_Surface.svg |
||
}} |
}} |
||
| Line 14: | Line 14: | ||
</div> |
</div> |
||
<span id="Description"></span> |
|||
==Descriere== |
==Descriere== |
||
| Line 28: | Line 29: | ||
{{Caption|Above left: mesh object with selected points on the surface. Above right: splines created by picking several points on the mesh. Lower left: a parametric surface reconstructed from the approximated splines, using [[Surface_Sections|Surface Sections]].}} |
{{Caption|Above left: mesh object with selected points on the surface. Above right: splines created by picking several points on the mesh. Lower left: a parametric surface reconstructed from the approximated splines, using [[Surface_Sections|Surface Sections]].}} |
||
<span id="Usage"></span> |
|||
<div class="mw-translate-fuzzy"> |
<div class="mw-translate-fuzzy"> |
||
== Cum se folosește == |
== Cum se folosește == |
||
| Line 43: | Line 45: | ||
* {{MenuCommand|Cancel}}: it will erase the tentative points that have been picked, and will stop the picking operation. Press {{Button|Start}} again to pick points once more. |
* {{MenuCommand|Cancel}}: it will erase the tentative points that have been picked, and will stop the picking operation. Press {{Button|Start}} again to pick points once more. |
||
<span id="Options"></span> |
|||
== Opţiuni == |
== Opţiuni == |
||
| Line 56: | Line 59: | ||
* {{MenuCommand|Maximum curve degree}}: it defaults to {{Value|5}}. It determines the maximum degree of the spline to approximate the surface; it can be a value from {{Value|1}} to {{Value|8}}. |
* {{MenuCommand|Maximum curve degree}}: it defaults to {{Value|5}}. It determines the maximum degree of the spline to approximate the surface; it can be a value from {{Value|1}} to {{Value|8}}. |
||
<span id="Properties"></span> |
|||
==Proprietăți== |
==Proprietăți== |
||
| Line 76: | Line 80: | ||
{{Docnav |
{{Docnav |
||
|[[Surface_ExtendFace|ExtendFace]] |
|[[Surface_ExtendFace|ExtendFace]] |
||
|[[Surface_BlendCurve|BlendCurve]] |
|||
| |
|||
|[[Surface_Workbench|Surface]] |
|[[Surface_Workbench|Surface]] |
||
|IconL=Surface_ExtendFace.svg |
|IconL=Surface_ExtendFace.svg |
||
|IconR= |
|IconR=Surface_BlendCurve.svg |
||
|IconC=Workbench_Surface.svg |
|IconC=Workbench_Surface.svg |
||
}} |
}} |
||
Latest revision as of 15:16, 2 June 2023
|
|
| Menu location |
|---|
| Surface → CurveOnMesh |
| Workbenches |
| Surface |
| Default shortcut |
| None |
| Introduced in version |
| - |
| See also |
| None |
Descriere
Surface CurveOnMesh creates approximated spline segments on top of a selected mesh.
If the object is not a Mesh, but a parametric Shape or surface, it must be converted first to a mesh using Mesh FromPartShape.
These edges created on top of the mesh may be further used to re-create the surface in a parametric way by using tools such as GeomFillSurface and
Sections.
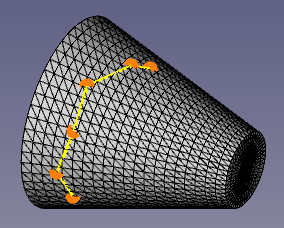
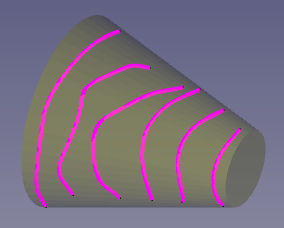
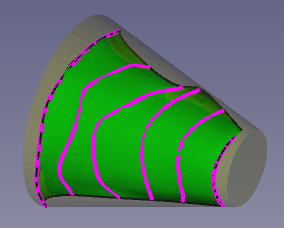
Above left: mesh object with selected points on the surface. Above right: splines created by picking several points on the mesh. Lower left: a parametric surface reconstructed from the approximated splines, using Surface Sections.
Cum se folosește
- Selectațiîn meiul Surface → CurveOnMesh.
- Pași detaliați sunt necesari.
- Definii opțiunile și apăsați OK.
After pressing Start, the context menu (right-click) in the 3D view shows various options beside Create.
- Close wire: if at least three points have been picked, this option will be available to join the last point to the first point with a line.
- Clear: it will erase the tentative points that have been picked on the mesh, and will allow you to pick new ones.
- Cancel: it will erase the tentative points that have been picked, and will stop the picking operation. Press Start again to pick points once more.
Opţiuni
(Editor: this information must be verified)
Wire section:
- Snap tolerances to vertices: it defaults to
10 px; it indicates the minimum distance between one point and another when picking with the pointer. - Split threshold: it defaults to
45 deg; it indicates the angular deviation from one point in the mesh to another point necessary to create a new spline instead of extending the previous spline.
Spline approximation, if it is checked, it will create spline objects, otherwise, it will create simple straight line objects (polyline).
- Tolerance to mesh: it defaults to
0.2. It is a parameter that takes into account the imperfections of the mesh; the smaller this number the more precise it will consider the mesh, particularly if it is a very fine mesh. - Continuity: it defaults to
C2. It determines the continuity of the spline; it can beC0(touching),C1(tangent),C2(curvature), andC3(acceleration curvature). - Maximum curve degree: it defaults to
5. It determines the maximum degree of the spline to approximate the surface; it can be a value from1to8.
Proprietăți
- DateProperty: descrierea proprietății
- VizualizareProperty: descrierea proprietății
If Spline approximation is checked, the Curve on mesh tool creates a
Part Spline (
Part::Spline class) which is derived from the basic Part Feature (Part::Feature class), therefore it shares all the latter's properties.
In addition to the properties described in Part Feature, the Part Spline has the following properties in the property editor.
View
Base
- VizualizareControl Points (
Bool): it defaults tofalse; if set totrue, it will show an overlay with the control points of the surface.
- Getting started
- Installation: Download, Windows, Linux, Mac, Additional components, Docker, AppImage, Ubuntu Snap
- Basics: About FreeCAD, Interface, Mouse navigation, Selection methods, Object name, Preferences, Workbenches, Document structure, Properties, Help FreeCAD, Donate
- Help: Tutorials, Video tutorials
- Workbenches: Std Base, Arch, Assembly, CAM, Draft, FEM, Inspection, Mesh, OpenSCAD, Part, PartDesign, Points, Reverse Engineering, Robot, Sketcher, Spreadsheet, Surface, TechDraw, Test Framework
- Hubs: User hub, Power users hub, Developer hub


