Sketcher Preferences/de: Difference between revisions
(Updating to match new version of source page) |
No edit summary |
||
| (71 intermediate revisions by 4 users not shown) | |||
| Line 1: | Line 1: | ||
<languages/> |
<languages/> |
||
{{Docnav |
|||
{{Docnav/de |
|||
|[[Sketcher_SwitchVirtualSpace|Switch Virtual Space]] |
|||
|[[Sketcher_SwitchVirtualSpace/de|VirtuellenBereichWechseln]] |
|||
| |
| |
||
|[[Sketcher_Workbench|Sketcher]] |
|[[Sketcher_Workbench/de|Sketcher]] |
||
|IconL= |
|IconL=Sketcher_SwitchVirtualSpace.svg |
||
|IconR= |
|||
|IconC=Workbench_Sketcher.svg |
|IconC=Workbench_Sketcher.svg |
||
|IconR=Freecad.svg |
|||
}} |
}} |
||
{{TOCright}} |
|||
<div class="mw-translate-fuzzy"> |
|||
Der Einstellungsdialog für den Sketcher befindet sich bei den allgemeinen Einstellungen (Menu Bearbeiten → Einstellungen → Skizze). |
|||
</div> |
|||
Die Einstellungen für den Arbeitsbereich [[Image:Workbench_Sketcher.svg|24px|link=Sketcher_Workbench/de]] [[Sketcher_Workbench/de|Sketcher]] befinden sich im [[Preferences Editor|Voreinstellungseditor]]. Im Menü wählt man {{MenuCommand|Bearbeiten → Einstellungen...}} und dann {{MenuCommand|Sketcher}}. |
|||
There are two tabs: General, and Colors. |
|||
Es gibt vier Seiten: [[#Allgemein|Allgemein]], [[#Raster|Raster]], [[#Anzeige|Anzeige]] und [[#Darstellung|Darstellung]]. |
|||
<div class="mw-translate-fuzzy"> |
|||
===Allgemein=== |
|||
[[File:Preference_Sketcher_Tab_01.png]] |
|||
</div> |
|||
Diese Seite wurde für Version 1.0 aktualisiert. |
|||
<div class="mw-translate-fuzzy"> |
|||
===Farben=== |
|||
[[File:Preference_Sketcher_Tab_02.png]] |
|||
</div> |
|||
In {{VersionMinus/de|0.21}} hieß die Seite [[#Darstellung|Darstellung]] noch "Farben". |
|||
This option and the following 5 preferences settings can also be specified only for single sketches in the [[Sketcher_Dialog#Edit_controls|sketcher dialog]] section ''Edit controls''. |
|||
<span id="General"></span> |
|||
==Allgemein== |
|||
[[Image:Preferences_Sketcher_Page_General.png|400px]] |
|||
Auf dieser Seite "Allgemein" kann Folgendes festgelegt werden: |
|||
{| class="wikitable float-right mw-collapsible mw-uncollapsed" |
|||
!style="width: 33%;"|Name |
|||
!style="width: 66%;"|Description |
|||
|- |
|- |
||
| {{MenuCommand| |
| {{MenuCommand|Show section 'Advanced solver control'}} |
||
| If checked, the [[Sketcher_Dialog|sketcher dialog]] will show the section ''Advanced solver control'' to adjust solver settings. |
|||
| The distance between two subsequent grid lines. Note that the default value of 0 mm will result in a 10 mm grid. |
|||
|- |
|- |
||
| {{MenuCommand| |
| {{MenuCommand|Improve solving while dragging}} |
||
| If checked, a special solver algorithm will be used while dragging sketch elements. This avoids that the sketch flips around while dragging. It is an improvement for most cases, however for complex sketches this option can increase the time to solve the sketch. |
|||
| If checked, new points will snap to the nearest grid line. Note that the points have already to be close to a grid line that the snap takes effect. The distance is a fifth of the value set for {{MenuCommand|Grid size}}, so for a 10 mm grid, the snapping only occurs if the point is not more than 2 mm away from a grid line. |
|||
'''Note:''' A snapped point has no coincident constraint with the grid point it snapped to. |
|||
|- |
|- |
||
| {{MenuCommand|Auto |
| {{MenuCommand|Auto remove redundants}} |
||
| If checked, new constraints that are redundant are automatically removed. |
|||
| If checked, the sketcher proposes automatically sensible constraints. If you draw for example a [[Sketcher_CreatePolyline|polyline]] [[Image:Sketcher_CreatePolyline.svg|20px]] and point towards the bottom, you will see that the sketcher proposes a vertical constraint:[[Image:Constraint_Vertical.svg|20px]]. If you set now a point the drawn line segment will get the vertical constraint. |
|||
|- |
|- |
||
| {{MenuCommand| |
| {{MenuCommand|Esc can leave sketch edit mode}} |
||
| If checked, the {{KEY|Esc}} key can trigger exiting sketch edit mode. The option to disable this may be useful for users who are used to pressing {{KEY|Esc}} as part of their workflow in other CAD solutions but don't necessarily want to exit a sketch. |
|||
| If checked, the sketcher tries not to propose redundant auto constraints. This option only has an effect if also the option {{MenuCommand|Auto constraints}} is used. |
|||
|- |
|- |
||
| {{MenuCommand| |
| {{MenuCommand|Notify automatic constraint substitutions}} |
||
| If checked, you will be informed with a dialog about constraint substitutions. For example if the endpoints of two arcs are connected with the [[Sketcher_ConstrainCoincident|coincident constraint]] and you reconnect the arcs using the [[Sketcher_ConstrainTangent|tangent constraint]], the coincidence constraint will be substituted by the tangent constraint and you will get a popup dialog telling you this. |
|||
| The order how sketches are rendered. To change it, drag and drop one of the geometries to the top or bottom. |
|||
|- |
|- |
||
| {{MenuCommand| |
| {{MenuCommand|Unify Coincident and PointOnObject}} {{Version|1.0}} |
||
| If checked, the [[Sketcher_ConstrainCoincident|Coincident constraint tool]] and [[Sketcher_ConstrainPointOnObject|PointOnObject constraint tool]] are unified in a [[Sketcher_ConstrainCoincidentUnified|single tool]]. |
|||
| If checked, the [[Sketcher_Dialog|sketcher dialog]] will have the additional section ''Advanced solver control'' to adjust solver settings. |
|||
{{Emphasis|After changing this preference you must restart FreeCAD.}} |
|||
|- |
|- |
||
| {{MenuCommand| |
| {{MenuCommand|Auto tool for Horizontal/Vertical}} {{Version|1.0}} |
||
| If checked, the [[Sketcher_ConstrainHorVer|Automatic horizontal/vertical constraint tool]] is added to the toolbar (it is always available in the menu and through its shortcut), and the [[Sketcher_ConstrainHorizontal|Horizontal constraint tool]] and [[Sketcher_ConstrainVertical|Vertical constraint tool]] are grouped below it in a dropdown. |
|||
| If checked, a special solver algorithm will be used while dragging sketch elements. This avoids that the sketch flips around while dragging. It is an improvement for most cases, however for complex sketches this option can increase the time to solve the sketch. |
|||
{{Emphasis|After changing this preference you must restart FreeCAD.}} |
|||
|- |
|||
| {{MenuCommand|Dimensioning constraints}} {{Version|1.0}} |
|||
| Specifies the dimensional constraint tools for the toolbar (all dimensional tools are always available in the menu and through their shortcuts). The options are: |
|||
* {{MenuCommand|Single tool}}: A combined [[Sketcher_Dimension|Dimension tool]] for all dimensional constraints. The separate tools are grouped below it in a dropdown. |
|||
* {{MenuCommand|Separated tools}}: Only the separate tools. |
|||
* {{MenuCommand|Both}}: Both the combined [[Sketcher_Dimension|Dimension tool]] and the separated tools. |
|||
{{Emphasis|After changing this preference you must restart FreeCAD.}} |
|||
|- |
|||
| {{MenuCommand|Dimension tool diameter/radius mode}} {{Version|1.0}} |
|||
| Specifies how the combined [[Sketcher_Dimension|Dimension tool]] handles circles and arcs. The options are: |
|||
* {{MenuCommand|Auto}}: First apply a radius dimension to arcs and a diameter dimension to circles. Before picking the point that will position the dimension, it is possible to switch with the {{KEY|M}} key. |
|||
* {{MenuCommand|Diameter}}: Always first apply a diameter dimension. Idem. |
|||
* {{MenuCommand|Radius}}: Always first apply a radius dimension. Idem. |
|||
|- |
|||
| {{MenuCommand|On-View-Parameters}} {{Version|1.0}} |
|||
| Specifies the visibility mode for the On-View-Parameters. The options are: |
|||
* {{MenuCommand|Disabled}}: On-View-Parameters are completely disabled. |
|||
* {{MenuCommand|Only dimensional}}: Only dimensional On-View-Parameters are enabled. They are the most useful. For example the radius of a circle. |
|||
* {{MenuCommand|All}}: Both dimensional and positional On-View-Parameters are enabled. Positional parameters are the position of the cursor. For example for the center of a circle. |
|||
|} |
|} |
||
<span id="Grid"></span> |
|||
<div class="mw-translate-fuzzy"> |
|||
===Raster=== |
|||
[[Category:User Documentation/de]] |
|||
</div> |
|||
[[Image:Preferences_Sketcher_Page_Grid.png|400px]] |
|||
Auf dieser Seite kann Folgendes festgelegt werden: |
|||
<div class="mw-translate-fuzzy"> |
|||
[[Category:Sketcher/de]] |
|||
</div> |
|||
{| class="wikitable float-right mw-collapsible mw-uncollapsed" |
|||
In the ''Colors'' tab you can specify the following: |
|||
{| class="wikitable float-right mw-collapsible mw-collapsed" |
|||
!style="width: 33%;"|Name |
!style="width: 33%;"|Name |
||
!style="width: 66%;"|Description |
!style="width: 66%;"|Description |
||
|- |
|- |
||
| {{MenuCommand| |
| {{MenuCommand|Grid}} |
||
| If checked, a grid will be shown while the sketch is in edit mode. Used for new sketches. Is stored in the {{PropertyView|Show Grid}} property of sketches. |
|||
| The color in which sketch edges will be displayed when the sketch is not edited. |
|||
|- |
|||
| {{MenuCommand|Grid Auto Spacing}} |
|||
| If checked, grid spacing is automatically adapted based on the view dimensions. Used for new sketches. Is stored in the {{PropertyView|Grid Auto}} property of sketches. |
|||
|- |
|||
| {{MenuCommand|Grid spacing}} |
|||
| The distance between two subsequent grid lines. Used as a base value if {{MenuCommand|Grid Auto Spacing}} is enabled. Used for new sketches. Is stored in the {{PropertyView|Grid Size}} property of sketches. |
|||
|- |
|||
| {{MenuCommand|Pixel size threshold}} |
|||
| The grid spacing threshold in pixels. Only used if {{MenuCommand|Grid Auto Spacing}} is enabled. If the onscreen spacing is smaller than this value, physical grid spacing is multiplied by the {{MenuCommand|Major grid lines every}} value. If the onscreen spacing is larger than the threshold value times the {{MenuCommand|every}} value, physical grid spacing is divided by the {{MenuCommand|every}} value. If the {{MenuCommand|every}} value is set to 1, 10 is used instead in these calculations. |
|||
|- |
|||
| {{MenuCommand|Minor grid lines}} |
|||
| For minor grid lines you can specify: |
|||
* {{MenuCommand|Line pattern}} |
|||
* {{MenuCommand|Line width}} |
|||
* {{MenuCommand|Line color}} |
|||
|- |
|||
| {{MenuCommand|Major grid lines}} |
|||
| For major grid lines you can specify: |
|||
* {{MenuCommand|Major grid lines every}}: The number of squares between major grid lines. Set to 1 to disable major grid lines. |
|||
* {{MenuCommand|Line pattern}} |
|||
* {{MenuCommand|Line width}} |
|||
* {{MenuCommand|Line color}} |
|||
|} |
|||
<span id="Display"></span> |
|||
Note: Changing the color will only have an effect for new sketches. |
|||
==Anzeige== |
|||
[[Image:Preferences_Sketcher_Page_Display.png|400px]] |
|||
Auf dieser Seite kann Folgendes festgelegt werden: |
|||
{| class="wikitable float-right mw-collapsible mw-uncollapsed" |
|||
!style="width: 33%;"|Name |
|||
!style="width: 66%;"|Description |
|||
|- |
|- |
||
| {{MenuCommand| |
| {{MenuCommand|Font size}} |
||
| The |
| The font size used for the labels and constraints in the sketch. |
||
|- |
|||
| {{MenuCommand|View scale ratio}} {{Version|0.21}} |
|||
| The 3D view is scaled based on this factor. |
|||
|- |
|||
| {{MenuCommand|Segments per geometry}} |
|||
| Curves are approximated by polygon segments for visualization. This value defines the number of segments. The lower limit is 50 segments. Higher values refine the visualization but can lead to longer calculation times, especially for [[Sketcher_CreateBSpline|B-splines]]. |
|||
|- |
|||
| {{MenuCommand|Ask for value after creating a dimensional constraint}} |
|||
| If checked, a dialog will pop up to input a value for new dimensional constraints. |
|||
|- |
|||
| {{MenuCommand|Geometry creation "Continue Mode"}} |
|||
| If checked, geometry creation tools will remain active after creating an element. You can leave a tool any time by right-clicking in the sketch. |
|||
|- |
|||
| {{MenuCommand|Constraint creation "Continue Mode"}} |
|||
| If checked, constraint creation tools will remain active after creating a constraint. You can leave a tool any time by right-clicking in the sketch. |
|||
|- |
|||
| {{MenuCommand|Hide base length units for supported unit systems}} |
|||
| If checked, the length unit from the selected [[Preferences_Editor#Units|unit system]] is used but not displayed in sketch constraints. Only for supported unit systems. |
|||
|- |
|||
| {{MenuCommand|Show coordinates beside cursor while editing}} {{Version|0.21}} |
|||
| If checked, cursor coordinates are displayed beside the cursor while editing a sketch. |
|||
|- |
|||
| {{MenuCommand|Use system decimals setting for cursor coordinates}} {{Version|0.21}} |
|||
| If checked, cursor coordinates will use the system decimals setting instead of the short form. |
|||
|- |
|||
| {{MenuCommand|Show dimensional constraint name with format}} {{Version|0.21}} |
|||
| If checked, the names of dimensional constraints (if available) are displayed using the given format: |
|||
* {{MenuCommand|%N}}: Parameter name. |
|||
* {{MenuCommand|%V}}: Dimension value. |
|||
|- |
|||
| {{MenuCommand|Hide all objects that depend on the sketch}} |
|||
| If checked, all objects that depend on the sketch will be hidden when the sketch is opened. Note that this may have no effect if the {{MenuCommand|Show objects used for external geometry}} and/or {{MenuCommand|Show objects that the sketch is attached to}} options are selected. |
|||
|- |
|||
| {{MenuCommand|Show objects used for external geometry}} |
|||
| If checked, hidden objects used for external geometry will be shown when the sketch is opened. |
|||
|- |
|||
| {{MenuCommand|Show objects that the sketch is attached to}} |
|||
| If checked, hidden objects the sketch is attached to will be shown when the sketch is opened. |
|||
|- |
|||
| {{MenuCommand|Restore camera position after editing}} |
|||
| If checked, the camera position is moved back to where it was before the sketch was opened. |
|||
|- |
|||
| {{MenuCommand|Force orthographic camera when entering edit}} |
|||
| If checked, camera mode will be forced to orthographic when the sketch is opened. Camera mode will be restored when leaving edit mode. This preference is only available if {{MenuCommand|Restore camera position after editing}} is activated. |
|||
|- |
|||
| {{MenuCommand|Open sketch in Section View mode}} |
|||
| If checked, the sketch will open with 'Section View' active. |
|||
|- |
|||
| {{Button|{{MenuCommand|Apply to existing sketches}}}} |
|||
| If pressed, the {{MenuCommand|Visibility automation}} settings will be applied to existing sketches too. Otherwise they will only be used for new sketches. |
|||
|} |
|||
<span id="Appearance"></span> |
|||
Note: Changing the color will only have an effect for new sketches. |
|||
==Darstellung== |
|||
[[Image:Preferences_Sketcher_Page_Appearance.png|400px]] |
|||
Unless otherwise stated these preferences are only used while a sketch is in edit mode. |
|||
Auf dieser Seite kann Folgendes festgelegt werden: |
|||
{| class="wikitable float-right mw-collapsible mw-uncollapsed" |
|||
!style="width: 33%;"|Name |
|||
!style="width: 66%;"|Description |
|||
|- |
|||
| {{MenuCommand|Creating line}} |
|||
| The color used for sketch elements while they are being created. |
|||
|- |
|- |
||
| {{MenuCommand| |
| {{MenuCommand|Coordinate text}} |
||
| The color used while |
| The color used for the coordinates displayed while creating sketch elements. |
||
|- |
|- |
||
| {{MenuCommand| |
| {{MenuCommand|Cursor crosshair}} |
||
| The color |
| The color used for the crosshair cursor displayed while creating sketch elements. |
||
|- |
|- |
||
| {{MenuCommand| |
| {{MenuCommand|Geometry}} {{Version|1.0}} |
||
| The colors used for constrained and unconstrained normal geometry. The line pattern and line width can also be specified. |
|||
| The color in which sketch [[Glossary#Vertex|vertices]] (points) will be displayed when the sketch is edited. |
|||
|- |
|- |
||
| {{MenuCommand|Construction geometry}} |
| {{MenuCommand|Construction geometry}} |
||
| The |
| The colors used for constrained and unconstrained [[Sketcher_ToggleConstruction|construction geometry]]. {{Version|1.0}}: The line pattern and line width can also be specified. |
||
|- |
|||
| {{MenuCommand|Internal alignment edge}} |
|||
| The colors used for constrained and unconstrained [[Sketcher_RestoreInternalAlignmentGeometry|internal alignment edges]]. {{Version|1.0}}: The line pattern and line width can also be specified. |
|||
|- |
|- |
||
| {{MenuCommand|External geometry}} |
| {{MenuCommand|External geometry}} |
||
| The color |
| The color used for [[Sketcher_External|external geometry]]. {{Version|1.0}}: The line pattern and line width can also be specified. |
||
|- |
|- |
||
| {{MenuCommand|Fully constrained |
| {{MenuCommand|Fully constrained Sketch}} |
||
| The color |
| The color used for a fully constrained sketch. |
||
|- |
|- |
||
| {{MenuCommand| |
| {{MenuCommand|Invalid Sketch}} |
||
| The color |
| The color used for an invalid sketch. |
||
|- |
|- |
||
| {{MenuCommand| |
| {{MenuCommand|Constraint symbols}} |
||
| The color |
| The color used for [[Sketcher_ToggleDrivingConstraint|driving geometric constraints]]. |
||
|- |
|- |
||
| {{MenuCommand| |
| {{MenuCommand|Dimensional constraint}} |
||
| The color |
| The color used for [[Sketcher_Dimension|driving dimensional constraints]]. |
||
|- |
|- |
||
| {{MenuCommand| |
| {{MenuCommand|Reference constraint}} |
||
| The color used for [[Sketcher_ToggleDrivingConstraint|reference dimensional constraints]]. |
|||
| The color of deactivated constraints in edit mode. {{Version|0.19}} |
|||
|- |
|- |
||
| {{MenuCommand| |
| {{MenuCommand|Expression dependent constraint}} |
||
| |
| The color used for [[Expressions|expression]] dependent dimensional constraints. |
||
|- |
|- |
||
| {{MenuCommand| |
| {{MenuCommand|Deactivated constraint}} |
||
| The color used for [[Sketcher_ToggleActiveConstraint|deactivated constraints]]. |
|||
| Text color of the coordinates. When creating a new sketch element or when dragging an existing element the coordinates are displayed next to the cursor in the specified color. |
|||
|- |
|- |
||
| {{MenuCommand| |
| {{MenuCommand|Colors outside Sketcher: Vertex}} |
||
| The color |
| The color used for [[Glossary#Vertex|vertices]] (points) when not in edit mode. |
||
|- |
|||
| {{MenuCommand|Colors outside Sketcher: Edge}} |
|||
| The color used for [[Glossary#Edge|edges]] when not in edit mode. |
|||
|} |
|} |
||
The colors for selections while a sketch is in edit mode are controlled by the global settings {{MenuCommand|Enable preselection highlighting}} and {{MenuCommand|Enable selection highlighting}}, see the [[Preferences_Editor#Selection|Preferences Editor]]. |
|||
[[File:Preference_Sketcher_Tab_02.png]] |
|||
<span id="Note"></span> |
|||
==Hinweis== |
|||
Es gibt eine weitere Einstellung, die einen Einfluss auf Skizzen hat. Ist die Einstellung {{MenuCommand|Transparente Objekte}} auf der Registerkarte [[Preferences_Editor/de#3D-Viewer|Anzeige → 3D-Viewer]] auf {{Value|Zusätzlicher Rückseiten-Render-Durchgang}} gesetzt, fehlt auf einigen Systemen die Pfeilspitzen an einem Ende der Skizzenmaße. Von der Rückseite betrachtet kann auch die Maßzahl fehlen. Die Versionen 0.19 bis 0.21 (außer Link-Branch) sind betroffen. In den Versionen 0.19 und 0.20 tritt der Effekt nur dann auf, wenn {{MenuCommand|Raster anzeigen}} im Abschnitt [[Sketcher_Dialog/de#Erweiterte Steuerung des Lösers|Erweiterte Steuerung des Lösers]] im [[Task_panel/de|Aufgaben-Bereich]] deaktiviert wurde, wie unten dargestellt. |
|||
Siehe [https://forum.freecad.org/viewtopic.php?t=70975&start=10 Forumsbeitrag]. |
|||
[[Image:Sketcher-Preferences-Note-Arrowhead-01.png|200px]] [[Image:Sketcher-Preferences-Note-Arrowhead-02.png|200px]] |
|||
{{Caption|Vorderansicht, Raster aktiviert und Raster deaktiviert}} |
|||
[[Image:Sketcher-Preferences-Note-Arrowhead-03.png|200px]] [[Image:Sketcher-Preferences-Note-Arrowhead-04.png|200px]] |
|||
{{Caption|Rückansicht, Raster aktiviert und Raster deaktiviert; die Pfeilspitzen fehlen an den gegenüberliegenden Enden und zusätzlich auch die Maßzahl}} |
|||
{{Docnav |
{{Docnav/de |
||
|[[Sketcher_SwitchVirtualSpace| |
|[[Sketcher_SwitchVirtualSpace/de|VirtuellenBereichWechseln]] |
||
| |
| |
||
|[[Sketcher_Workbench|Sketcher]] |
|[[Sketcher_Workbench/de|Sketcher]] |
||
|IconL= |
|IconL=Sketcher_SwitchVirtualSpace.svg |
||
|IconR= |
|||
|IconC=Workbench_Sketcher.svg |
|IconC=Workbench_Sketcher.svg |
||
|IconR=Freecad.svg |
|||
}} |
}} |
||
{{ |
{{Sketcher_Tools_navi{{#translation:}}}} |
||
{{Userdocnavi{{#translation:}}}} |
{{Userdocnavi{{#translation:}}}} |
||
[[Category:Preferences{{#translation:}}]] |
[[Category:Preferences{{#translation:}}]] |
||
{{clear}} |
|||
Latest revision as of 13:04, 8 May 2024
Die Einstellungen für den Arbeitsbereich Sketcher befinden sich im Voreinstellungseditor. Im Menü wählt man Bearbeiten → Einstellungen... und dann Sketcher.
Es gibt vier Seiten: Allgemein, Raster, Anzeige und Darstellung.
Diese Seite wurde für Version 1.0 aktualisiert.
In Version 0.21 und darunter hieß die Seite Darstellung noch "Farben".
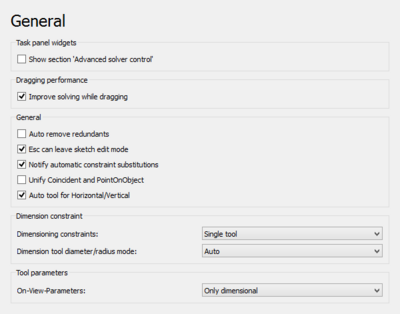
Allgemein
Auf dieser Seite "Allgemein" kann Folgendes festgelegt werden:
| Name | Description |
|---|---|
| Show section 'Advanced solver control' | If checked, the sketcher dialog will show the section Advanced solver control to adjust solver settings. |
| Improve solving while dragging | If checked, a special solver algorithm will be used while dragging sketch elements. This avoids that the sketch flips around while dragging. It is an improvement for most cases, however for complex sketches this option can increase the time to solve the sketch. |
| Auto remove redundants | If checked, new constraints that are redundant are automatically removed. |
| Esc can leave sketch edit mode | If checked, the Esc key can trigger exiting sketch edit mode. The option to disable this may be useful for users who are used to pressing Esc as part of their workflow in other CAD solutions but don't necessarily want to exit a sketch. |
| Notify automatic constraint substitutions | If checked, you will be informed with a dialog about constraint substitutions. For example if the endpoints of two arcs are connected with the coincident constraint and you reconnect the arcs using the tangent constraint, the coincidence constraint will be substituted by the tangent constraint and you will get a popup dialog telling you this. |
| Unify Coincident and PointOnObject introduced in version 1.0 | If checked, the Coincident constraint tool and PointOnObject constraint tool are unified in a single tool.
After changing this preference you must restart FreeCAD. |
| Auto tool for Horizontal/Vertical introduced in version 1.0 | If checked, the Automatic horizontal/vertical constraint tool is added to the toolbar (it is always available in the menu and through its shortcut), and the Horizontal constraint tool and Vertical constraint tool are grouped below it in a dropdown.
After changing this preference you must restart FreeCAD. |
| Dimensioning constraints introduced in version 1.0 | Specifies the dimensional constraint tools for the toolbar (all dimensional tools are always available in the menu and through their shortcuts). The options are:
After changing this preference you must restart FreeCAD. |
| Dimension tool diameter/radius mode introduced in version 1.0 | Specifies how the combined Dimension tool handles circles and arcs. The options are:
|
| On-View-Parameters introduced in version 1.0 | Specifies the visibility mode for the On-View-Parameters. The options are:
|
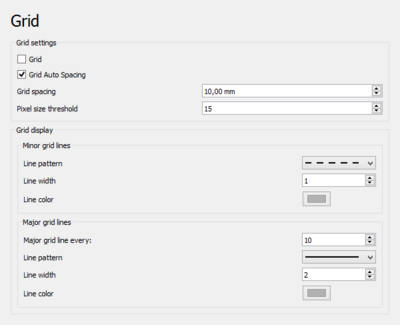
Raster
Auf dieser Seite kann Folgendes festgelegt werden:
| Name | Description |
|---|---|
| Grid | If checked, a grid will be shown while the sketch is in edit mode. Used for new sketches. Is stored in the AnsichtShow Grid property of sketches. |
| Grid Auto Spacing | If checked, grid spacing is automatically adapted based on the view dimensions. Used for new sketches. Is stored in the AnsichtGrid Auto property of sketches. |
| Grid spacing | The distance between two subsequent grid lines. Used as a base value if Grid Auto Spacing is enabled. Used for new sketches. Is stored in the AnsichtGrid Size property of sketches. |
| Pixel size threshold | The grid spacing threshold in pixels. Only used if Grid Auto Spacing is enabled. If the onscreen spacing is smaller than this value, physical grid spacing is multiplied by the Major grid lines every value. If the onscreen spacing is larger than the threshold value times the every value, physical grid spacing is divided by the every value. If the every value is set to 1, 10 is used instead in these calculations. |
| Minor grid lines | For minor grid lines you can specify:
|
| Major grid lines | For major grid lines you can specify:
|
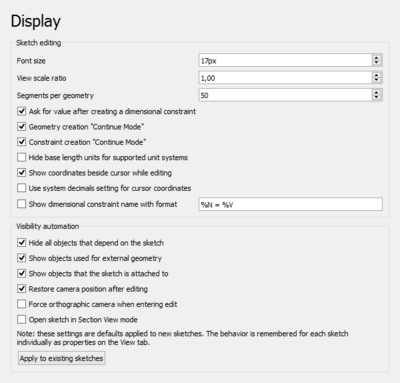
Anzeige
Auf dieser Seite kann Folgendes festgelegt werden:
| Name | Description |
|---|---|
| Font size | The font size used for the labels and constraints in the sketch. |
| View scale ratio introduced in version 0.21 | The 3D view is scaled based on this factor. |
| Segments per geometry | Curves are approximated by polygon segments for visualization. This value defines the number of segments. The lower limit is 50 segments. Higher values refine the visualization but can lead to longer calculation times, especially for B-splines. |
| Ask for value after creating a dimensional constraint | If checked, a dialog will pop up to input a value for new dimensional constraints. |
| Geometry creation "Continue Mode" | If checked, geometry creation tools will remain active after creating an element. You can leave a tool any time by right-clicking in the sketch. |
| Constraint creation "Continue Mode" | If checked, constraint creation tools will remain active after creating a constraint. You can leave a tool any time by right-clicking in the sketch. |
| Hide base length units for supported unit systems | If checked, the length unit from the selected unit system is used but not displayed in sketch constraints. Only for supported unit systems. |
| Show coordinates beside cursor while editing introduced in version 0.21 | If checked, cursor coordinates are displayed beside the cursor while editing a sketch. |
| Use system decimals setting for cursor coordinates introduced in version 0.21 | If checked, cursor coordinates will use the system decimals setting instead of the short form. |
| Show dimensional constraint name with format introduced in version 0.21 | If checked, the names of dimensional constraints (if available) are displayed using the given format:
|
| Hide all objects that depend on the sketch | If checked, all objects that depend on the sketch will be hidden when the sketch is opened. Note that this may have no effect if the Show objects used for external geometry and/or Show objects that the sketch is attached to options are selected. |
| Show objects used for external geometry | If checked, hidden objects used for external geometry will be shown when the sketch is opened. |
| Show objects that the sketch is attached to | If checked, hidden objects the sketch is attached to will be shown when the sketch is opened. |
| Restore camera position after editing | If checked, the camera position is moved back to where it was before the sketch was opened. |
| Force orthographic camera when entering edit | If checked, camera mode will be forced to orthographic when the sketch is opened. Camera mode will be restored when leaving edit mode. This preference is only available if Restore camera position after editing is activated. |
| Open sketch in Section View mode | If checked, the sketch will open with 'Section View' active. |
| Apply to existing sketches | If pressed, the Visibility automation settings will be applied to existing sketches too. Otherwise they will only be used for new sketches. |
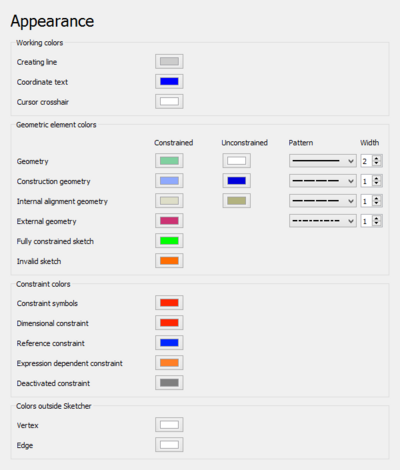
Darstellung
Unless otherwise stated these preferences are only used while a sketch is in edit mode.
Auf dieser Seite kann Folgendes festgelegt werden:
| Name | Description |
|---|---|
| Creating line | The color used for sketch elements while they are being created. |
| Coordinate text | The color used for the coordinates displayed while creating sketch elements. |
| Cursor crosshair | The color used for the crosshair cursor displayed while creating sketch elements. |
| Geometry introduced in version 1.0 | The colors used for constrained and unconstrained normal geometry. The line pattern and line width can also be specified. |
| Construction geometry | The colors used for constrained and unconstrained construction geometry. introduced in version 1.0: The line pattern and line width can also be specified. |
| Internal alignment edge | The colors used for constrained and unconstrained internal alignment edges. introduced in version 1.0: The line pattern and line width can also be specified. |
| External geometry | The color used for external geometry. introduced in version 1.0: The line pattern and line width can also be specified. |
| Fully constrained Sketch | The color used for a fully constrained sketch. |
| Invalid Sketch | The color used for an invalid sketch. |
| Constraint symbols | The color used for driving geometric constraints. |
| Dimensional constraint | The color used for driving dimensional constraints. |
| Reference constraint | The color used for reference dimensional constraints. |
| Expression dependent constraint | The color used for expression dependent dimensional constraints. |
| Deactivated constraint | The color used for deactivated constraints. |
| Colors outside Sketcher: Vertex | The color used for vertices (points) when not in edit mode. |
| Colors outside Sketcher: Edge | The color used for edges when not in edit mode. |
The colors for selections while a sketch is in edit mode are controlled by the global settings Enable preselection highlighting and Enable selection highlighting, see the Preferences Editor.
Hinweis
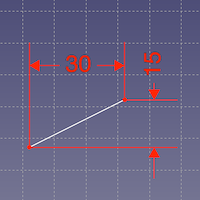
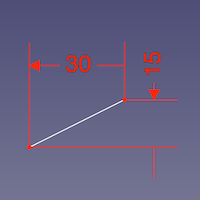
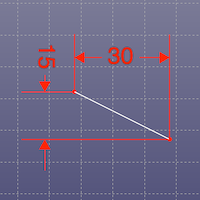
Es gibt eine weitere Einstellung, die einen Einfluss auf Skizzen hat. Ist die Einstellung Transparente Objekte auf der Registerkarte Anzeige → 3D-Viewer auf Zusätzlicher Rückseiten-Render-Durchgang gesetzt, fehlt auf einigen Systemen die Pfeilspitzen an einem Ende der Skizzenmaße. Von der Rückseite betrachtet kann auch die Maßzahl fehlen. Die Versionen 0.19 bis 0.21 (außer Link-Branch) sind betroffen. In den Versionen 0.19 und 0.20 tritt der Effekt nur dann auf, wenn Raster anzeigen im Abschnitt Erweiterte Steuerung des Lösers im Aufgaben-Bereich deaktiviert wurde, wie unten dargestellt.
Siehe Forumsbeitrag.
Vorderansicht, Raster aktiviert und Raster deaktiviert
Rückansicht, Raster aktiviert und Raster deaktiviert; die Pfeilspitzen fehlen an den gegenüberliegenden Enden und zusätzlich auch die Maßzahl
(FIXME)
- Die Werkzeuge: Skizze erstellen, Skizze bearbeiten, Skizze verlassen, Skizze anzeigen, View section, Skizze einer Fläche zuordnen..., Reorient sketch, Skizze überprüfen, Skizzen zusammenführen, Skizze spiegeln
- Skizzen-Geometrien: Punkt, Linie, Bögen erstellen, Bogen, Kreisbogen durch drei Punkte, Kreise erstellen, Kreis, Kreis durch drei Punkte, Kegelförmige Körper erstellen, Ellipse mit Mittelpunkt, Ellipse durch drei Punkte, Ellipsenbogen, Hyperbel erstellen, Parabel erstellen, B-splines erstellen, B-spline, Create periodic B-spline, Linienzug (Mehrpunktlinie), Rechteck, Reguläres Polygon erstellen, Dreieck, Quadrat, Fünfeck, Sechseck, Siebeneck, Achteck, Create Regular Polygon, Nut, Abrundung erstellen, Kante zuschneiden, Verlängern, Externe Geometrie, CarbonCopy, Konstruktionsmodus
- Skizzenbeschränkungen
- Geometrische Beschränkungen Koinzidenz erzwingen, Punkt auf Objekt festlegen, Vertikal, Horizontal, Parallel, Orthogonal, Tangente, Gleichheit, Symmetrisch, Constrain Block
- Dimensional constraints Sperren, Horizontaler Abstand, Vertikaler Abstand, Distanz festlegen, Radius festlegen, Winkel festlegen, Snell's Law, Umschalten auf steuernde Bemaßung,
- Sketcher tools Select solver DOFs, Close Shape, Connect Edges, Select Constraints, Select Origin, Select Vertical Axis, Select Horizontal Axis, Select Redundant Constraints, Select Conflicting Constraints, Select Elements Associated with constraints, Show/Hide internal geometry, Symmetry, Clone, Copy, Move, Rectangular Array, Delete All Geometry, Delete All Constraints
- Sketcher B-spline tools Show/Hide B-spline degree, Show/Hide B-spline control polygon, Show/Hide B-spline curvature comb, Show/Hide B-spline knot multiplicity, Convert Geometry to B-spline, Increase degree, Increase knot multiplicity, Decrease knot multiplicity
- Sketcher virtual space Switch Virtual Space
- Erste Schritte
- Installation: Herunterladen, Windows, Linux, Mac, Zusätzlicher Komponenten, Docker, AppImage, Ubuntu Snap
- Grundlagen: Über FreeCAD, Graphische Oberfläche, Mausbedienung, Auswahlmethoden, Objektname, Programmeinstellungen, Arbeitsbereiche, Dokumentstruktur, Objekteigenschaften, Hilf FreeCAD, Spende
- Hilfe: Tutorien, Video Tutorien
- Arbeitsbereiche: Std Base, Arch, Assembly, CAM, Draft, FEM, Inspection, Mesh, OpenSCAD, Part, PartDesign, Points, Reverse Engineering, Robot, Sketcher, Spreadsheet, Surface, TechDraw, Test Framework
