Sketcher CreatePolyline/es: Difference between revisions
(Updating to match new version of source page) |
(Updating to match new version of source page) |
||
| Line 2: | Line 2: | ||
{{Docnav |
{{Docnav |
||
|[[ |
|[[Sketcher_CreatePeriodicBSplineByInterpolation|Periodic B-spline by knots]] |
||
|[[Sketcher_CompCreateRectangles|Create a rectangle]] |
|[[Sketcher_CompCreateRectangles|Create a rectangle]] |
||
|[[Sketcher_Workbench|Sketcher]] |
|[[Sketcher_Workbench|Sketcher]] |
||
|IconL=Sketcher_CreatePeriodicBSplineByInterpolation.svg |
|||
|IconL=Sketcher_CreatePeriodicBSpline.svg |
|||
|IconR=Sketcher_CompCreateRectangles.png |
|IconR=Sketcher_CompCreateRectangles.png |
||
|IconC=Workbench_Sketcher.svg |
|IconC=Workbench_Sketcher.svg |
||
| Line 14: | Line 14: | ||
</div> |
</div> |
||
<span id="Description"></span> |
|||
==Descripción== |
==Descripción== |
||
| Line 26: | Line 27: | ||
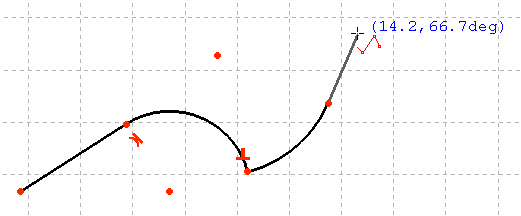
{{Caption|Polyline started with a line, a tangent arc, a perpendicular arc then a tangent line.}} |
{{Caption|Polyline started with a line, a tangent arc, a perpendicular arc then a tangent line.}} |
||
<span id="Usage"></span> |
|||
<div class="mw-translate-fuzzy"> |
<div class="mw-translate-fuzzy"> |
||
==Utilización== |
==Utilización== |
||
| Line 46: | Line 48: | ||
{{Docnav |
{{Docnav |
||
|[[ |
|[[Sketcher_CreatePeriodicBSplineByInterpolation|Periodic B-spline by knots]] |
||
|[[Sketcher_CompCreateRectangles|Create a rectangle]] |
|[[Sketcher_CompCreateRectangles|Create a rectangle]] |
||
|[[Sketcher_Workbench|Sketcher]] |
|[[Sketcher_Workbench|Sketcher]] |
||
|IconL=Sketcher_CreatePeriodicBSplineByInterpolation.svg |
|||
|IconL=Sketcher_CreatePeriodicBSpline.svg |
|||
|IconR=Sketcher_CompCreateRectangles.png |
|IconR=Sketcher_CompCreateRectangles.png |
||
|IconC=Workbench_Sketcher.svg |
|IconC=Workbench_Sketcher.svg |
||
Revision as of 11:02, 3 June 2023
|
|
| Ubicación en el Menú |
|---|
| Croquizador→ Geometrías del croquizador → Crear polilínea |
| Entornos de trabajo |
| Croquizador |
| Atajo de teclado por defecto |
| Ninguno |
| Introducido en versión |
| - |
| Ver también |
| Línea |
Descripción
Esta herramienta trabaja como la herramienta Línea, pero crea segmentos de líneas continuos conectados por sus vértices.
Cuando se inicia la herramienta, el puntero del ratón cambia a una cruz blanca con un icono de polilínea rojo. Las coordenadas del puntero se muestran al lado de este en color azul en tiempo real.
Polyline started with a line, a tangent arc, a perpendicular arc then a tangent line.
Utilización
The polyline always starts with a straight line segment: click - move the mouse - click. Move the mouse again. After placing the first line segment, the Sketcher polyline tool has multiple modes that can be toggled with the M key. For example you can draw tangent or perpendicular arcs following a line or arc segment. Repeatedly pressing the M key toggles through these different modes:
- Press the M key: the new segment is a line which is perpendicular to the previous segment.
- Press the M key again: the new segment is a line which is tangential to the previous segment.
- Press the M key again: the new segment is an arc which is tangential to the previous segment.
- Press the M key again: the new segment is an arc which is perpendicular (left) to the previous segment.
- Press the M key again: the new segment is an arc which is perpendicular(right) to the previous segment.
- Press the M key again: You are again in the state where you started; the line is only connected with a coincidence to the previous segment.
- version 0.18 and above While in any of the arc modes, holding down the Ctrl key (MacOS: CMD key) and moving the cursor causes the arc to snap by increments of 45 degrees, relative to the previously created polyline segment.
- Pick points on an empty area of the 3D view, or on an existing object (auto constraints must be active in TaskView).
- Pressing Esc or clicking the right mouse button before closing the polyline to a loop ends the current polyline and you can continue with a new one. Pressing Esc or clicking the right mouse button again ends the polyline function.
- Pressing Esc or clicking the right mouse button after closing the polyline to a loop ends the polyline function.
- General: Create sketch, Edit sketch, Map sketch to face, Reorient sketch, Validate sketch, Merge sketches, Mirror sketch, Leave sketch, View sketch, View section, Toggle grid, Toggle snap, Configure rendering order, Stop operation
- Sketcher geometries: Point, Line, Arc, Arc by 3 points, Circle, Circle by 3 points, Ellipse, Ellipse by 3 points, Arc of ellipse, Arc of hyperbola, Arc of parabola, B-spline by control points, Periodic B-spline by control points, B-spline by knots, Periodic B-spline by knots, Polyline, Rectangle, Centered rectangle, Rounded rectangle, Triangle, Square, Pentagon, Hexagon, Heptagon, Octagon, Regular polygon, Slot, Fillet, Corner-preserving fillet, Trim, Extend, Split, External geometry, Carbon copy, Toggle construction geometry
- Sketcher constraints:
- Geometric constraints: Coincident, Point on object, Vertical, Horizontal, Parallel, Perpendicular, Tangent, Equal, Symmetric, Block
- Dimensional constraints: Lock, Horizontal distance, Vertical distance, Distance, Radius or weight, Diameter, Auto radius/diameter, Angle, Refraction (Snell's law)
- Constraint tools: Toggle driving/reference constraint, Activate/deactivate constraint
- Sketcher tools: Select unconstrained DoF, Select associated constraints, Select associated geometry, Select redundant constraints, Select conflicting constraints, Show/hide internal geometry, Select origin, Select horizontal axis, Select vertical axis, Symmetry, Clone, Copy, Move, Rectangular array, Remove axes alignment, Delete all geometry, Delete all constraints
- Sketcher B-spline tools: Show/hide B-spline degree, Show/hide B-spline control polygon, Show/hide B-spline curvature comb, Show/hide B-spline knot multiplicity, Show/hide B-spline control point weight, Convert geometry to B-spline, Increase B-spline degree, Decrease B-spline degree, Increase knot multiplicity, Decrease knot multiplicity, Insert knot, Join curves
- Sketcher virtual space: Switch virtual space
- Additional: Sketcher Dialog, Preferences, Sketcher scripting
- Getting started
- Installation: Download, Windows, Linux, Mac, Additional components, Docker, AppImage, Ubuntu Snap
- Basics: About FreeCAD, Interface, Mouse navigation, Selection methods, Object name, Preferences, Workbenches, Document structure, Properties, Help FreeCAD, Donate
- Help: Tutorials, Video tutorials
- Workbenches: Std Base, Arch, Assembly, CAM, Draft, FEM, Inspection, Mesh, OpenSCAD, Part, PartDesign, Points, Reverse Engineering, Robot, Sketcher, Spreadsheet, Surface, TechDraw, Test Framework
- Hubs: User hub, Power users hub, Developer hub
