Sketcher ConstrainRadius/cs: Difference between revisions
(Updating to match new version of source page) |
(Updating to match new version of source page) |
||
| (One intermediate revision by the same user not shown) | |||
| Line 2: | Line 2: | ||
{{Docnav |
{{Docnav |
||
|[[ |
|[[Sketcher_ConstrainRadiam|Auto radius/diameter]] |
||
|[[Sketcher_ConstrainDiameter|Diameter]] |
|[[Sketcher_ConstrainDiameter|Diameter]] |
||
|[[Sketcher_Workbench|Sketcher]] |
|[[Sketcher_Workbench|Sketcher]] |
||
|IconL= |
|IconL=Sketcher_ConstrainRadiam.svg |
||
|IconR=Sketcher_ConstrainDiameter.svg |
|IconR=Sketcher_ConstrainDiameter.svg |
||
|IconC=Workbench_Sketcher.svg |
|IconC=Workbench_Sketcher.svg |
||
| Line 20: | Line 20: | ||
</div> |
</div> |
||
The [[Image:Sketcher_ConstrainRadius.svg|24px]] [[Sketcher_ConstrainRadius|Sketcher ConstrainRadius]] tool fixes the radius of circles, arcs and [[Sketcher_CreateBSpline#Notes|B-spline weight circles]]. |
|||
This constraint constrains the value of the radius of a circle or arc to have a specific value. If more than one circle or arc is selected before launching the command : |
|||
* If the constrain is applied in 'Reference' mode, a new reference constrain is added to each object separately according above rules |
|||
* If the constrain is applied in 'Normal' (driving) mode, following rules are applied |
|||
** A reference constrain is applied separately on each object which is an external geometry |
|||
** {{Button|[[File:Sketcher_ConstrainEqual.svg|16px]] [[Sketcher_ConstrainEqual|Equal constrains]]}} are applied sequentially between all real/construction geometry objects and a dimensional constrain is applied to the first selected object according above rules |
|||
NB : B-spline poles can't be mixed with other object type in the selection |
|||
[[File:Sketcher ConstrainRadius example.png]] |
[[File:Sketcher ConstrainRadius example.png]] |
||
| Line 46: | Line 41: | ||
</div> |
</div> |
||
See also: [[Sketcher_Workbench#Drawing_aids|Drawing aids]]. |
|||
# Pick one or more circles or arcs. |
|||
| ⚫ | |||
# A pop up dialog opens to edit or confirm the value. Press {{Button|OK}} to validate. In case multiple circles/arcs were selected, all constraints will adopt this value. Edit their separate values by double-clicking on the dimension label in the 3D view; or in the Constraints list, double-click on the constraint or right-click and select '''Change value'''. |
|||
# Optionally the dimension label and line can be moved and rotated in the 3D view by clicking on the value and dragging while keeping the left mouse button pressed. |
|||
===[[Sketcher_Workbench#Continue_modes|Continue mode]]=== |
|||
'''Note:''' the constraint tool can also be started with no prior selection. By default the command will be in continue mode to create new constraints; press the right mouse button or {{KEY|Esc}} once to quit the command. |
|||
# Make sure there is no selection. |
|||
# There are several ways to invoke the tool: |
|||
#* {{Version|1.0}}: If the {{MenuCommand|Dimensioning constraints}} [[Sketcher_Preferences#General|preference]] is set to {{Value|Single tool}} (default): press the down arrow to the right of the {{Button|[[Image:Sketcher_Dimension.svg||x16px]][[Image:Toolbar_flyout_arrow.svg|x16px]]}} button and select the {{MenuCommand|[[Image:Sketcher_ConstrainRadius.svg|16px]] Constrain radius}} option from the dropdown. |
|||
| ⚫ | |||
#* Select the {{MenuCommand|Sketch → Sketcher constraints → [[Image:Sketcher_ConstrainRadius.svg|16px]] Constrain radius}} option from the menu. |
|||
#* {{Version|1.0}}: Right-click in the [[3D_view|3D view]] and select the {{MenuCommand|Dimension → [[Image:Sketcher_ConstrainRadius.svg|16px]] Constrain radius}} option from the context menu. |
|||
#* Use the keyboard shortcut: {{KEY|K}} then {{KEY|R}}. |
|||
# For further steps see [[Sketcher_ConstrainRadiam#Continue_mode|Sketcher ConstrainRadiam]]. |
|||
===Run-once mode=== |
|||
See [[Sketcher_ConstrainRadiam#Once-only_mode|Sketcher ConstrainRadiam]]. |
|||
== Scripting == |
== Scripting == |
||
| Line 61: | Line 66: | ||
{{Docnav |
{{Docnav |
||
|[[ |
|[[Sketcher_ConstrainRadiam|Auto radius/diameter]] |
||
|[[Sketcher_ConstrainDiameter|Diameter]] |
|[[Sketcher_ConstrainDiameter|Diameter]] |
||
|[[Sketcher_Workbench|Sketcher]] |
|[[Sketcher_Workbench|Sketcher]] |
||
|IconL= |
|IconL=Sketcher_ConstrainRadiam.svg |
||
|IconR=Sketcher_ConstrainDiameter.svg |
|IconR=Sketcher_ConstrainDiameter.svg |
||
|IconC=Workbench_Sketcher.svg |
|IconC=Workbench_Sketcher.svg |
||
Latest revision as of 15:16, 23 April 2024
|
|
| Umístění Menu |
|---|
| Sketch → Sketcher constraints → Constrain radius |
| Pracovní stoly |
| Náčrt, Návrh dílu |
| Výchozí zástupce |
| Nikdo |
| Představen ve verzi |
| - |
| Viz také |
| Vazba délky, Vazba vodorovnosti, Vazba svislosti |
Popis
Tato vazba nastavuje hodnotu poloměru kružnice nebo oblouku na zadanou hodnotu. Najednou může být nastavena hodnota pouze pro jednu kružnici nebo jeden obklouk.
The Sketcher ConstrainRadius tool fixes the radius of circles, arcs and B-spline weight circles.
Postup

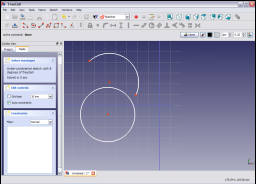
Kliknutím vyberte oblouk nebo kružnici v náčrtu ( vybraná položka bude mít tmavězelenou barvu).

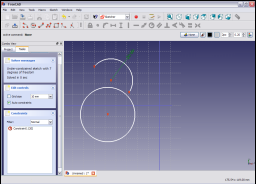
Aplikujte vazbu kliknutím na ikonu vazby poloměru ![]() v nástrojovém pruhu Náčrtu nebo výběrem položky Vazba poloměru v submenu Vazby náčrtu v menu Náčrtu (nebo Návrhu dílu, závisí ve které pracovní ploše jste - Náčrt nebo Navrh dílu).
v nástrojovém pruhu Náčrtu nebo výběrem položky Vazba poloměru v submenu Vazby náčrtu v menu Náčrtu (nebo Návrhu dílu, závisí ve které pracovní ploše jste - Náčrt nebo Navrh dílu).

Poloměr je zafixován na aktuální hodnotu poloměru.
Hodnotu nastavení změníte buď dvojklikem na vazbu ve 3D zobrazení (změna barvy na červenou indikuje, že vazba je vybrána) nebo dvojklikem na vazbu v panelu vazeb záložky Nástroje v rozbalovacím pohledu.
Tím zobrazíte vyskakovací dialogové okno.

Zadáte požadovanou hodnotu poloměru do dialogového okna a kliknete na OK a tak nastavíte hodnotu vazby.

Vazba je nastavena na hodnotu zadanou v dialogovém okně.
See also: Drawing aids.
Continue mode
- Make sure there is no selection.
- There are several ways to invoke the tool:
- introduced in version 1.0: If the Dimensioning constraints preference is set to
Single tool(default): press the down arrow to the right of thebutton and select the
Constrain radius option from the dropdown.
- If this preference has a different value (and in version 0.21 and below): press the
Constrain radius button.
- Select the Sketch → Sketcher constraints →
Constrain radius option from the menu.
- introduced in version 1.0: Right-click in the 3D view and select the Dimension →
Constrain radius option from the context menu.
- Use the keyboard shortcut: K then R.
- introduced in version 1.0: If the Dimensioning constraints preference is set to
- For further steps see Sketcher ConstrainRadiam.
Run-once mode
Scripting
Sketch.addConstraint(Sketcher.Constraint('Radius', ArcOrCircle, App.Units.Quantity('123.0 mm')))
The Sketcher scripting page explains the values which can be used for ArcOrCircle, and contains further examples on how to create constraints from Python scripts.
- General: Create sketch, Edit sketch, Map sketch to face, Reorient sketch, Validate sketch, Merge sketches, Mirror sketch, Leave sketch, View sketch, View section, Toggle grid, Toggle snap, Configure rendering order, Stop operation
- Sketcher geometries: Point, Line, Arc, Arc by 3 points, Circle, Circle by 3 points, Ellipse, Ellipse by 3 points, Arc of ellipse, Arc of hyperbola, Arc of parabola, B-spline by control points, Periodic B-spline by control points, B-spline by knots, Periodic B-spline by knots, Polyline, Rectangle, Centered rectangle, Rounded rectangle, Triangle, Square, Pentagon, Hexagon, Heptagon, Octagon, Regular polygon, Slot, Fillet, Corner-preserving fillet, Trim, Extend, Split, External geometry, Carbon copy, Toggle construction geometry
- Sketcher constraints:
- Geometric constraints: Coincident, Point on object, Vertical, Horizontal, Parallel, Perpendicular, Tangent, Equal, Symmetric, Block
- Dimensional constraints: Lock, Horizontal distance, Vertical distance, Distance, Radius or weight, Diameter, Auto radius/diameter, Angle, Refraction (Snell's law)
- Constraint tools: Toggle driving/reference constraint, Activate/deactivate constraint
- Sketcher tools: Select unconstrained DoF, Select associated constraints, Select associated geometry, Select redundant constraints, Select conflicting constraints, Show/hide internal geometry, Select origin, Select horizontal axis, Select vertical axis, Symmetry, Clone, Copy, Move, Rectangular array, Remove axes alignment, Delete all geometry, Delete all constraints
- Sketcher B-spline tools: Show/hide B-spline degree, Show/hide B-spline control polygon, Show/hide B-spline curvature comb, Show/hide B-spline knot multiplicity, Show/hide B-spline control point weight, Convert geometry to B-spline, Increase B-spline degree, Decrease B-spline degree, Increase knot multiplicity, Decrease knot multiplicity, Insert knot, Join curves
- Sketcher virtual space: Switch virtual space
- Additional: Sketcher Dialog, Preferences, Sketcher scripting
- Getting started
- Installation: Download, Windows, Linux, Mac, Additional components, Docker, AppImage, Ubuntu Snap
- Basics: About FreeCAD, Interface, Mouse navigation, Selection methods, Object name, Preferences, Workbenches, Document structure, Properties, Help FreeCAD, Donate
- Help: Tutorials, Video tutorials
- Workbenches: Std Base, Arch, Assembly, CAM, Draft, FEM, Inspection, Mesh, OpenSCAD, Part, PartDesign, Points, Reverse Engineering, Robot, Sketcher, Spreadsheet, Start, Surface, TechDraw, Test Framework, Web
- Hubs: User hub, Power users hub, Developer hub
