Sketcher ConstrainAngle/es: Difference between revisions
Emagdalena (talk | contribs) m (Languages spanish) |
(Updating to match new version of source page) |
||
| (32 intermediate revisions by 4 users not shown) | |||
| Line 1: | Line 1: | ||
<languages/> |
|||
{{GuiCommand/es|Name=Constraint InternalAngle|Workbenches=[[Sketcher Workbench/es|Croquizador]], [[PartDesign Workbench/es|Diseño de Piezas]]|Shortcut=A|MenuLocation=Croquizador → Restricciones del Croquizador → Restricción angular|SeeAlso=[[Constraint Length/es|Restricción distancia]], [[Constraint Perpendicular/es|Restricción perpendicular]]}} |
|||
{{Docnav |
|||
====Descripción==== |
|||
|[[Sketcher_ConstrainDiameter|Diameter]] |
|||
|[[Sketcher_ConstrainLock|Lock]] |
|||
|[[Sketcher_Workbench|Sketcher]] |
|||
|IconL=Sketcher_ConstrainDiameter.svg |
|||
|IconR=Sketcher_ConstrainLock.svg |
|||
|IconC=Workbench_Sketcher.svg |
|||
}} |
|||
<div class="mw-translate-fuzzy"> |
|||
Esta herramienta restringe el ángulo entre dos líneas seleccionadas en un croquis a un valor especificado. Por defecto, el ángulo interno, el menor de los ángulos formados en la intersección de dos líneas (o sus extensiones) es restringido. |
|||
{{GuiCommand/es |
|||
Si se selecciona una única línea, el ángulo es restringido respecto al eje horizontal del planos de croquis seleccionado |
|||
|Name=Constraint InternalAngle |
|||
|Name/es=Constraint InternalAngle |
|||
|Workbenches=[[Sketcher Workbench/es|Croquizador]], [[PartDesign Workbench/es|Diseño de Piezas]] |
|||
|Shortcut=A |
|||
|MenuLocation=Croquizador → Restricciones del Croquizador → Restricción angular |
|||
|SeeAlso=[[Sketcher_ConstrainDistance/es|Restricción distancia]], [[Sketcher_ConstrainPerpendicular/es|Restricción perpendicular]] |
|||
}} |
|||
</div> |
|||
==Description== |
|||
====Funcionamiento==== |
|||
The [[Image:Sketcher_ConstrainAngle.svg|24px]] [[Sketcher_ConstrainAngle|Sketcher ConstrainAngle]] tool fixes the angle between two edges (lines are then treated as infinite, and open curves are virtually extended as well), the angle of a line with the horizontal axis of the sketch, or the aperture angle of a circular arc. |
|||
Selecciona dos líneas cualquiera en el croquis. Su color cambiará a verde oscuro cuando esteń seleccionadas. La dirección de la línea desde el primer punto creado al punto final es significativa en los cálculos del ángulo entre las líneas. |
|||
==Usage== |
|||
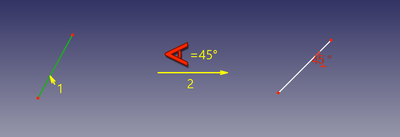
[[File:ConstrainAngle1.png|256px|<span title="Selected lines"></span>]] |
|||
See also: [[Sketcher_Workbench#Drawing_aids|Drawing aids]]. |
|||
Luego pulsa el icono de la restricción angular([[Image:Constraint_InternalAngle.png|16px]]) en la barra de herramientas del Croquizador o Diseño de Piezas o selecciona el elemento de menú de la restricción angular dentro del submenú de restricciones del Croquizador que se encuentra en el menú del Croquizador (entorno del Croquizador) o en el menú Diseño de Pieza (entorno de Diseño de Pieza) para añadir la restricción. |
|||
===[[Sketcher_Workbench#Continue_modes|Continue mode]]=== |
|||
La restricción se establece inicialmente con el valor del ángulo interno actual entre las líneas y la restricción se añade a la pestaña de Tareas del Panel. |
|||
# Make sure there is no selection. |
|||
[[File:ConstrainAngle2.png|256px|<span title="Constraint applied"></span>]] |
|||
# There are several ways to invoke the tool: |
|||
#* {{Version|1.0}}: If the {{MenuCommand|Dimensioning constraints}} [[Sketcher_Preferences#General|preference]] is set to {{Value|Single tool}} (default): press the down arrow to the right of the {{Button|[[Image:Sketcher_Dimension.svg||x16px]][[Image:Toolbar_flyout_arrow.svg|x16px]]}} button and select the {{MenuCommand|[[Image:Sketcher_ConstrainAngle.svg|16px]] Constrain angle}} option from the dropdown. |
|||
#* If this preference has a different value (and in {{VersionMinus|0.21}}): press the {{Button|[[Image:Sketcher_ConstrainAngle.svg|16px]] [[Sketcher_ConstrainAngle|Constrain angle]]}} button. |
|||
#* Select the {{MenuCommand|Sketch → Sketcher constraints → [[Image:Sketcher_ConstrainAngle.svg|16px]] Constrain angle}} option from the menu. |
|||
#* {{Version|1.0}}: Right-click in the [[3D_view|3D view]] and select the {{MenuCommand|Dimension → [[Image:Sketcher_ConstrainAngle.svg|16px]] Constrain angle}} option from the context menu. |
|||
#* Use the keyboard shortcut: {{KEY|K}} then {{KEY|A}}. |
|||
# The cursor changes to a cross with the tool icon. |
|||
# Do one of the following: |
|||
#* Select two lines. |
|||
#* Select a point and two edges (in that order). |
|||
#* Select an edge, a point and an edge (idem). |
|||
# If a [[Sketcher_ToggleDrivingConstraint|driving dimensional constraint]] is created, depending on the [[Sketcher_Preferences#Display|preferences]], a dialog opens to [[Sketcher_Workbench#Edit_constraints|edit its value]]. A negative value will reverse the angle direction. |
|||
# An Angle constraint is added. If a point and two edges have been selected, up to two [[Sketcher_ConstrainPointOnObject|Point to object constraints]] can also be added. See [[#Between_two_edges_at_point|Examples]]. |
|||
# Optionally keep creating constraints. |
|||
# To finish, right-click or press {{KEY|Esc}}, or start another geometry or constraint creation tool. |
|||
===Run-once mode=== |
|||
Haciendo doble clic en la restricción en la pestaña de Tareas se mostrará un letrero de diálogo en el cual se puede editar para establecer el valor deseado. También se puede hacer doble clic en el texto del valor en la vista 3D diálogo anterior. |
|||
# Do one of the following: |
|||
[[File:ConstrainAngle3.png|256px|<span title="Editing value"></span>]] |
|||
#* Select a single line. |
|||
#* Select a single circular arc. |
|||
#* Select two lines. |
|||
#* Select a point and two edges (in any order). |
|||
# Invoke the tool as explained above. |
|||
# Optionally [[Sketcher_Workbench#Edit_constraints|edit the constraint value]]. |
|||
# An Angle constraint is added. If a point and two edges have been selected, up to two [[Sketcher_ConstrainPointOnObject|Point on object constraints]] can also be added. See [[#Between_two_edges_at_point|Examples]]. |
|||
==Examples== |
|||
[[File:ConstrainAngle4.png|256px|<span title="Constraint applied"></span>]] |
|||
===Single line=== |
|||
El valor se puede establecer a valores superiores a 180º (e incluso 360º), en cuyo caso se convierte en una restricción del ángulo exterior. |
|||
[[Image:Sketcher_ConsraintAngle_mode1.png|400px]] |
|||
El modo absoluto se invoca seleccionando sólo una línea antes de aplicar la restricción. |
|||
The angle of the line with the positive X axis of the sketch is fixed. |
|||
[[File:ConstrainAngle5.png|256px|<span title="Constraint applied"></span>]] |
|||
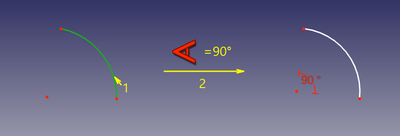
===Single circular arc=== |
|||
Al aplicar la restricción, el ángulo se restringe con respecto al eje horizontal del plano de croquis seleccionado. |
|||
[[Image:Sketcher_ConsraintAngle_mode2.png|400px]] |
|||
[[File:ConstrainAngle6.png|256px|<span title="Constraint applied"></span>]] |
|||
The aperture angle of the arc is fixed. |
|||
Seleccionando la segunda línea que se ha dibujado desde la esquina superior derecha a la inferior izquierda. |
|||
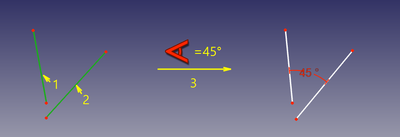
===Between two lines=== |
|||
[[File:ConstrainAngle7.png|256px|<span title="Constraint applied"></span>]] |
|||
[[Image:Sketcher_ConsraintAngle_mode3.png|400px]] |
|||
Y aplicando la restricción como se hizo antes, |
|||
The angle between the two lines is fixed. It is not required that the lines intersect. |
|||
[[File:ConstrainAngle8.png|256px|<span title="Constraint applied"></span>]] |
|||
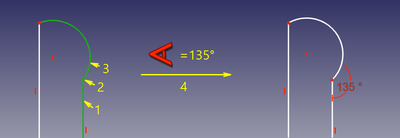
===Between two edges at point=== |
|||
la línea se restringe ahora a tener un valor relativo a la dirección del eje horizontal en el sentido de las agujas del reloj (los valores angulares están restringidos a 180 grados en sentido horario o antihorario). |
|||
[[Image:Sketcher_ConsraintAngle_mode4.png|400px]] |
|||
Como antes haciendo doble clic en la restricción tanto en la pestaña de Tareas o en la vista 3D permitirá editar el valor del ángulo restringido. |
|||
The angle between the two edges at a given point is fixed. The point can be any point, e.g. the center of a circle, the endpoint of an edge, or the origin, it can belong to either or both edges, and it can also be a [[Sketcher_CreatePoint|Point object]]. If required [[Sketcher_ConstrainPointOnObject|Point on object constraint(s)]] are added to ensure the point lies on both (extended) edges. These additional constraints are called [[Sketcher_helper_constraint|helper constraints]]. |
|||
{{languages/es | {{en|Constraint_InternalAngle}} }} |
|||
==Scripting== |
|||
Angle Constraint can be created from [[Macros|macros]] and from the [[Python|Python]] console by using the following: |
|||
{{Code|code= |
|||
# line slope angle |
|||
Sketch.addConstraint(Sketcher.Constraint('Angle',iline,angle)) |
|||
# angular span of arc |
|||
Sketch.addConstraint(Sketcher.Constraint('Angle',iarc,angle)) |
|||
# angle between lines |
|||
Sketch.addConstraint(Sketcher.Constraint('Angle',iline1,pointpos1,iline2,pointpos2,angle)) |
|||
# angle-via-point (no helper constraints are added automatically when from python) |
|||
Sketch.addConstraint(Sketcher.Constraint('AngleViaPoint',icurve1,icurve2,geoidpoint,pointpos,angle)) |
|||
}} |
|||
where: |
|||
:* {{incode|Sketch}} is a sketch object |
|||
:* {{incode|iline, iline1, iline2}} are integers specifying the lines by their ordinal numbers in {{incode|Sketch}}. |
|||
:* {{incode|pointpos1, pointpos2}} should be 1 for start point and 2 for end point. The choice of endpoints allows to set internal angle (or external), and it affects how the constraint is drawn on the screen. |
|||
:* {{incode|geoidpoint}} and {{incode|pointpos}} in {{incode|AngleViaPoint}} are the indexes specifying the point of intersection. |
|||
:* {{incode|angle}} is the angle value in radians. The angle is counted between tangent vectors in counterclockwise direction. Tangent vectors are pointing from start to end for the lines (or vice versa if ending point is supplied in angle between lines mode), and along counterclockwise direction for circles, arcs and ellipses. Quantity is also accepted as an angle (e.g. {{incode|App.Units.Quantity('45 deg')}}) |
|||
The [[Sketcher_scripting|Sketcher scripting]] page explains the values which can be used for {{incode|iline}}, {{incode|iline1}}, {{incode|iline2}}, {{incode|pointpos1}}, {{incode|pointpos2}}, {{incode|geoidpoint}} and {{incode|pointpos}} and contains further examples on how to create constraints from Python scripts. |
|||
{{Docnav |
|||
|[[Sketcher_ConstrainDiameter|Diameter]] |
|||
|[[Sketcher_ConstrainLock|Lock]] |
|||
|[[Sketcher_Workbench|Sketcher]] |
|||
|IconL=Sketcher_ConstrainDiameter.svg |
|||
|IconR=Sketcher_ConstrainLock.svg |
|||
|IconC=Workbench_Sketcher.svg |
|||
}} |
|||
{{Sketcher_Tools_navi{{#translation:}}}} |
|||
{{Userdocnavi{{#translation:}}}} |
|||
Latest revision as of 13:42, 24 April 2024
|
|
| Ubicación en el Menú |
|---|
| Croquizador → Restricciones del Croquizador → Restricción angular |
| Entornos de trabajo |
| Croquizador, Diseño de Piezas |
| Atajo de teclado por defecto |
| A |
| Introducido en versión |
| - |
| Ver también |
| Restricción distancia, Restricción perpendicular |
Description
The Sketcher ConstrainAngle tool fixes the angle between two edges (lines are then treated as infinite, and open curves are virtually extended as well), the angle of a line with the horizontal axis of the sketch, or the aperture angle of a circular arc.
Usage
See also: Drawing aids.
Continue mode
- Make sure there is no selection.
- There are several ways to invoke the tool:
- introduced in version 1.0: If the Dimensioning constraints preference is set to
Single tool(default): press the down arrow to the right of thebutton and select the
Constrain angle option from the dropdown.
- If this preference has a different value (and in version 0.21 and below): press the
Constrain angle button.
- Select the Sketch → Sketcher constraints →
Constrain angle option from the menu.
- introduced in version 1.0: Right-click in the 3D view and select the Dimension →
Constrain angle option from the context menu.
- Use the keyboard shortcut: K then A.
- introduced in version 1.0: If the Dimensioning constraints preference is set to
- The cursor changes to a cross with the tool icon.
- Do one of the following:
- Select two lines.
- Select a point and two edges (in that order).
- Select an edge, a point and an edge (idem).
- If a driving dimensional constraint is created, depending on the preferences, a dialog opens to edit its value. A negative value will reverse the angle direction.
- An Angle constraint is added. If a point and two edges have been selected, up to two Point to object constraints can also be added. See Examples.
- Optionally keep creating constraints.
- To finish, right-click or press Esc, or start another geometry or constraint creation tool.
Run-once mode
- Do one of the following:
- Select a single line.
- Select a single circular arc.
- Select two lines.
- Select a point and two edges (in any order).
- Invoke the tool as explained above.
- Optionally edit the constraint value.
- An Angle constraint is added. If a point and two edges have been selected, up to two Point on object constraints can also be added. See Examples.
Examples
Single line
The angle of the line with the positive X axis of the sketch is fixed.
Single circular arc
The aperture angle of the arc is fixed.
Between two lines
The angle between the two lines is fixed. It is not required that the lines intersect.
Between two edges at point
The angle between the two edges at a given point is fixed. The point can be any point, e.g. the center of a circle, the endpoint of an edge, or the origin, it can belong to either or both edges, and it can also be a Point object. If required Point on object constraint(s) are added to ensure the point lies on both (extended) edges. These additional constraints are called helper constraints.
Scripting
Angle Constraint can be created from macros and from the Python console by using the following:
# line slope angle
Sketch.addConstraint(Sketcher.Constraint('Angle',iline,angle))

# angular span of arc
Sketch.addConstraint(Sketcher.Constraint('Angle',iarc,angle))

# angle between lines
Sketch.addConstraint(Sketcher.Constraint('Angle',iline1,pointpos1,iline2,pointpos2,angle))

# angle-via-point (no helper constraints are added automatically when from python)
Sketch.addConstraint(Sketcher.Constraint('AngleViaPoint',icurve1,icurve2,geoidpoint,pointpos,angle))
where:
Sketchis a sketch objectiline, iline1, iline2are integers specifying the lines by their ordinal numbers inSketch.pointpos1, pointpos2should be 1 for start point and 2 for end point. The choice of endpoints allows to set internal angle (or external), and it affects how the constraint is drawn on the screen.geoidpointandpointposinAngleViaPointare the indexes specifying the point of intersection.angleis the angle value in radians. The angle is counted between tangent vectors in counterclockwise direction. Tangent vectors are pointing from start to end for the lines (or vice versa if ending point is supplied in angle between lines mode), and along counterclockwise direction for circles, arcs and ellipses. Quantity is also accepted as an angle (e.g.App.Units.Quantity('45 deg'))
The Sketcher scripting page explains the values which can be used for iline, iline1, iline2, pointpos1, pointpos2, geoidpoint and pointpos and contains further examples on how to create constraints from Python scripts.
- General: Create sketch, Edit sketch, Map sketch to face, Reorient sketch, Validate sketch, Merge sketches, Mirror sketch, Leave sketch, View sketch, View section, Toggle grid, Toggle snap, Configure rendering order, Stop operation
- Sketcher geometries: Point, Line, Arc, Arc by 3 points, Circle, Circle by 3 points, Ellipse, Ellipse by 3 points, Arc of ellipse, Arc of hyperbola, Arc of parabola, B-spline by control points, Periodic B-spline by control points, B-spline by knots, Periodic B-spline by knots, Polyline, Rectangle, Centered rectangle, Rounded rectangle, Triangle, Square, Pentagon, Hexagon, Heptagon, Octagon, Regular polygon, Slot, Fillet, Corner-preserving fillet, Trim, Extend, Split, External geometry, Carbon copy, Toggle construction geometry
- Sketcher constraints:
- Geometric constraints: Coincident, Point on object, Vertical, Horizontal, Parallel, Perpendicular, Tangent, Equal, Symmetric, Block
- Dimensional constraints: Lock, Horizontal distance, Vertical distance, Distance, Radius or weight, Diameter, Auto radius/diameter, Angle, Refraction (Snell's law)
- Constraint tools: Toggle driving/reference constraint, Activate/deactivate constraint
- Sketcher tools: Select unconstrained DoF, Select associated constraints, Select associated geometry, Select redundant constraints, Select conflicting constraints, Show/hide internal geometry, Select origin, Select horizontal axis, Select vertical axis, Symmetry, Clone, Copy, Move, Rectangular array, Remove axes alignment, Delete all geometry, Delete all constraints
- Sketcher B-spline tools: Show/hide B-spline degree, Show/hide B-spline control polygon, Show/hide B-spline curvature comb, Show/hide B-spline knot multiplicity, Show/hide B-spline control point weight, Convert geometry to B-spline, Increase B-spline degree, Decrease B-spline degree, Increase knot multiplicity, Decrease knot multiplicity, Insert knot, Join curves
- Sketcher virtual space: Switch virtual space
- Additional: Sketcher Dialog, Preferences, Sketcher scripting
- Getting started
- Installation: Download, Windows, Linux, Mac, Additional components, Docker, AppImage, Ubuntu Snap
- Basics: About FreeCAD, Interface, Mouse navigation, Selection methods, Object name, Preferences, Workbenches, Document structure, Properties, Help FreeCAD, Donate
- Help: Tutorials, Video tutorials
- Workbenches: Std Base, Arch, Assembly, CAM, Draft, FEM, Inspection, Mesh, OpenSCAD, Part, PartDesign, Points, Reverse Engineering, Robot, Sketcher, Spreadsheet, Surface, TechDraw, Test Framework
- Hubs: User hub, Power users hub, Developer hub


