Part Torus/ro: Difference between revisions
(Updating to match new version of source page) |
(Updating to match new version of source page) |
||
| (One intermediate revision by the same user not shown) | |||
| Line 28: | Line 28: | ||
</div> |
</div> |
||
A Part Torus can be turned into a segment of a torus by changing its {{PropertyData|Angle3}} property. By changing its {{PropertyData|Angle1}} and/or {{PropertyData|Angle2}} properties the swept profile can become a segment of a circle. |
|||
[[File:SimpleTorus.jpg|400px]] |
|||
[[Image:Part_Torus_Example.png|400px]] |
|||
<div class="mw-translate-fuzzy"> |
<div class="mw-translate-fuzzy"> |
||
| Line 39: | Line 41: | ||
</div> |
</div> |
||
| ⚫ | |||
[[Image:Part_Torus_Scripting_Example.png|thumb|Part Torus from the scripting example]] |
|||
'''Result:''' The torus will be positioned at origin (point 0,0,0) on creation.<br /> |
|||
The angle parameters (angle1, angle2, angle3), as well as the radius parameters (radius1, radius2) permit to parametrize the torus, see next section. |
|||
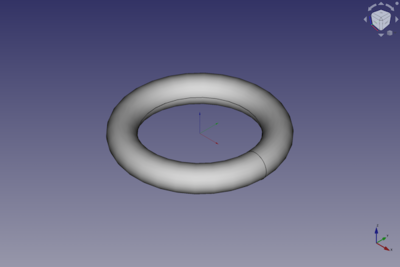
A Part Torus object created with the [[#Scripting|scripting example]] below is shown here. |
|||
| ⚫ | |||
== Notes == |
|||
[[File:TorusExampleOverviewParameters.jpg]] |
|||
* A Part Torus can also be created with the [[Image:Part_Primitives.svg|16px]] [[Part_Primitives|Part Primitives]] command. With that command you can specify the dimensions and placement at creation time. |
|||
'''Parameter''' |
|||
| ⚫ | |||
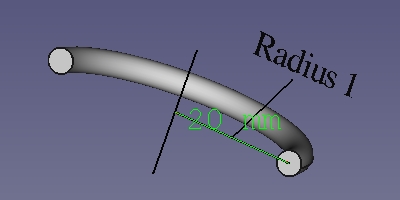
A torus can be assimilated to a small disc that makes a circular orbit around an imaginary axe. Thus the parametric torus is defined by the following parameters: |
|||
| ⚫ | |||
| ⚫ | |||
| ⚫ | |||
See also: [[Property_editor|Property editor]]. |
|||
A Part Torus object is derived from a [[Part_Feature|Part Feature]] object and inherits all its properties. It also has the following additional properties: |
|||
=== Data === |
|||
{{TitleProperty|Attachment}} |
|||
The object has the same attachment properties as a [[Part_Part2DObject#Data|Part Part2DObject]]. |
|||
{{TitleProperty|Torus}} |
|||
<div class="mw-translate-fuzzy"> |
|||
* {{Parameter|Radius1:}} Raza cercului în jurul căruia circulă discul |
* {{Parameter|Radius1:}} Raza cercului în jurul căruia circulă discul |
||
* {{Parameter|Radius2:}} Raza discului care definește forma torului |
* {{Parameter|Radius2:}} Raza discului care definește forma torului |
||
| Line 56: | Line 74: | ||
* {{Parameter|Angle2:}} al doilea unghi pentru a tăia / defini discul torului |
* {{Parameter|Angle2:}} al doilea unghi pentru a tăia / defini discul torului |
||
* {{Parameter|Angle3:}} al treilea unghi pentru a defini circumferința torului. |
* {{Parameter|Angle3:}} al treilea unghi pentru a defini circumferința torului. |
||
</div> |
|||
== Scripting == |
|||
precum și setul standard de parametri de plasare. Imaginile de mai jos oferă o imagine de ansamblu vizuală a parametrilor menționați antecedent: |
|||
See also: [https://freecad.github.io/SourceDoc/ Autogenerated API documentation], [[Part_scripting|Part scripting]] and [[FreeCAD_Scripting_Basics|FreeCAD Scripting Basics]]. |
|||
| ⚫ | |||
| ⚫ | |||
A Part Torus can be created with the {{Incode|addObject()}} method of the document: |
|||
[[File:TorusExampleRadius2.jpg]] |
|||
The parameter Radius2 has a value of 2 mm. |
|||
{{Code|code= |
|||
[[File:TorusExampleAngle1.jpg]] |
|||
torus = FreeCAD.ActiveDocument.addObject("Part::Torus", "myTorus") |
|||
The parameter Angle1 has a value of -90°. Notice that, the "angle measure" tool cannot display negative angle. Considered the displayed value in picture as "-90°". |
|||
}} |
|||
* Where {{Incode|"myTorus"}} is the name for the object. |
|||
[[File:TorusExampleAngle2.jpg]] |
|||
* The function returns the newly created object. |
|||
The parameter Angle2 has a value of 90°. |
|||
Example: |
|||
| ⚫ | |||
[[File:TorusExampleAngle3.jpg]] |
|||
{{Code|code= |
|||
The parameter Angle3 has a value of 90°. |
|||
import FreeCAD as App |
|||
| ⚫ | |||
doc = App.activeDocument() |
|||
torus = doc.addObject("Part::Torus", "myTorus") |
|||
torus.Radius1 = 20 |
|||
torus.Radius2 = 10 |
|||
torus.Angle1 = -90 |
|||
torus.Angle2 = 45 |
|||
torus.Angle3 = 270 |
|||
torus.Placement = App.Placement(App.Vector(1, 2, 3), App.Rotation(30, 45, 10)) |
|||
doc.recompute() |
|||
}} |
|||
| Line 86: | Line 117: | ||
}} |
}} |
||
{{ |
{{Part_Tools_navi{{#translation:}}}} |
||
{{Userdocnavi{{#translation:}}}} |
{{Userdocnavi{{#translation:}}}} |
||
Latest revision as of 09:58, 3 March 2022
|
|
| poziția meniului |
|---|
| Part → Torus |
| Ateliere |
| Part, Complete |
| scurtătură |
| nici unul |
| Prezentat în versiune |
| - |
| A se vedea, de asemenea, |
| Part CreatePrimitives |
Description
Descriere
Creează un tor simplu parametric, cu parametrii de poziție, unghi1, unghi2, unghi 3, raza1 și raza2.
A Part Torus can be turned into a segment of a torus by changing its DateAngle3 property. By changing its DateAngle1 and/or DateAngle2 properties the swept profile can become a segment of a circle.
Cum se folosește
În bara de lucru Part faceți clic pe pictograma torus ![]() . Torusul va fi poziționat la origine (punctul 0,0,0) la crearea.
Parametrii unghiului (unghiul1, unghiul2, unghiul3), precum și parametrii razei (raza1, raza2) permit parametrizarea torusului, a se vedea paragraful următor.
. Torusul va fi poziționat la origine (punctul 0,0,0) la crearea.
Parametrii unghiului (unghiul1, unghiul2, unghiul3), precum și parametrii razei (raza1, raza2) permit parametrizarea torusului, a se vedea paragraful următor.
Example

A Part Torus object created with the scripting example below is shown here.
Notes
- A Part Torus can also be created with the
Part Primitives command. With that command you can specify the dimensions and placement at creation time.
See also: Property editor.
A Part Torus object is derived from a Part Feature object and inherits all its properties. It also has the following additional properties:
Data
Attachment
The object has the same attachment properties as a Part Part2DObject.
Torus
- Radius1: Raza cercului în jurul căruia circulă discul
- Radius2: Raza discului care definește forma torului
- Angle1: un unghi pentru a tăia / defini discul torului
- Angle2: al doilea unghi pentru a tăia / defini discul torului
- Angle3: al treilea unghi pentru a defini circumferința torului.
Scripting
See also: Autogenerated API documentation, Part scripting and FreeCAD Scripting Basics.
A Part Torus can be created with the addObject() method of the document:
torus = FreeCAD.ActiveDocument.addObject("Part::Torus", "myTorus")
- Where
"myTorus"is the name for the object. - The function returns the newly created object.
Example:
import FreeCAD as App

doc = App.activeDocument()

torus = doc.addObject("Part::Torus", "myTorus")
torus.Radius1 = 20
torus.Radius2 = 10
torus.Angle1 = -90
torus.Angle2 = 45
torus.Angle3 = 270
torus.Placement = App.Placement(App.Vector(1, 2, 3), App.Rotation(30, 45, 10))

doc.recompute()
- Primitives: Box, Cylinder, Sphere, Cone, Torus, Tube, Create primitives, Shape builder
- Creation and modification: Extrude, Revolve, Mirror, Fillet, Chamfer, Make face from wires, Ruled Surface, Loft, Sweep, Section, Cross sections, 3D Offset, 2D Offset, Thickness, Projection on surface, Attachment
- Boolean: Make compound, Explode Compound, Compound Filter, Boolean, Cut, Fuse, Common, Connect, Embed, Cutout, Boolean fragments, Slice apart, Slice, XOR
- Measure: Measure Linear, Measure Angular, Measure Refresh, Clear All, Toggle All, Toggle 3D, Toggle Delta
- Getting started
- Installation: Download, Windows, Linux, Mac, Additional components, Docker, AppImage, Ubuntu Snap
- Basics: About FreeCAD, Interface, Mouse navigation, Selection methods, Object name, Preferences, Workbenches, Document structure, Properties, Help FreeCAD, Donate
- Help: Tutorials, Video tutorials
- Workbenches: Std Base, Arch, Assembly, CAM, Draft, FEM, Inspection, Mesh, OpenSCAD, Part, PartDesign, Points, Reverse Engineering, Robot, Sketcher, Spreadsheet, Surface, TechDraw, Test Framework
- Hubs: User hub, Power users hub, Developer hub

