PartDesign tutorial/fr: Difference between revisions
(Created page with "=== Procédure === ==== Créer une forme géométrique 3D ==== L'objectif de l' ''' atelier PartDesign''' est de permettre à l'utilisateur de créer des formes géométriques...") |
|||
| Line 24: | Line 24: | ||
L'objectif de l' ''' atelier PartDesign''' est de permettre à l'utilisateur de créer des formes géométriques dans un espace 3D, pour répondre à un certain besoin. Ainsi , sont mis à disposition des outils pour faire des esquisses et les convertir en objets 3D. |
L'objectif de l' ''' atelier PartDesign''' est de permettre à l'utilisateur de créer des formes géométriques dans un espace 3D, pour répondre à un certain besoin. Ainsi , sont mis à disposition des outils pour faire des esquisses et les convertir en objets 3D. |
||
Il existe deux outils de base pour y parvenir: [[Image:PartDesign_Pad.png|32px]] [[PartDesign_Pad|Pad]] et [[Image:PartDesign_Revolution.png|32px]] [[PartDesign_Revolution|Revolution]]. À coté de leur équivalent de substitution ([[Image:PartDesign_Pocket.png|32px]] [[PartDesign_Pocket|Pocket]] et [[Image:PartDesign_Groove.png|32px]] [[PartDesign_Groove|Groove]]) Ils permettent de faire la plupart des actions usuelles utilisées dans cet atelier. |
|||
# Switch to the PartDesign Workbench |
# Switch to the PartDesign Workbench |
||
Revision as of 13:22, 4 March 2016
| Thème |
|---|
| Sketcher |
| Niveau |
| Beginner |
| Temps d'exécution estimé |
| 15 minutes |
| Auteurs |
| Drei |
| Version de FreeCAD |
| 0.16 or above |
| Fichiers exemples |
| Voir aussi |
| None |
Introduction
Ce tutoriel a pour but d'initier le lecteur à l'utilisisation de l' atelier PartDesign.
Ce tutorial se base sur l'esquisse crée précédmment.
File:PartDesign tutorial result.png
Prérequis
- FreeCAD version 0.16 ou supérieure
- Avoir lu le tutoriel sur les esquisses
Procédure
Créer une forme géométrique 3D
L'objectif de l' atelier PartDesign est de permettre à l'utilisateur de créer des formes géométriques dans un espace 3D, pour répondre à un certain besoin. Ainsi , sont mis à disposition des outils pour faire des esquisses et les convertir en objets 3D.
Il existe deux outils de base pour y parvenir: ![]() Pad et
Pad et ![]() Revolution. À coté de leur équivalent de substitution (
Revolution. À coté de leur équivalent de substitution (![]() Pocket et
Pocket et ![]() Groove) Ils permettent de faire la plupart des actions usuelles utilisées dans cet atelier.
Groove) Ils permettent de faire la plupart des actions usuelles utilisées dans cet atelier.
- Switch to the PartDesign Workbench
- Select the sketch that was created in the Sketcher tutorial
- Select
 Pad
Pad - Set the distance to 5 mm
- Select Ok
Another way to create 3D geometry is with the ![]() Revolution tool.
Revolution tool.
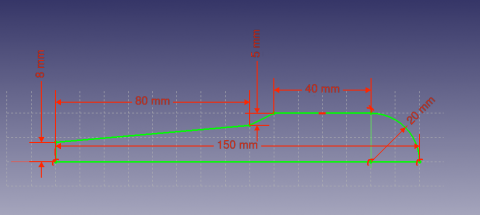
- Create a sketch based on the image above
- Select
 Revolution
 - Set the angle to 360°
Subtracting Features
We'll begin by creating a sketch with the shape we want to subtract.
- Select the top face of the Pad
- Select
 New sketch
 - Select
 External Geometry
 - Approach the edge of the pad. An arc should be highlighted
- Select the arc. An arc of a different color should appear in the sketch
- Create a circle centered on the same point as the arc and set its radius to 5 mm
Afterwards, we'll proceed to apply a Pocket feature.
- Select the sketch
- Select
 Pocket
 - Set the distance to Through all
Pattern Features
We are now finished with the basic workflow for the Sketcher Module.
