PartDesign Draft/de: Difference between revisions
No edit summary |
(Updating to match new version of source page) |
||
| Line 21: | Line 21: | ||
</div> |
</div> |
||
== Description == |
|||
<div class="mw-translate-fuzzy"> |
<div class="mw-translate-fuzzy"> |
||
| Line 30: | Line 30: | ||
{| |
{| |
||
| |
| |
||
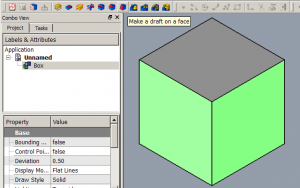
[[Image:PartDesign_Draft-01.png|thumb|left|Select one or more faces |
[[Image:PartDesign_Draft-01.png|thumb|left|Select one or more faces of the object before starting the tool. Here, 2 faces have been selected.]] |
||
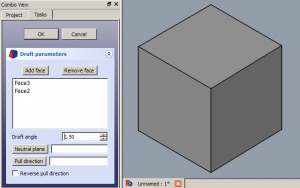
[[Image:PartDesign_Draft-02.png|thumb|left|Showing Draft |
[[Image:PartDesign_Draft-02.png|thumb|left|Showing Draft Parameters in TaskPanel.]] |
||
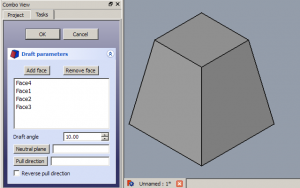
[[Image:PartDesign_Draft-03.png|thumb|left|2 faces have been added, and a 10 deg. draft applied. The bottom plane has remained dimensionally stable, while the draft has made the top plane smaller.]] |
[[Image:PartDesign_Draft-03.png|thumb|left|2 faces have been added, and a 10 deg. draft applied. The bottom plane has remained dimensionally stable, while the draft has made the top plane smaller.]] |
||
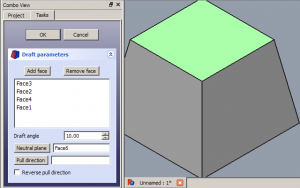
[[Image:PartDesign_Draft-04.png|thumb|left|The Neutral Plane has been changed to the |
[[Image:PartDesign_Draft-04.png|thumb|left|The Neutral Plane has been changed to the top. Now, the top plane has stayed dimensionally stable, while the draft has made the bottom plane larger.]] |
||
[[Image:PartDesign_Draft-05.png|thumb|left|Pull direction is set to the lower right edge, resulting in the draft pulling to the left.]] |
[[Image:PartDesign_Draft-05.png|thumb|left|Pull direction is set to the lower right edge, resulting in the draft pulling to the left.]] |
||
[[Image:PartDesign_Draft-06.png|thumb|left|Checking the Reverse Direction box has applied an inward draft rather than outward.]] |
[[Image:PartDesign_Draft-06.png|thumb|left|Checking the Reverse Direction box has applied an inward draft rather than outward.]] |
||
| |
| |
||
| ⚫ | |||
{{Clear}} |
|||
== Usage == |
|||
=== |
=== Add a draft === |
||
<div class="mw-translate-fuzzy"> |
<div class="mw-translate-fuzzy"> |
||
| Line 71: | Line 76: | ||
</div> |
</div> |
||
| ⚫ | |||
:''Remember'': |
|||
==== Add Face / Remove Face ==== |
|||
:* Since there must be at least one face for the feature, the last remaining face in the list cannot be removed. |
|||
=== Edit a draft === |
|||
Click Add Face or Remove Face, then select a single face to update the list of active faces. Repeat as needed. |
|||
# Do one of the following: |
|||
==== Draft Angle ==== |
|||
#* Double-click the Draft item in the [[Tree_view|Tree view]]. |
|||
#* Right-click the Draft item in the [[Tree_view|Tree view]] and select {{MenuCommand|Edit Draft}} from the context menu. |
|||
# The {{MenuCommand|Draft parameters}} [[Task_panel|task panel]] opens. See [[#Options|Options]] for more information. |
|||
# Press the {{Button|OK}} button to finish. |
|||
| ⚫ | |||
| ⚫ | |||
| ⚫ | |||
==== Neutral Plane ==== |
|||
* {{MenuCommand|Add}}: Add faces to the selection by pressing the {{Button|Add}} button and selecting more faces. |
|||
* {{MenuCommand|Remove}}: Choose a way to remove faces from the selection: |
|||
** Select one or more faces in the list and press the {{KEY|Del}} key or right-click the list and select {{MenuCommand|Remove}} from the context menu. |
|||
** Press the {{Button|Remove}} button. All previously selected faces are highlighted in purple. Select each face to be removed. |
|||
* {{MenuCommand|Neutral plane}}: Set the the neutral plane by pressing the {{Button|Neutral plane}} button and selecting the plane that must not change dimensionally. |
|||
| ⚫ | |||
* {{MenuCommand|Reverse pull direction}}: Invert the pull direction by checking the {{MenuCommand|Reverse pull direction}} checkbox. This will toggle the draft between positive and negative angles. |
|||
== Notes == |
|||
Click Neutral Plane, then select the plane that must not change dimensionally. The change is made in real time. |
|||
| ⚫ | |||
==== Pull Direction ==== |
|||
==Properties== |
|||
| ⚫ | |||
See also: [[Property_editor|Property editor]]. |
|||
==== Reverse Pull Direction ==== |
|||
A PartDesign Draft object is derived from a [[Part_Feature|Part Feature]] object and inherits all its properties. It also has the following additional properties: |
|||
Checking Reverse Pull Direction will toggle the draft between positive and negative angles. |
|||
=== |
===Data=== |
||
{{Properties_Title|Base}} |
|||
| ⚫ | The Draft tool will only |
||
| ⚫ | |||
* {{PropertyData|Angle|Angle}}: Cannot be negative. Default: {{value|1.5 °}}. |
|||
* {{PropertyData|Reversed|Bool}}: Default: {{FALSE}}. |
|||
* {{PropertyData|Base|LinkSub}}: Sub-link to the parent feature's list of selected edges and faces. |
|||
* {{PropertyData|Support Transform|Bool}}: "Include the base additive/subtractive shape when used in pattern features. If disabled, only the dressed part of the shape is used for patterning". Default: {{FALSE}}. |
|||
* {{PropertyData|Add Sub Shape|PartShape|hidden}} |
|||
* {{PropertyData|Base Feature|Link|hidden}}: Link to the parent feature. |
|||
* {{PropertyData|_ Body|LinkHidden|hidden}}: Link to the parent body. |
|||
{{Properties_Title|Draft}} |
|||
* {{PropertyData|Neutral Plane|LinkSub}}: Sub-link to the parent feature's list containing the neutral plane. |
|||
* {{PropertyData|Pull Direction|LinkSub}} |
|||
{{Properties_Title|Part Design}} |
|||
* {{PropertyData|Refine|Bool}}: "Refine shape (clean up redundant edges) after adding/subtracting". The default value is determined by the {{MenuCommand|Automatically refine model after sketch-based operation}} preference. See [[PartDesign_Preferences#General|PartDesign Preferences]]. |
|||
Revision as of 10:18, 4 June 2022
|
|
| Menüeintrag |
|---|
| Part Design → Apply a dress up feature (Verschönerung) → Formschräge |
| Arbeitsbereich |
| Part Design |
| Standardtastenkürzel |
| - |
| Eingeführt in Version |
| - |
| Siehe auch |
| Keine |
Description
Beschreibung
Dieses Werkzeug erzeugt einen Winkelentwurf auf den ausgewählten Flächen eines Objekts. Ein neuer separater Eintrag für Entwürfe (gefolgt von einer fortlaufenden Nummer, wenn bereits Entwürfe im Dokument vorhanden sind) wird im Projektbaum erstellt.
Usage
Add a draft
      |
Anwendung
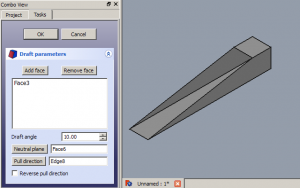
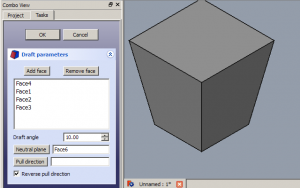
Parameter und OptionenFläche hinzufügen / Fläche entfernen =Klicke auf Fläche hinzufügen oder Fläche entfernen und wähle dann eine einzelne Fläche aus, um die Liste der aktiven Flächen zu aktualisieren. Wiederhole den Vorgang bei Bedarf. EntwurfswinkelSetze den Entwurfswinkel durch Eingabe eines Wertes oder auf die Pfeile nach oben/unten klicken. Der angewandte Entwurfswinkel wird in Echtzeit angezeigt. Neutrale EbeneKlicke auf Neutrale Ebene und wähle dann die Ebene aus, die sich nicht dimensional ändern darf. Die Änderung wird in Echtzeit vorgenommen. ZugrichtungKlicke auf Zugrichtung und wähle dann eine Kante aus. Die Zugrichtung ist nur wirksam, wenn die Neutrale Ebene festgelegt wurde. Die Ergebnisse können unvorhersehbar sein. Umgekehrte ZugrichtungAnhaken der Rückwärtszugrichtung wird die Zugrichtung zwischen positiven und negativen Winkeln umgeschaltet. SonderfälleDas Entwurfswerkzeug funktioniert nur auf Flächen, die normal zueinander stehen. Wenn an der Fläche, auf die du den Entwurf anwenden möchtest, tangentiale Flächen angebracht sind, schlägt es fehl. Eine häufige Fehlerursache ist der Versuch, das Entwurfswerkzeug auf eine Fläche anzuwenden, auf die bereits eine Verrundung oder Fase angewendet wurde. In diesem Fall entferne die tangentiale Fläche, wende den Entwurf nach Bedarf an und bringe dann die Verrundung oder Abschrägung erneut an. |
- Remember:
- Since there must be at least one face for the feature, the last remaining face in the list cannot be removed.
Edit a draft
- Do one of the following:
- The Draft parameters task panel opens. See Options for more information.
- Press the OK button to finish.
Options
- Draft angle: Set the Draft angle either by entering a value or by clicking the up/down arrows.
- Add: Add faces to the selection by pressing the Add button and selecting more faces.
- Remove: Choose a way to remove faces from the selection:
- Select one or more faces in the list and press the Del key or right-click the list and select Remove from the context menu.
- Press the Remove button. All previously selected faces are highlighted in purple. Select each face to be removed.
- Neutral plane: Set the the neutral plane by pressing the Neutral plane button and selecting the plane that must not change dimensionally.
- Pull direction: Set the the pull direction by pressing the Pull direction button, then select an edge. Pull Direction is only effective if the Neutral Plane has been set. Results can be unpredictable.
- Reverse pull direction: Invert the pull direction by checking the Reverse pull direction checkbox. This will toggle the draft between positive and negative angles.
Notes
- The Draft tool will only work on faces that are not tangentially connected to other faces. A common mistake is to attempt to apply draft to a face that already has a fillet applied to it. To solve this, remove the fillet, apply the draft as needed, then re-apply the fillet.
Properties
See also: Property editor.
A PartDesign Draft object is derived from a Part Feature object and inherits all its properties. It also has the following additional properties:
Data
Base
- DatenAngle (
Angle): Cannot be negative. Default:1.5 °. - DatenReversed (
Bool): Default:false. - DatenBase (
LinkSub): Sub-link to the parent feature's list of selected edges and faces. - DatenSupport Transform (
Bool): "Include the base additive/subtractive shape when used in pattern features. If disabled, only the dressed part of the shape is used for patterning". Default:false. - Daten (hidden)Add Sub Shape (
PartShape) - Daten (hidden)Base Feature (
Link): Link to the parent feature. - Daten (hidden)_ Body (
LinkHidden): Link to the parent body.
Draft
- DatenNeutral Plane (
LinkSub): Sub-link to the parent feature's list containing the neutral plane. - DatenPull Direction (
LinkSub)
Part Design
- DatenRefine (
Bool): "Refine shape (clean up redundant edges) after adding/subtracting". The default value is determined by the Automatically refine model after sketch-based operation preference. See PartDesign Preferences.
- Struktur-Werkzeuge: Part-Arbeitsbereich, Gruppe
- Part Design-Hilfswerkzeuge: Körper erstellen, Skizze erstellen, Skizze bearbeiten, Skizze einer Fläche zuordnen
- Part Design-Modellierungswerkzeuge
- Datum tools: Bezugspunkt erstellen, Bezugslinie erstellen, Bezugsebene erstellen, Lokales Koordinatensystem erzeugen, Referenzobjekt erstellen, Klon erzeugen
- Additive tools: Aufpolstern (Pad), Rotation, Ausformung, Additives Rohr, Erzeugen eines zusätzlichen geometrischen Körpers
- Subtractive tools: Tasche, Bohrung, Nut, Abziehbarer Loft, Abziehbares Rohr, Erzeuge einen abzuziehenden Grundkörper
- Transformation Werkzeuge: Spiegeln, Lineares Muster, Polares Muster, Create MultiTransform
- Verschönerungswerkzeuge: Verrundung, Fase, Draft-Arbeitsbereich, Dicke
- Boolesche Operationen: Boolesche Operationen
- Extras: Migrieren, Shaft design wizard, Involute gear
- Contextual Menu tools: Spitze festlegen, Move object to other body, Objekt nach einem anderen Objekt verschieben
- Erste Schritte
- Installation: Herunterladen, Windows, Linux, Mac, Zusätzlicher Komponenten, Docker, AppImage, Ubuntu Snap
- Grundlagen: Über FreeCAD, Graphische Oberfläche, Mausbedienung, Auswahlmethoden, Objektname, Programmeinstellungen, Arbeitsbereiche, Dokumentstruktur, Objekteigenschaften, Hilf FreeCAD, Spende
- Hilfe: Tutorien, Video Tutorien
- Arbeitsbereiche: Std Base, Arch, Assembly, CAM, Draft, FEM, Inspection, Mesh, OpenSCAD, Part, PartDesign, Points, Reverse Engineering, Robot, Sketcher, Spreadsheet, Surface, TechDraw, Test Framework