FEM ConstraintForce/ro: Difference between revisions
(Updating to match new version of source page) |
(Updating to match new version of source page) |
||
| (11 intermediate revisions by 2 users not shown) | |||
| Line 1: | Line 1: | ||
<languages/> |
<languages/> |
||
{{UnfinishedDocu{{#translation:}}}} |
|||
{{Docnav |
{{Docnav |
||
|[[ |
|[[FEM_ConstraintSpring|Constraint spring]] |
||
|[[FEM_ConstraintPressure|Constraint pressure]] |
|[[FEM_ConstraintPressure|Constraint pressure]] |
||
|[[ |
|[[FEM_Workbench|FEM]] |
||
|IconL= |
|IconL=FEM_ConstraintSpring.svg |
||
| ⚫ | |||
|IconC=Workbench_FEM.svg |
|IconC=Workbench_FEM.svg |
||
| ⚫ | |||
}} |
}} |
||
<div class="mw-translate-fuzzy"> |
<div class="mw-translate-fuzzy"> |
||
{{GuiCommand|Name=FEM ConstraintForce|MenuLocation=Model → Mechanical Constraints → Constraint force||Workbenches=[[ |
{{GuiCommand|Name=FEM ConstraintForce|MenuLocation=Model → Mechanical Constraints → Constraint force||Workbenches=[[FEM_Workbench|FEM]]|Shortcut=|SeeAlso=[[FEM_tutorial|FEM tutorial]]}} |
||
</div> |
</div> |
||
<span id="Description"></span> |
|||
==Descriere== |
==Descriere== |
||
<div class="mw-translate-fuzzy"> |
|||
Această comandă aplică o forță de valoare dată [N] la geometria țintei selectată. |
Această comandă aplică o forță de valoare dată [N] la geometria țintei selectată. |
||
</div> |
|||
<span id="Usage"></span> |
|||
<div class="mw-translate-fuzzy"> |
<div class="mw-translate-fuzzy"> |
||
== Cum se folosește == |
== Cum se folosește == |
||
</div> |
</div> |
||
<div class="mw-translate-fuzzy"> |
|||
1)Aplicarea unei forțe în direcția normală a unei fațete |
1)Aplicarea unei forțe în direcția normală a unei fațete |
||
** In Atelierul FEM, click pe [[File:Fem-constraint-force.svg|24px|Constraint Force]] or select {{KEY|Model}} → {{KEY|Mechanical Constraints}} → {{KEY|Constraint force}} pentru a deschide dialogul proprietăților Force Constraint |
** In Atelierul FEM, click pe [[File:Fem-constraint-force.svg|24px|Constraint Force]] or select {{KEY|Model}} → {{KEY|Mechanical Constraints}} → {{KEY|Constraint force}} pentru a deschide dialogul proprietăților Force Constraint |
||
| Line 31: | Line 36: | ||
** {{KEY|Direction}}: In a typical case, you'll click this field empty to apply a force in normal direction to the face. You can revert the direction of the force by clicking {{KEY|Reverse direction}}. In other cases, you need to pick a face or plane, which is in normal to the force direction (it could differ from the face, to which the force is being applied) |
** {{KEY|Direction}}: In a typical case, you'll click this field empty to apply a force in normal direction to the face. You can revert the direction of the force by clicking {{KEY|Reverse direction}}. In other cases, you need to pick a face or plane, which is in normal to the force direction (it could differ from the face, to which the force is being applied) |
||
** Click pe obiectul {{KEY|Close}} to finish the dialog and create {{KEY|[[File:FEM_ConstraintForce.png|24px]] ConstraintForce}} |
** Click pe obiectul {{KEY|Close}} to finish the dialog and create {{KEY|[[File:FEM_ConstraintForce.png|24px]] ConstraintForce}} |
||
</div> |
|||
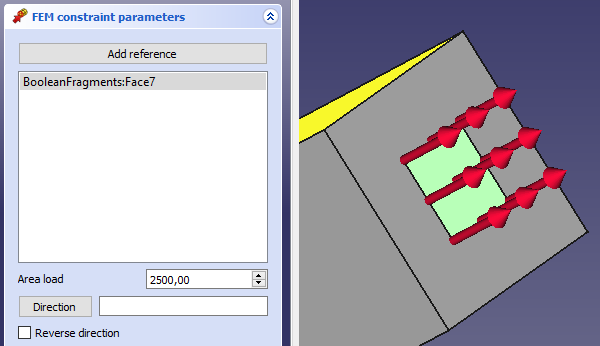
[[File:FEM ConstraintForce example.JPG]] |
|||
==Notes== |
|||
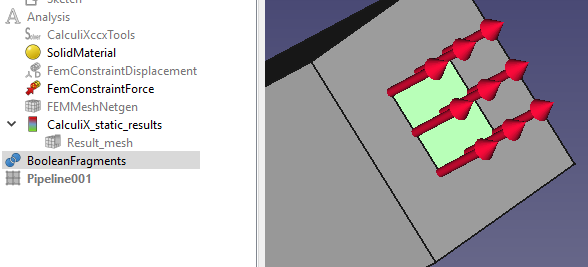
2) Applying a force in to line in selected direction |
|||
** In FEM workbench, click on [[File:FEM_ConstraintForce.png|24px|Constraint Force]] or select {{KEY|Model}} → {{KEY|Mechanical Constraints}} → {{KEY|Constraint force}} to open Force Constraint properties dialog |
|||
* The defined force is applied uniformly to the selected objects. For example, if you define one force load with 200 N applied to two faces having the same area, each face will be uniformly loaded with 100 N. |
|||
** If you have Mesh displayed, you need to hide it (select the mesh object and press {{KEY|spacebar}} or right click and select {{KEY|Hide item}}) and show the original model. |
|||
* This feature uses the [https://web.mit.edu/calculix_v2.7/CalculiX/ccx_2.7/doc/ccx/node172.html *CLOAD card in CalculiX]. |
|||
** Click on a ''line segment'' to which a force should be applied. It will appear in the list of geometrical objects. |
|||
** Fill in {{KEY|Area load}} with a force value in [N] |
|||
** {{KEY|Direction}}: Acum, cu segmentul de linie selectat, probabil că forța este aplicată într-o direcție greșită. Trebuie să specificăm direcția făcând clic pe butonul {{KEY|Direction}} și apoi făcând clic pe o fațetă care indică direcția sa normală în direcția forței (sau direcția inversă). Din nou, puteți reveni la direcția forței făcând clic pe {{KEY|Reverse direction}}. |
|||
[[File:FEMforceonline.PNG]] |
|||
** Click pe {{KEY|Close}} pentru a încheia dealogul și a crea obiectul {{KEY|[[File:FEM_ConstraintForce.png|24px]] ConstraintForce}} |
|||
{{Docnav |
{{Docnav |
||
|[[ |
|[[FEM_ConstraintSpring|Constraint spring]] |
||
|[[FEM_ConstraintPressure|Constraint pressure]] |
|[[FEM_ConstraintPressure|Constraint pressure]] |
||
|[[ |
|[[FEM_Workbench|FEM]] |
||
|IconL= |
|IconL=FEM_ConstraintSpring.svg |
||
| ⚫ | |||
|IconC=Workbench_FEM.svg |
|IconC=Workbench_FEM.svg |
||
| ⚫ | |||
}} |
}} |
||
{{FEM Tools navi{{#translation:}}}} |
{{FEM Tools navi{{#translation:}}}} |
||
{{Userdocnavi{{#translation:}}}} |
{{Userdocnavi{{#translation:}}}} |
||
{{clear}} |
|||
Latest revision as of 08:48, 27 January 2024
|
|
| Menu location |
|---|
| Model → Mechanical Constraints → Constraint force |
| Workbenches |
| FEM |
| Default shortcut |
| None |
| Introduced in version |
| - |
| See also |
| FEM tutorial |
Descriere
Această comandă aplică o forță de valoare dată [N] la geometria țintei selectată.
Cum se folosește
1)Aplicarea unei forțe în direcția normală a unei fațete
- If you have Mesh displayed, you need to hide it (select the mesh object and press spacebar or right click and select Hide item) and show the original model.
- Click on a face to which a force should be applied. It will appear in the list of geometrical objects.
- Fill in Line load with a force value in [N] (attention: Not in [N/m])
- Direction: In a typical case, you'll click this field empty to apply a force in normal direction to the face. You can revert the direction of the force by clicking Reverse direction. In other cases, you need to pick a face or plane, which is in normal to the force direction (it could differ from the face, to which the force is being applied)
- Click pe obiectul Close to finish the dialog and create
 ConstraintForce
Notes
- The defined force is applied uniformly to the selected objects. For example, if you define one force load with 200 N applied to two faces having the same area, each face will be uniformly loaded with 100 N.
- This feature uses the *CLOAD card in CalculiX.
- Materials: Solid, Fluid, Nonlinear mechanical, Reinforced (concrete); Material editor
- Element geometry: Beam (1D), Beam rotation (1D), Shell (2D), Fluid flow (1D)
Constraints
- Electromagnetic: Electrostatic potential, Current density, Magnetization
- Geometrical: Plane rotation, Section print, Transform
- Mechanical: Fixed, Displacement, Contact, Tie, Spring, Force, Pressure, Centrif, Self weight
- Thermal: Initial temperature, Heat flux, Temperature, Body heat source
- Overwrite Constants: Constant vacuum permittivity
- Solve: CalculiX Standard, Elmer, Mystran, Z88; Equations: Deformation, Elasticity, Electrostatic, Electricforce, Magnetodynamic, Magnetodynamic 2D, Flow, Flux, Heat; Solver: Solver control, Solver run
- Results: Purge, Show; Postprocessing: Apply changes, Pipeline from result, Warp filter, Scalar clip filter, Function cut filter, Region clip filter, Contours filter, Line clip filter, Stress linearization plot, Data at point clip filter, Filter function plane, Filter function sphere, Filter function cylinder, Filter function box
- Additional: Preferences; FEM Install, FEM Mesh, FEM Solver, FEM CalculiX, FEM Concrete; FEM Element Types
- Getting started
- Installation: Download, Windows, Linux, Mac, Additional components, Docker, AppImage, Ubuntu Snap
- Basics: About FreeCAD, Interface, Mouse navigation, Selection methods, Object name, Preferences, Workbenches, Document structure, Properties, Help FreeCAD, Donate
- Help: Tutorials, Video tutorials
- Workbenches: Std Base, Arch, Assembly, CAM, Draft, FEM, Inspection, Mesh, OpenSCAD, Part, PartDesign, Points, Reverse Engineering, Robot, Sketcher, Spreadsheet, Surface, TechDraw, Test Framework
- Hubs: User hub, Power users hub, Developer hub


