Draft PointArray: Difference between revisions
(Position [0,0,0]) |
(Please do not add translate units manually. They are added automatically once the page is marked for translation. Limitations section removed: no need to mention the tool is not available before v0.18, that's what the Version is for in GuiCommand.) |
||
| Line 1: | Line 1: | ||
<languages/> |
<languages/> |
||
<translate> |
<translate> |
||
{{GuiCommand |
|||
<!--T:1--> |
|||
|Name=Draft PointArray |
|||
{{GuiCommand|Name=Draft PointArray|Workbenches=[[Draft Module|Draft]], [[Arch Module|Arch]]|MenuLocation=Draft → PointArray|SeeAlso=[[Draft Array|Draft Array]], [[Draft PathArray]]|Icon=Draft_PointArray.svg|Version=0.18}} |
|||
|Icon=Draft_PointArray.svg |
|||
|Workbenches=[[Draft Module|Draft]], [[Arch Module|Arch]] |
|||
|MenuLocation=Draft → PointArray |
|||
|Version=0.18 |
|||
|SeeAlso=[[Draft Array|Draft Array]], [[Draft PathArray]] |
|||
}} |
|||
==Description== |
==Description== |
||
<!--T:3--> |
|||
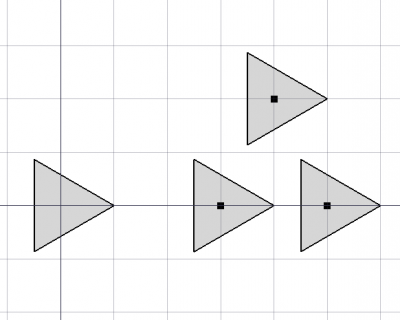
The PointArray tool places copies of a selected shape along various selected points. |
The PointArray tool places copies of a selected shape along various selected points. |
||
</translate> |
</translate> |
||
| Line 13: | Line 18: | ||
<translate> |
<translate> |
||
==How to use== |
==How to use== |
||
<!--T:5--> |
|||
# Create a shape object you wish to distribute. You will get the best results if your object is '''centred around the origin''', that is, if its {{PropertyData|position}} is [0, 0, 0]. |
# Create a shape object you wish to distribute. You will get the best results if your object is '''centred around the origin''', that is, if its {{PropertyData|position}} is [0, 0, 0]. |
||
# Place points using [[Draft Point]]. |
# Place points using [[Draft Point]]. |
||
| Line 21: | Line 25: | ||
# First select your shape, then the new point compound, and then press the {{KEY|[[Image:Draft_PointArray.svg|16px]] [[Draft PointArray]]}} button. |
# First select your shape, then the new point compound, and then press the {{KEY|[[Image:Draft_PointArray.svg|16px]] [[Draft PointArray]]}} button. |
||
==Options== |
==Options== |
||
<!--T:7--> |
|||
* The array starts with shape copies which are not aligned to the path, nor translated to a new position by default. You can then change the alignment and/or translation vector in the properties. |
* The array starts with shape copies which are not aligned to the path, nor translated to a new position by default. You can then change the alignment and/or translation vector in the properties. |
||
==Properties== |
==Properties== |
||
<!--T:9--> |
|||
* {{PropertyData|Base}}: The shape object |
* {{PropertyData|Base}}: The shape object |
||
* {{PropertyData|Count}}: The number of times to copy the shape (read only) |
* {{PropertyData|Count}}: The number of times to copy the shape (read only) |
||
* {{PropertyData|PointList}}: a compound of points |
* {{PropertyData|PointList}}: a compound of points |
||
==Scripting== |
==Scripting== |
||
<!--T:11--> |
|||
The PointArray tool can be used in [[macros]] and from the [[Python]] console by using the following function: |
The PointArray tool can be used in [[macros]] and from the [[Python]] console by using the following function: |
||
| Line 43: | Line 44: | ||
}} |
}} |
||
<translate> |
<translate> |
||
<!--T:12--> |
|||
* {{incode|base}} is the shape to copy, and {{incode|ptlst}} is an object with Geometry, Links, or Components that define the position of the copies. |
* {{incode|base}} is the shape to copy, and {{incode|ptlst}} is an object with Geometry, Links, or Components that define the position of the copies. |
||
<!--T:13--> |
|||
Example: |
Example: |
||
</translate> |
</translate> |
||
| Line 64: | Line 63: | ||
<translate> |
<translate> |
||
==Usage Notes== |
==Usage Notes== |
||
* {{emphasis|in progress}} |
* {{emphasis|in progress}} |
||
==Limitations== <!--T:14--> |
|||
* This tool is not available before version 0.18 |
|||
</translate> |
</translate> |
||
Revision as of 21:06, 11 November 2018
|
|
| Menu location |
|---|
| Draft → PointArray |
| Workbenches |
| Draft, Arch |
| Default shortcut |
| None |
| Introduced in version |
| 0.18 |
| See also |
| Draft Array, Draft PathArray |
Description
The PointArray tool places copies of a selected shape along various selected points.
How to use
- Create a shape object you wish to distribute. You will get the best results if your object is centred around the origin, that is, if its Dataposition is [0, 0, 0].
- Place points using Draft Point.
- Select the points and create a compound of them using Draft Upgrade.
- First select your shape, then the new point compound, and then press the
Draft PointArray button.
Options
- The array starts with shape copies which are not aligned to the path, nor translated to a new position by default. You can then change the alignment and/or translation vector in the properties.
Properties
- DataBase: The shape object
- DataCount: The number of times to copy the shape (read only)
- DataPointList: a compound of points
Scripting
The PointArray tool can be used in macros and from the Python console by using the following function:
makePointArray(base, ptlst)
baseis the shape to copy, andptlstis an object with Geometry, Links, or Components that define the position of the copies.
Example:
import FreeCAD, Draft

poly = Draft.makePolygon(3, radius=500.0)
p1 = Draft.makePoint(FreeCAD.Vector(1500, 0, 0))
p2 = Draft.makePoint(FreeCAD.Vector(2500, 0, 0))
p3 = Draft.makePoint(FreeCAD.Vector(2000, 1000, 0))

upg = Draft.upgrade([p1, p2, p3], delete=True)
compound = upg[0][0]  # Extract the compound from the list

array = Draft.makePointArray(poly, compound)
Usage Notes
- in progress
