Arch Schedule/ru: Difference between revisions
(Updating to match new version of source page) |
(Updating to match new version of source page) |
||
| (21 intermediate revisions by 3 users not shown) | |||
| Line 1: | Line 1: | ||
<languages/> |
<languages/> |
||
{{Docnav |
{{Docnav |
||
|[[Arch_MultiMaterial| |
|[[Arch_MultiMaterial|MultiMaterial]] |
||
|[[Arch_CompPipe|CompPipe]] |
|||
|[[Arch_CutLine|Cut with a line]] |
|||
|[[ |
|[[Arch_Workbench|Arch]] |
||
|IconL=Arch_MultiMaterial.svg |
|IconL=Arch_MultiMaterial.svg |
||
|IconR= |
|IconR=Arch_CompPipe.png |
||
|IconC=Workbench_Arch.svg |
|IconC=Workbench_Arch.svg |
||
}} |
}} |
||
| Line 13: | Line 14: | ||
|Name=Arch Schedule |
|Name=Arch Schedule |
||
|Name/ru=Arch Schedule |
|Name/ru=Arch Schedule |
||
| ⚫ | |||
|MenuLocation=Архитектура → Create schedule... |
|MenuLocation=Архитектура → Create schedule... |
||
| ⚫ | |||
|Shortcut= |
|Shortcut= |
||
}} |
}} |
||
</div> |
</div> |
||
<span id="Description"></span> |
|||
==Описание== |
|||
| ⚫ | |||
==Description== |
|||
{{Emphasis|Примечание}}: Данный инструмент был значительно переработан в FreeCAD 0.17 и отличается от предыдущих версий. |
|||
| ⚫ | |||
| ⚫ | |||
{{Emphasis|Note}}: This tool has been rewritten in FreeCAD 0.17 and differs from previous versions. |
|||
<span id="Usage"></span> |
|||
| ⚫ | |||
==Применение== |
|||
==Usage== |
|||
# Open or create a FreeCAD document which contains some objects. |
# Open or create a FreeCAD document which contains some objects. |
||
| Line 35: | Line 37: | ||
# Press {{Button|OK}}. |
# Press {{Button|OK}}. |
||
= |
<span id="Workflow"></span> |
||
==Рабочий процесс== |
|||
Для начала требуется некоторая готовая конструкция. Например, как здание в этом документе, которое содержит множество объектов созданных в верстаке Arch (хотя на самом деле также поддерживаются и другие объекты). |
|||
First you need to have a model. For example, here is a document with a couple of objects. I did Arch stuff here, but it doesn't need to be Arch, it can be anything. |
|||
[[Image:Arch_schedule_example01.jpg]] |
[[Image:Arch_schedule_example01.jpg]] |
||
Далее нажмите на кнопку {{Button|[[Image:Arch_Schedule.svg|16px]] [[Arch_Schedule/ru|Планирование]]}}. В результате чего откроется панель задач, как на изображении ниже. Она довольно широкая, поэтому для удобной работы, вам нужно будет расширить комбо панель по горизонтали. |
|||
Then you press the {{Button|[[Image:Arch_Schedule.svg|16px]] [[Arch_Schedule|Arch Schedule]]}} button. You get a task panel like this. It is pretty wide, so you'll need to widen the task panel to be comfortable. |
|||
[[Image:Arch_schedule_example02.jpg]] |
[[Image:Arch_schedule_example02.jpg]] |
||
Затем вы можете заполнять строки таблицы друг за другом. Каждая строка представляет собой "запрос" и будет отображать одну строку в электронной таблице. Нажмите кнопку {{Button|Add}}, чтобы добавить новую строку, и дважды щелкните каждую ячейку из этой строки, чтобы заполнить значения. Кнопка {{Button|Del}} удаляет строку, содержащую выбранную в данный момент ячейку, а кнопка {{Button|Clear}} удаляет абсолютно все строки. Доступными полями для заполнения в столбцах являются: |
|||
Then you can fill line by line. Each line is a "query" and will render one line in the spreadsheet. Press the {{Button|Add}} button to add a new line, and double-click each cell from that line to fill in the values. The {{Button|Del}} button will delete the line which contains a currently selected cell, and {{Button|Clear}} will delete all the lines. Possible values to put in columns are: |
|||
<div class="mw-translate-fuzzy"> |
|||
* '''Description''': A description for this query. The Description column will be the first column of the resulting spreadsheet. The description is mandatory to have a query performed. If you leave the description cell empty, the whole line will be skipped and left blank in the spreadsheet. This allows you to add "separator" lines. |
|||
* '''Description''': Описание для этого запроса. Столбец "Описание" - Это первый столбец результирующей электронной таблицы. В описании обязательно должен быть представлен запрос. Если вы оставите ячейку описания пустой, вся строка будет пропущена и оставлена пустой в электронной таблице. Это позволяет добавлять "разделительные" строки. |
|||
* '''Value''': This is the real query that you want to perform on all the objects selected by the query. It can be two things: either the word {{incode|count}} or an object property: |
|||
* '''Value''': Это реальный запрос, который вы хотите выполнить для всех объектов, выбранных этим запросом. Это может быть два типа вещей: либо слово {{incode|count}} или свойство объекта: |
|||
** If you enter {{incode|count}} (or {{incode|Count}} or {{incode|COUNT}}, it's case-insensitive) the selected objects will simply be counted. |
|||
** Если вы войдете {{incode|count}} (или {{incode|Count}} или {{incode|COUNT}}, не чувствителен к регистру) выбранные объекты будут просто подсчитаны. |
|||
** If you enter an object property the value of this property for each of the selected objects will be retrieved and summed up. Objects that do not have the property will be skipped. Use dot notation to retrieve properties of properties: {{incode|PropertyOfObject.PropertyOfProperty1.PropertyOfProperty2}}. If the property before the first dot starts with a lowercase letter it will be considered a reference to the object itself and be ignored. Entering for example {{incode|object.Shape.Volume}} is the same as entering {{incode|Shape.Volume}}. |
|||
** Если вы введете свойство объекта, значение этого свойства для каждого из выбранных объектов будет извлечено и суммировано. Объекты, у которых нет этого свойства, будут пропущены. Используйте точечную нотацию для извлечения свойств свойств:{{incode|PropertyOfObject.PropertyOfProperty1.PropertyOfProperty2}}. Если свойство перед первой точкой начинается со строчной буквы, оно будет считаться ссылкой на сам объект и игнорироваться. Ввод, например {{incode|object.Shape.Volume}} это то же самое, что{{incode|Shape.Volume}}. |
|||
:: If you have added [[Property_editor#Actions|dynamic properties]] to objects and want to retrieve their values you need to know that their names have this syntax {{incode|NameOfGroup_NameOfProperty}}, where {{incode|NameOfGroup}} is the name of the group the property appears in in the [[Property_editor|Property editor]]. |
|||
* '''Unit''': Дополнительная единица измерения для выражения результатов. Вы сами должны указать единицу измерения, соответствующую выполняемому вами запросу, например, если вы извлекаете тома, вы должны использовать единицу измерения объема, например {{incode|m^3}}. Если вы используете неправильную единицу измерения, например, см, вы получите неправильные результаты. |
|||
* '''Unit''': An optional unit to express the results in. It's up to you to give a unit that matches the query you are doing, for example, if you are retrieving volumes, you should use a volume unit, such as {{incode|m^3}}. If you use a wrong unit, for ex. cm, you'll get wrong results. |
|||
* '''Objects''': Вы можете оставить это поле пустым, тогда все объекты документа будут рассматриваться этим запросом, или предоставить разделенный точкой с запятой (;) список имен объектов (не меток). Если какой-либо из объектов в этом списке является группой, то также будут выбраны его дочерние объекты. Таким образом, самый простой способ использовать эту функцию - правильно сгруппировать ваши объекты в документе и просто указать здесь имя группы. Вы также можете использовать кнопку {{Button|Selection}} чтобы добавить объекты, выбранные в данный момент в документе. |
|||
* '''Objects''': You can leave this empty, then all the objects of the document will be considered by this query, or give a semicolon (;)-separated list of object names (not labels). If any of the objects in this list is a group, its children will be selected as well. So the easiest way to use this feature is to group your objects meaningfully in the document, and just give a group name here. You can also use the {{Button|Selection}} button to add objects currently selected in the document. |
|||
* '''Filter''': |
* '''Filter''': Здесь вы можете добавить точку с запятой{{incode|;}}-разделенный список фильтров. Каждый фильтр записывается в виде: {{incode|property:value}}. Вы можете использовать только те свойства, которые содержат строковое значение. Как свойство, так и значение не чувствительны к регистру. The {{incode|value}} can be left out but not the {{incode|:}}. To properly handle schedules created with previous versions of Arch Schedule the {{incode|type}} property will be translated to the {{incode|ifctype}} property. It is advisable to not use {{incode|type}} in new schedules. |
||
: Например: |
|||
: For example: |
|||
:: {{incode|label:floor1;ifctype:window}} |
:: {{incode|label:floor1;ifctype:window}} сохранит только объекты, у которых есть "floor1" в их {{PropertyData|Label}} и "window" в их {{PropertyData|IFC Type}}. Окно с {{PropertyData|Label}} "Floor1-AA" и {{PropertyData|IFC Type}} равным "Window Standard Case" будет включено. |
||
:: {{incode|label:door}} |
:: {{incode|label:door}} Сохранит только те объекты, которые имеют "door" в свойстве {{PropertyData|Label}}. |
||
:: {{incode|!label:door}} |
:: {{incode|!label:door}} Сохранит только объекты, которые не имеют "door" в свойстве {{PropertyData|Label}}. |
||
:: {{incode|ifctype:structural}} Will retain only objects that have "structural" in their {{PropertyData|IFC Type}}. |
:: {{incode|ifctype:structural}} Will retain only objects that have "structural" in their {{PropertyData|IFC Type}}. |
||
:: {{incode|!ifctype:something}} Will retain only objects that do not have "structural" in their {{PropertyData|IFC Type}} or that do not have the {{PropertyData|IFC Type}} property. |
:: {{incode|!ifctype:something}} Will retain only objects that do not have "structural" in their {{PropertyData|IFC Type}} or that do not have the {{PropertyData|IFC Type}} property. |
||
:: {{incode|!ifctype:}} Will retain only objects that do not have the {{PropertyData|IFC Type}} property. |
:: {{incode|!ifctype:}} Will retain only objects that do not have the {{PropertyData|IFC Type}} property. |
||
</div> |
|||
The {{Button|Import}} button allows you to build this list in another spreadsheet application, and import that as a csv file here. |
The {{Button|Import}} button allows you to build this list in another spreadsheet application, and import that as a csv file here. |
||
Таким образом, мы можем составить список запросов, подобный этому: |
|||
So we can build a list of queries like this: |
|||
[[Image:Arch_schedule_example03.jpg]] |
[[Image:Arch_schedule_example03.jpg]] |
||
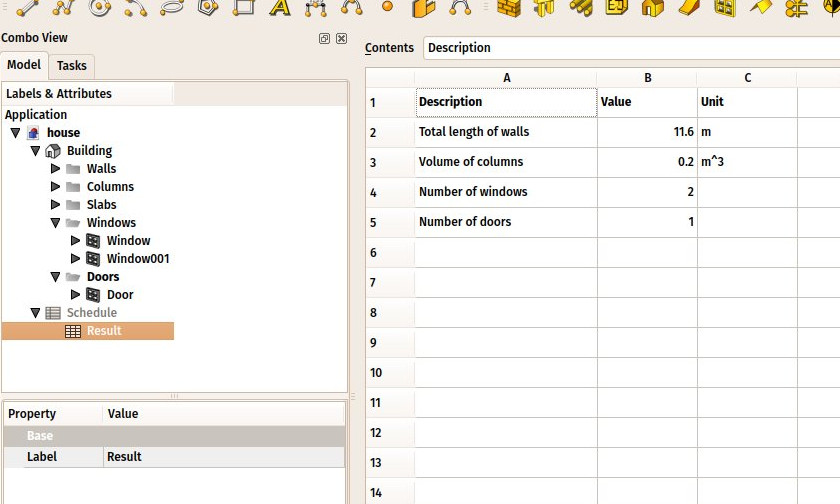
После этого нажмите {{Button|OK}}, и в документ будет добавлен новый объект "Планирование", содержащий результат в виде электронной таблицы: |
|||
After that, press {{Button|OK}} and a new Schedule object is added to the document, which contains a result spreadsheet: |
|||
[[Image:Arch_schedule_example04.jpg]] |
[[Image:Arch_schedule_example04.jpg]] |
||
| Line 78: | Line 82: | ||
The spreadsheet can then be exported to csv normally, from the Spreadsheet workbench. |
The spreadsheet can then be exported to csv normally, from the Spreadsheet workbench. |
||
<span id="Dynamic_properties"></span> |
|||
==Динамические свойства == |
|||
It is possible to add your own properties to objects. These are called [[Property_editor#Actions|Dynamic properties]]. If they have been added with the {{MenuCommand|Prefix group name}} option selected, their names will indeed start with the group name, but this prefix is not displayed in the [[Property_editor|Property editor]]. Their names have this form: {{incode|NameOfGroup_NameOfProperty}}. To reference them in a schedule this full name must be used. |
|||
{{Docnav |
{{Docnav |
||
|[[Arch_MultiMaterial| |
|[[Arch_MultiMaterial|MultiMaterial]] |
||
|[[Arch_CompPipe|CompPipe]] |
|||
|[[Arch_CutLine|Cut with a line]] |
|||
|[[ |
|[[Arch_Workbench|Arch]] |
||
|IconL=Arch_MultiMaterial.svg |
|IconL=Arch_MultiMaterial.svg |
||
|IconR= |
|IconR=Arch_CompPipe.png |
||
|IconC=Workbench_Arch.svg |
|IconC=Workbench_Arch.svg |
||
}} |
}} |
||
Latest revision as of 19:06, 8 December 2023
|
|
| Системное название |
|---|
| Arch Schedule |
| Расположение в меню |
| Архитектура → Create schedule... |
| Верстаки |
| Arch |
| Быстрые клавиши |
| Нет |
| Представлено в версии |
| - |
| См. также |
| Нет |
Описание
The Schedule tool allows you to create and automatically populate a spreadsheet with contents gathered from the model.
Примечание: Данный инструмент был значительно переработан в FreeCAD 0.17 и отличается от предыдущих версий.
For a more general solution, see the Reporting Workbench in the list of external workbenches. This workbench uses SQL syntax to extract information from the document.
Применение
- Open or create a FreeCAD document which contains some objects.
- Press the
Schedule button.
- Adjust the desired options.
- Press OK.
Рабочий процесс
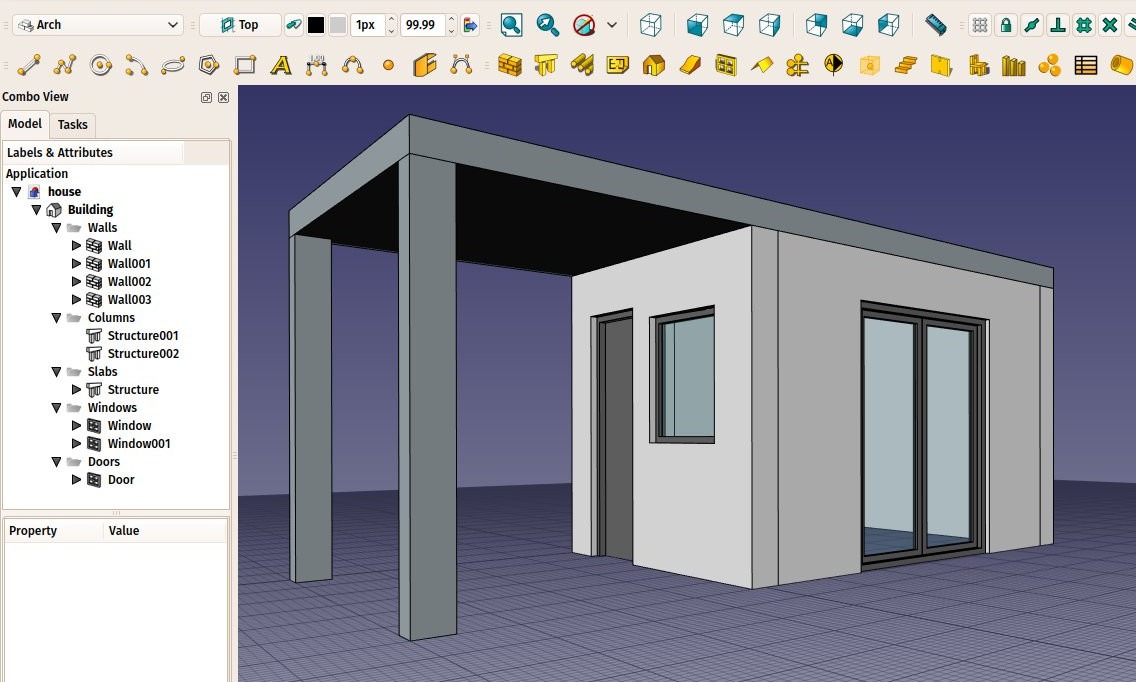
Для начала требуется некоторая готовая конструкция. Например, как здание в этом документе, которое содержит множество объектов созданных в верстаке Arch (хотя на самом деле также поддерживаются и другие объекты).
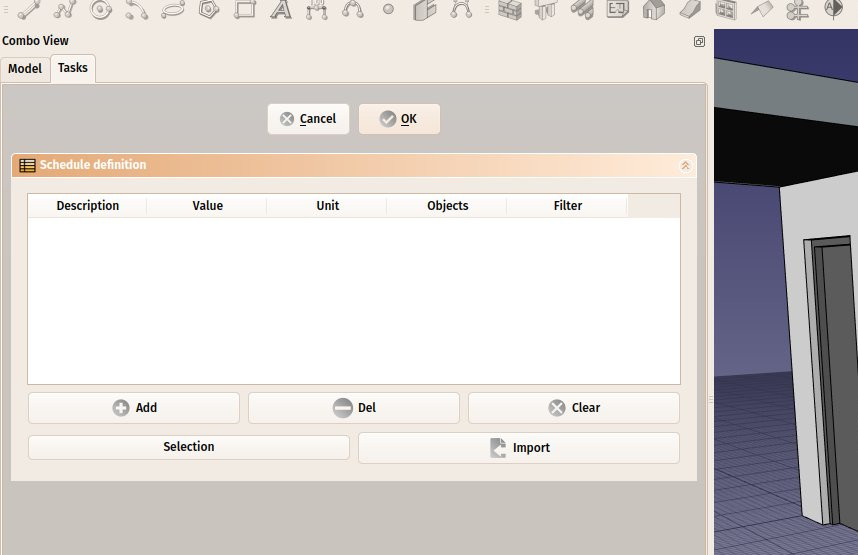
Далее нажмите на кнопку Планирование. В результате чего откроется панель задач, как на изображении ниже. Она довольно широкая, поэтому для удобной работы, вам нужно будет расширить комбо панель по горизонтали.
Затем вы можете заполнять строки таблицы друг за другом. Каждая строка представляет собой "запрос" и будет отображать одну строку в электронной таблице. Нажмите кнопку Add, чтобы добавить новую строку, и дважды щелкните каждую ячейку из этой строки, чтобы заполнить значения. Кнопка Del удаляет строку, содержащую выбранную в данный момент ячейку, а кнопка Clear удаляет абсолютно все строки. Доступными полями для заполнения в столбцах являются:
- Description: Описание для этого запроса. Столбец "Описание" - Это первый столбец результирующей электронной таблицы. В описании обязательно должен быть представлен запрос. Если вы оставите ячейку описания пустой, вся строка будет пропущена и оставлена пустой в электронной таблице. Это позволяет добавлять "разделительные" строки.
- Value: Это реальный запрос, который вы хотите выполнить для всех объектов, выбранных этим запросом. Это может быть два типа вещей: либо слово
countили свойство объекта:- Если вы войдете
count(илиCountилиCOUNT, не чувствителен к регистру) выбранные объекты будут просто подсчитаны. - Если вы введете свойство объекта, значение этого свойства для каждого из выбранных объектов будет извлечено и суммировано. Объекты, у которых нет этого свойства, будут пропущены. Используйте точечную нотацию для извлечения свойств свойств:
PropertyOfObject.PropertyOfProperty1.PropertyOfProperty2. Если свойство перед первой точкой начинается со строчной буквы, оно будет считаться ссылкой на сам объект и игнорироваться. Ввод, напримерobject.Shape.Volumeэто то же самое, чтоShape.Volume.
- Если вы войдете
- Unit: Дополнительная единица измерения для выражения результатов. Вы сами должны указать единицу измерения, соответствующую выполняемому вами запросу, например, если вы извлекаете тома, вы должны использовать единицу измерения объема, например
m^3. Если вы используете неправильную единицу измерения, например, см, вы получите неправильные результаты. - Objects: Вы можете оставить это поле пустым, тогда все объекты документа будут рассматриваться этим запросом, или предоставить разделенный точкой с запятой (;) список имен объектов (не меток). Если какой-либо из объектов в этом списке является группой, то также будут выбраны его дочерние объекты. Таким образом, самый простой способ использовать эту функцию - правильно сгруппировать ваши объекты в документе и просто указать здесь имя группы. Вы также можете использовать кнопку Selection чтобы добавить объекты, выбранные в данный момент в документе.
- Filter: Здесь вы можете добавить точку с запятой
;-разделенный список фильтров. Каждый фильтр записывается в виде:property:value. Вы можете использовать только те свойства, которые содержат строковое значение. Как свойство, так и значение не чувствительны к регистру. Thevaluecan be left out but not the:. To properly handle schedules created with previous versions of Arch Schedule thetypeproperty will be translated to theifctypeproperty. It is advisable to not usetypein new schedules.
- Например:
label:floor1;ifctype:windowсохранит только объекты, у которых есть "floor1" в их ДанныеLabel и "window" в их ДанныеIFC Type. Окно с ДанныеLabel "Floor1-AA" и ДанныеIFC Type равным "Window Standard Case" будет включено.label:doorСохранит только те объекты, которые имеют "door" в свойстве ДанныеLabel.!label:doorСохранит только объекты, которые не имеют "door" в свойстве ДанныеLabel.ifctype:structuralWill retain only objects that have "structural" in their ДанныеIFC Type.!ifctype:somethingWill retain only objects that do not have "structural" in their ДанныеIFC Type or that do not have the ДанныеIFC Type property.!ifctype:Will retain only objects that do not have the ДанныеIFC Type property.
The Import button allows you to build this list in another spreadsheet application, and import that as a csv file here.
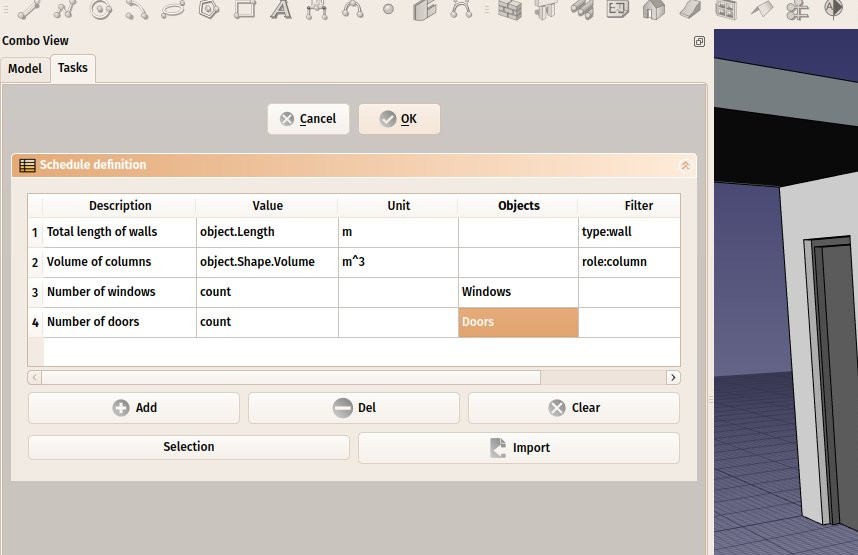
Таким образом, мы можем составить список запросов, подобный этому:
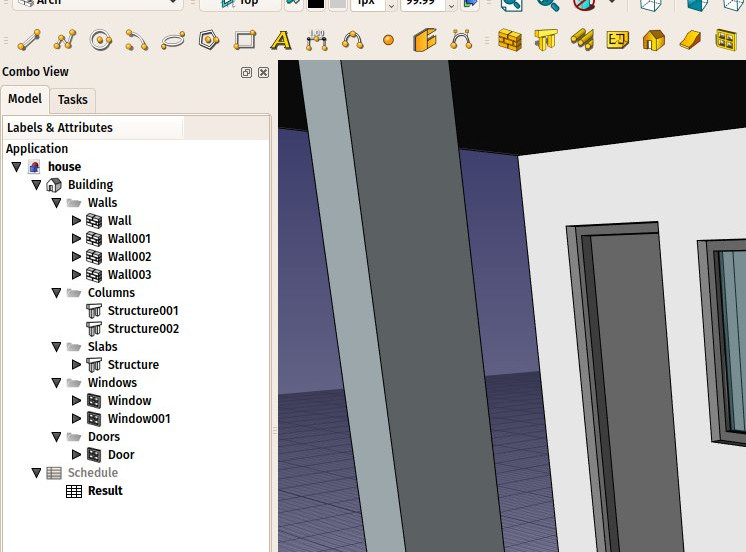
После этого нажмите OK, и в документ будет добавлен новый объект "Планирование", содержащий результат в виде электронной таблицы:
By double-clicking the Schedule object, you get back to the task panel and change the values. By double-clicking the spreadsheet itself, you get the results in 3 columns: description, value, unit (if applicable):
The spreadsheet can then be exported to csv normally, from the Spreadsheet workbench.
Динамические свойства
It is possible to add your own properties to objects. These are called Dynamic properties. If they have been added with the Prefix group name option selected, their names will indeed start with the group name, but this prefix is not displayed in the Property editor. Their names have this form: NameOfGroup_NameOfProperty. To reference them in a schedule this full name must be used.
- Elements: Wall, Structure, Curtain Wall, Window, Roof, Space, Stairs, Equipment, Frame, Fence, Truss, Profile, Pipe, Pipe Connector
- Reinforcements: Straight Rebar, U-Shape Rebar, L-Shape Rebar, Stirrup, Bent-Shape Rebar, Helical Rebar, Column Reinforcement, Beam Reinforcement, Slab Reinforcement, Footing Reinforcement, Custom Rebar
- Panels: Panel, Panel Cut, Panel Sheet, Nest
- Materials: Material, Multi-Material
- Organization: Building Part, Project, Site, Building, Level, External reference, Section Plane, Schedule
- Axes: Axis, Axes system, Grid
- Modification: Cut with plane, Add component, Remove component, Survey
- Utilities: Component, Clone component, Split Mesh, Mesh to Shape, Select non-manifold meshes, Remove Shape from Arch, Close Holes, Merge Walls, Check, Toggle IFC Brep flag, 3 Views from mesh, Create IFC spreadsheet, Toggle Subcomponents
- Additional: Preferences, Import Export Preferences (IFC, DAE, OBJ, JSON, 3DS, SHP), IfcOpenShell, IfcPlusPlus, Arch API
- Начинающим
- Установка: Загрузка, Windows, Linux, Mac, Дополнительных компонентов, Docker, AppImage, Ubuntu Snap
- Базовая: О FreeCAD, Интерфейс, Навигация мыши, Методы выделения, Имя объекта, Настройки, Верстаки, Структура документа, Свойства, Помоги FreeCAD, Пожертвования
- Помощь: Учебники, Видео учебники
- Верстаки: Std Base, Arch, Assembly, CAM, Draft, FEM, Inspection, Mesh, OpenSCAD, Part, PartDesign, Points, Reverse Engineering, Robot, Sketcher, Spreadsheet, Surface, TechDraw, Test Framework
