Arch Крыша
|
|
| Системное название |
|---|
| Arch_Roof |
| Расположение в меню |
| Архитектура → Крыша |
| Верстаки |
| Arch |
| Быстрые клавиши |
| R F |
| Представлено в версии |
| - |
| См. также |
| Структура, Стена |
Описание
The Arch Roof tool allows for the creation of a sloped roof from a selected wire. The created roof object is parametric, keeping its relationship with the base object. The principle is that each edge is seen allotting a profile of roof (slope, width, overhang, thickness).
Note: This tool is still in development, and might fail with very complex shapes.
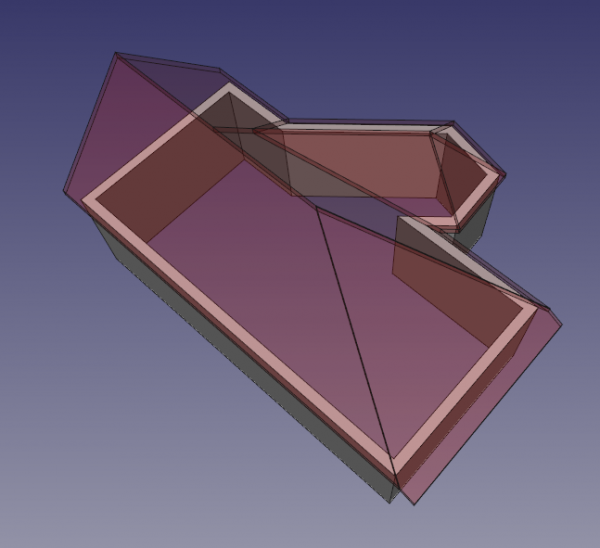
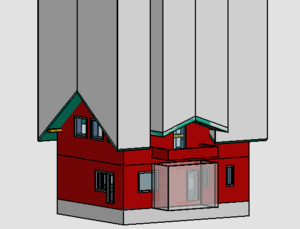
View from above a building model showing the roof with certain transparency
Применение
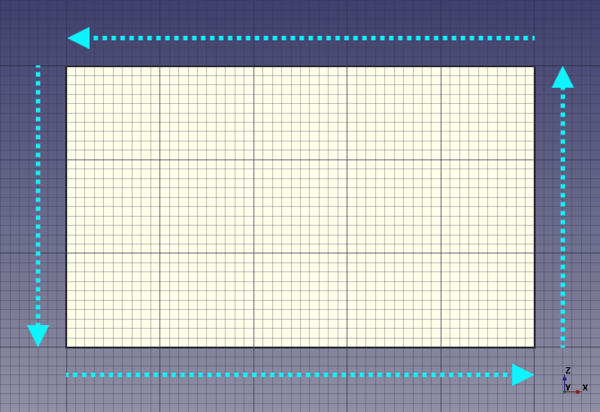
- Создайте замкнутый контур с помощью инструмента Wire с направлением построения против часовой стрелки и выберите его.
- Нажмите кнопку
Крыша, или клавишу клавиатуры R затем F
- Крыша созданная изначально может иметь странную форму, это связанно с тем, что параметры граней созданной крыши, пока что ещё не настроены.
- После создания крыши по умолчанию дважды щелкните по объекту в древе проекта для доступа к редактированию свойств. Угол крыши должен быть между 0 и 90.
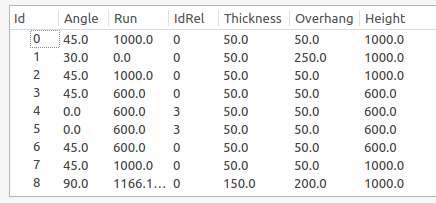
- Каждая строка соответствует одной из панелей крыши. Таким образом, вы можете установить нужные свойства для каждой панели крыши.
- Чтобы помочь себе, вы можете установить
Angle (Угол)илиRunв0и определитьRelative Id, что приведет к автоматическому расчету, чтобы найти данные относительноRelative Id. - Это работает следующим образом:
- Если
Angle (Угол) = 0иRun = 0тогда профиль идентичен относительному профилю. - Если
Angle (Угол) = 0тогдаAngle (Угол)рассчитывается таким образом, чтобы высота была такой же, как и относительный профиль. - Если
Run = 0тогдаRunрассчитывается таким образом, чтобы высота была такой же, как и относительный профиль.
- Если
- Наконец, установите Angle (Угол) на 90°, чтобы сделать фронтон.
- Примечание: для лучшего понимания, пожалуйста, посмотрите это youtube видеоролик.
Usage (solid base)
If your roof has a complex shape (e.g. contains pitched windows or other non-standard features) you can create a custom solid object using various other FreeCAD workbenches (Part, Sketcher etc.). And then use this solid as the base object for your roof:
- Select the solid base object.
- Press the
Arch Roof button, or press R then F keys.
For such a custom roof the automatic subtraction volume (subvolume) is just the base object itself. If you remove this roof from your walls you will see that walls are not subtracted properly. Wall parts above the roof are not removed:
To fix this, you need to define your own subvolume. This shape can be created by extruding the bottom faces of the roof in the Z direction:
After that:
- version 0.21 and below: Remove this shape from the walls with Arch Remove.
- introduced in version 0.22: To override the default subvolume set the ДанныеSubvolume property of the roof to the created shape, and remove the roof itself from the walls.
Опции
- Крыши обладают таким же свойствами и моделью поведения, как и все остальные компоненты верстака Arch
Свойства
Data
Roof
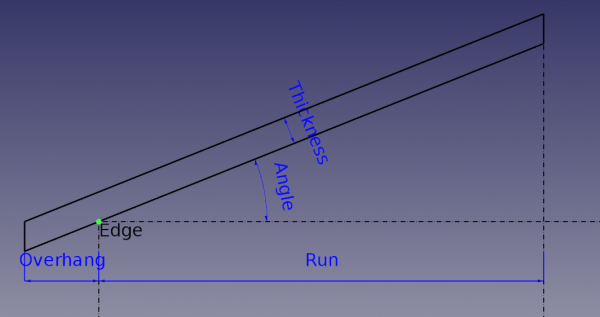
- ДанныеAngles (Углы): Список содержащий углы наклона крыши, для каждой её грани.
- ДанныеRuns (): Список содержащий расстояние от центра крыши до свеса, для каждой грани крыши.
- ДанныеIdRel: Список содержащий идентификаторы, для каждой грани крыши.
- ДанныеThickness (Толщины): Список содержащий толщины крыши, для каждой её грани.
- ДанныеOverhang (Свесы): Список содержащий длины свесов крыши, для каждой её грани.
- ДанныеFace (Грань): Индекс грани базового объекта (не используется).
Scripting
Программирование
См. так же: Arch API и Основы составления скриптов FreeCAD.
The Roof tool can be used in macros and from the Python console by using the following function:
Roof = makeRoof(baseobj=None, facenr=0, angles=[45.,], run=[], idrel=[0,], thickness=[50.,], overhang=[100.,], name="Roof")
- Creates a
Roofobject from the givenbaseobj, which can be a closed wire or a solid object.- If
baseobjis a wire, you can provide lists forangles,run,idrel,thickness, andoverhang, for each edge in the wire to define the shape of the roof. - The lists are automatically completed to match the number of edges in the wire.
- If
Пример:
import FreeCAD as App
import Arch, Draft

doc = App.newDocument()

rect = Draft.makeRectangle(3000, 4000)
doc.recompute()

roof = Arch.makeRoof(rect, angles=[30.,])

p1 = App.Vector(0, 0, 0)
p2 = App.Vector(1000, 1000, 0)
p3 = App.Vector(0, 2000, 0)

wire = Draft.make_wire([p1, p2, p3], closed=True)
doc.recompute()

roof1 = Arch.makeRoof(wire)

doc.recompute()
- Elements: Wall, Structure, Curtain Wall, Window, Roof, Space, Stairs, Equipment, Frame, Fence, Truss, Profile, Pipe, Pipe Connector
- Reinforcements: Straight Rebar, U-Shape Rebar, L-Shape Rebar, Stirrup, Bent-Shape Rebar, Helical Rebar, Column Reinforcement, Beam Reinforcement, Slab Reinforcement, Footing Reinforcement, Custom Rebar
- Panels: Panel, Panel Cut, Panel Sheet, Nest
- Materials: Material, Multi-Material
- Organization: Building Part, Project, Site, Building, Level, External reference, Section Plane, Schedule
- Axes: Axis, Axes system, Grid
- Modification: Cut with plane, Add component, Remove component, Survey
- Utilities: Component, Clone component, Split Mesh, Mesh to Shape, Select non-manifold meshes, Remove Shape from Arch, Close Holes, Merge Walls, Check, Toggle IFC Brep flag, 3 Views from mesh, Create IFC spreadsheet, Toggle Subcomponents
- Additional: Preferences, Import Export Preferences (IFC, DAE, OBJ, JSON, 3DS, SHP), IfcOpenShell, IfcPlusPlus, Arch API
- Начинающим
- Установка: Загрузка, Windows, Linux, Mac, Дополнительных компонентов, Docker, AppImage, Ubuntu Snap
- Базовая: О FreeCAD, Интерфейс, Навигация мыши, Методы выделения, Имя объекта, Настройки, Верстаки, Структура документа, Свойства, Помоги FreeCAD, Пожертвования
- Помощь: Учебники, Видео учебники
- Верстаки: Std Base, Arch, Assembly, CAM, Draft, FEM, Inspection, Mesh, OpenSCAD, Part, PartDesign, Points, Reverse Engineering, Robot, Sketcher, Spreadsheet, Surface, TechDraw, Test Framework
